
Maximizing a small backyard requires a strategic approach to spatial geometry. The corner garden shed is a premier solution for homeowners who need significant storage without sacrificing the central lawn area. By utilizing the 90-degree intersection of a property line, this structure turns dead space into a highly functional utility hub.
Beyond mere storage, a well-constructed corner shed increases property value and aesthetic appeal. It provides a dedicated environment for expensive lawn equipment, seasonal decor, and gardening tools, protecting them from the elements. This guide provides the professional framework needed to build a structure that lasts for decades.
Constructing this shed is an investment in your home’s infrastructure. We focus on a heavy-duty design that mirrors residential framing standards. This ensures the building can withstand snow loads, high winds, and the daily rigors of a busy household while maintaining a compact footprint.
Quick Specs
Dimensions: 8ft x 8ft x 9ft (Front Height)
Estimated Cost: $1,200 – $1,800 USD
Difficulty Level: Intermediate
Estimated Build Time: 3 to 4 Days (2-person crew)
Materials and Tools
A successful build starts with high-quality lumber and the correct fasteners. We recommend pressure-treated lumber for all components in contact with the ground or moisture. For the siding and trim, kiln-dried spruce or cedar provides the best balance of weight and durability for the upper framing.
| Material Category | Item Description | Quantity/Notes |
|---|---|---|
| Foundation | 4×4 Pressure-Treated Skids | 3 Units @ 8ft |
| Floor Joists | 2×6 Pressure-Treated Lumber | 7 Units @ 8ft |
| Flooring | 3/4-inch CDX Plywood | 2 Sheets (4×8) |
| Wall Studs | 2×4 Standard KD Spruce | 28 Units @ 8ft |
| Roof Rafters | 2×6 Standard KD Spruce | 10 Units @ 10ft |
| Exterior Siding | T1-11 or LP SmartSide | 8 Sheets (4×8) |
| Roofing | 3-Tab Asphalt Shingles | 3 Bundles |
| Fasteners | 3-inch Exterior Wood Screws | 5 lbs |
Required tools include a circular saw or miter saw for precise cross-cuts. You will also need a cordless drill, a level (4ft preferred), a framing square, and a chalk line. Safety gear such as impact-rated eye protection and heavy-duty work gloves are mandatory for this project to prevent site injuries.
Technical Layout
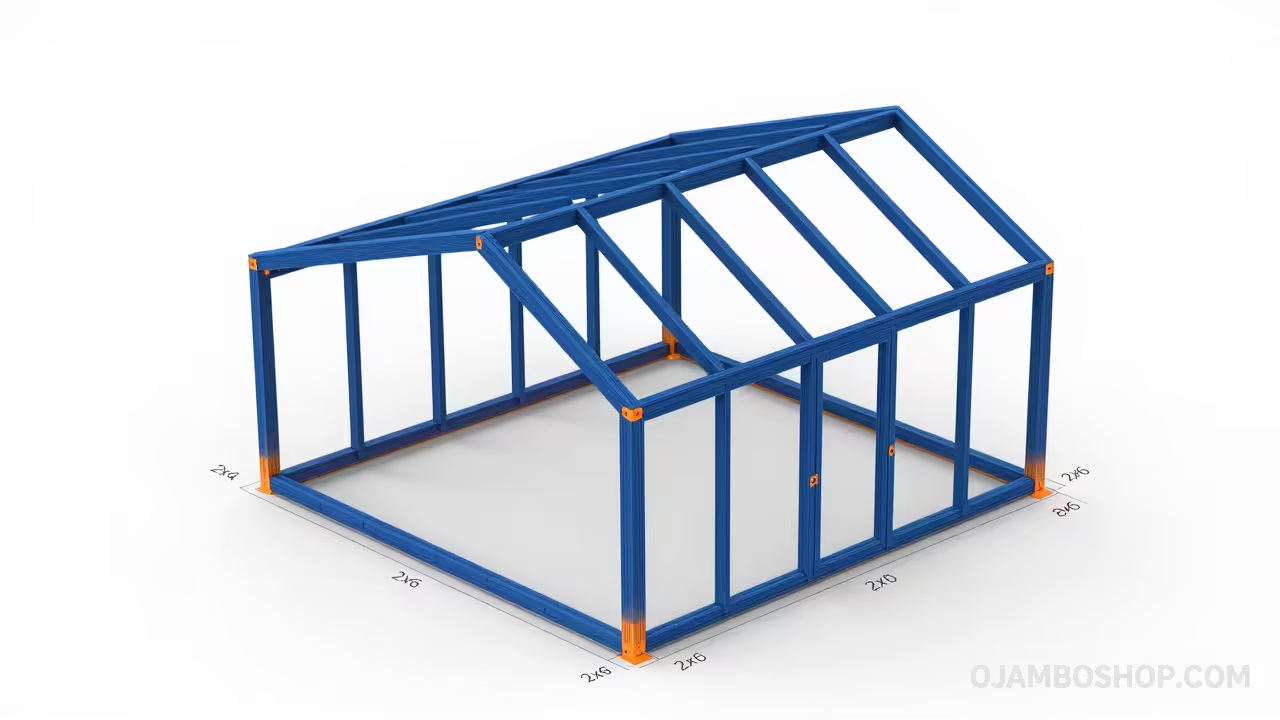
The structural integrity of a corner shed depends entirely on the floor diaphragm and the corner post-integration. We utilize a 16-inch on-center (OC) spacing for the 2×6 floor joists to ensure the floor can support heavy machinery like riding mowers or snowblowers without sagging. The joists are capped by rim joists and secured to the 4×4 pressure-treated skids using galvanized hurricane ties. This creates a rigid base that resists shifting over time due to frost heave or soil compression.
For the walls, we employ a standard advanced framing technique. The rear two walls, which meet at the 90-degree corner, act as the primary shear panels for the entire building. By using double top plates, we allow the roof load to be distributed evenly across the vertical studs. The roof itself features a 4/12 pitch mono-slope design, which is specifically chosen to direct water runoff away from the property fence line. This prevents moisture buildup in the tight gap between the shed and the boundary, which is a common cause of rot in corner-placed structures.
Step-by-Step Instructions
Phase 1: Foundation and Floor Framing
Begin by clearing a 10×10 area and leveling the ground with crushed stone or gravel. Lay your three 4×4 pressure-treated skids parallel to each other, spaced 45 inches apart. Check for level across the skids and adjust the gravel base as needed until the foundation is perfectly flat.
Construct the floor frame using 2×6 pressure-treated lumber. Cut two rim joists to 96 inches and seven interior joists to 93 inches. Nail the rim joists to the ends of the interior joists using 16-inch OC spacing. Lay the frame onto the skids and check for square by measuring the diagonals; they must be equal.
Once the frame is square, secure it to the skids. Install the 3/4-inch CDX plywood flooring using 2-inch galvanized screws spaced every 8 inches along the joists. Ensure the plywood edges are flush with the perimeter of the frame to provide a clean base for the wall plates.
Phase 2: Wall Framing Construction
Build the two rear walls first, as these define the corner. The rear walls should be 96 inches long and 84 inches high. Use a single bottom plate and a double top plate for each wall section. Space your studs at 16 inches OC to provide maximum support for the exterior siding panels.
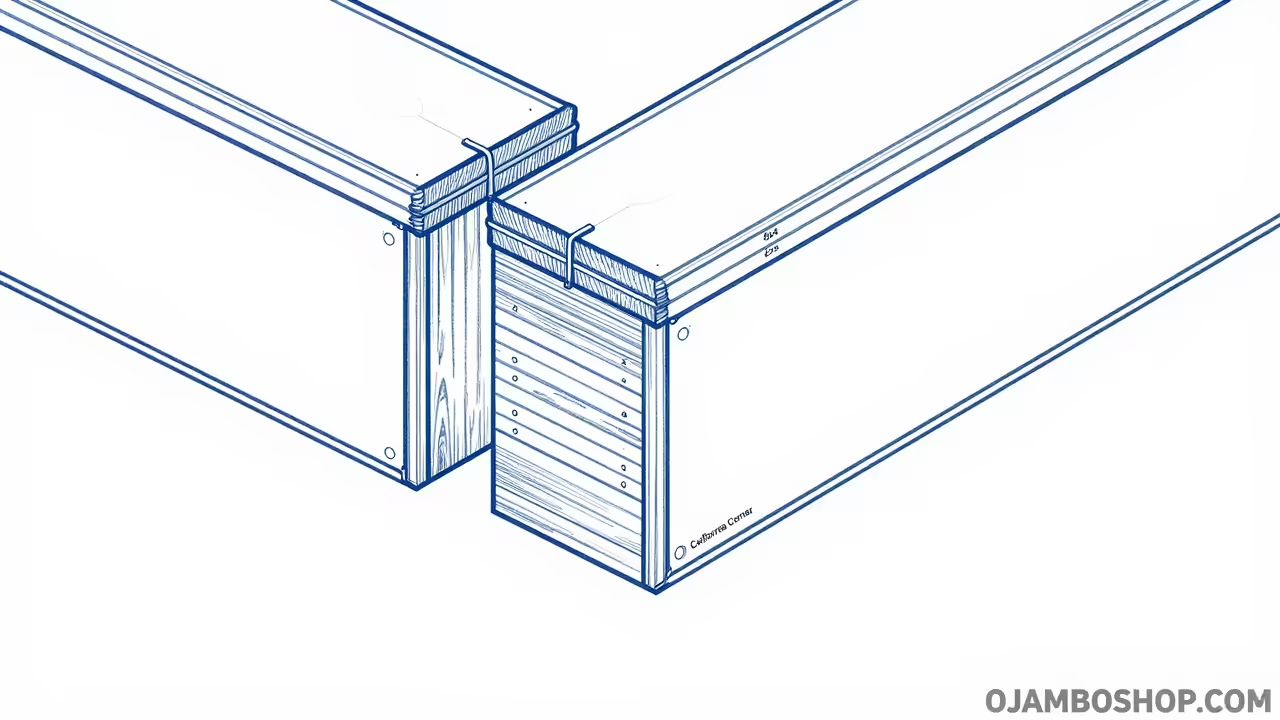
Pro-Tip: When framing the corner where the two rear walls meet, ensure you add an extra stud to the end of one wall. This “California Corner” provides a solid nailing surface for interior finishings or shelving later on. Always use ACQ-rated fasteners when working with treated lumber to prevent the chemicals from corroding the metal over time.
Construct the front and side walls next. The front wall will be taller (approx. 108 inches) to create the roof pitch. Include a 60-inch wide rough opening for a double door to allow for easy access. Brace the walls temporarily with scrap lumber as you stand them up and nail them into the floor joists.
Phase 3: Plumb, Square, and Sheath
With all four walls standing, check each corner with a level to ensure they are plumb. Nail the double top plates together at the corners to tie the entire structure into a single monolithic unit. This is the most critical stage for ensuring the doors will hang properly and the roof will fit correctly.
Install the exterior siding panels starting from one rear corner. If using T1-11 siding, ensure the grooves are vertical and the bottom edge overlaps the floor frame by at least 1 inch. This overlap acts as a natural drip edge, preventing water from wicked into the floor joists or the plywood subfloor.
Fasten the siding with 2-inch galvanized siding nails every 6 inches along the edges and 12 inches in the field. Leave a 1/8-inch gap between panels to allow for natural expansion and contraction. This prevents the siding from buckling during periods of high humidity or heavy rainfall.
Phase 4: Rafter Installation and Roof Decking
Cut your 2×6 rafters to length, including a 6-inch overhang on both the front and back. Use a birdsmouth cut where the rafters sit on the top plates to provide a flat bearing surface. Space the rafters at 24 inches OC, aligning them with the wall studs where possible for direct load transfer.
Nail the rafters into the top plates using 3-inch screws or framing nails. Once the rafters are secured, install the 5/8-inch OSB or plywood roof sheathing. Start from the lower edge and work upward, ensuring the joints are staggered for increased structural rigidity across the roof plane.
Attach drip edge flashing along the entire perimeter of the roof deck. This metal strip prevents water from running under the shingles and rotting the fascia boards. Cover the decking with synthetic roofing underlayment, overlapping the seams by 4 inches to create a secondary water barrier.
Phase 5: Roofing and Trim
Install the asphalt shingles starting with a starter course at the bottom edge. Use four roofing nails per shingle, placing them just below the adhesive strip. Follow the manufacturer’s pattern to ensure the tabs are offset, which provides the necessary water-shedding capabilities required for a low-pitch roof.
Once the shingles are complete, install the 1×4 trim boards on the corners and around the door opening. The trim hides the raw edges of the siding and provides a finished, professional look. Use a high-quality exterior caulk to seal any gaps where the trim meets the siding to prevent moisture infiltration.
Build the doors using a “Z-frame” design on the back. This diagonal bracing prevents the doors from sagging over time. Hang the doors using three heavy-duty T-hinges per door, ensuring they swing freely and clear the ground by at least 1/2 inch to account for future settling.
Common Mistakes
The most frequent error is failing to level the foundation properly. If the skids are not level, the entire shed will be racked, leading to doors that bind and a roof that leaks. Take the extra hour at the start to ensure your gravel base is perfectly flat and compacted.
Another mistake is ignoring the importance of ventilation. In a small, enclosed shed, moisture can build up and lead to mold or rot. Always install at least two gable vents—one high and one low—to encourage passive airflow and keep the interior dry and smelling fresh.
Many builders also forget to use the correct fasteners. Standard interior screws will rust and snap within a year when exposed to the elements. Only use hot-dipped galvanized or stainless steel fasteners for any exterior application, especially when dealing with the copper-based chemicals in pressure-treated wood.
Maintenance and Safety
To ensure the longevity of your corner shed, apply a high-quality exterior stain or paint within 60 days of completion. This seals the wood fibers against UV damage and moisture. Inspect the roof every autumn for debris buildup, as trapped leaves can hold moisture against the shingles and cause premature failure.
Safety should be your primary concern during the construction phase. Always use a stable ladder and never stand on the top two rungs while installing rafters. If you are working alone, use temporary bracing to hold walls in place until they can be permanently secured to the floor and adjacent walls.
Keep your workspace clean and organized to prevent trip hazards. Unplug power tools when changing blades or when they are not in use. By following these professional protocols, you will create a safe building environment and a finished product that serves your home for many years to be.