
The Floating Walnut Bookshelves (Heavy Duty Brackets) project represents a pinnacle of modern interior woodworking. These shelves combine the organic warmth of premium American Black Walnut with the industrial strength of concealed steel support systems. For the homeowner, this project offers more than just storage; it provides a sophisticated focal point that increases property value through high-end custom cabinetry.
The minimalist aesthetic of a floating shelf hides a complex engineering challenge that requires precision and patience. By eliminating visible corbels, you create a seamless transition between the wall and the wood. This guide will walk you through the structural requirements and refined finishing techniques needed to ensure these shelves remain level and secure under the weight of a full private library.
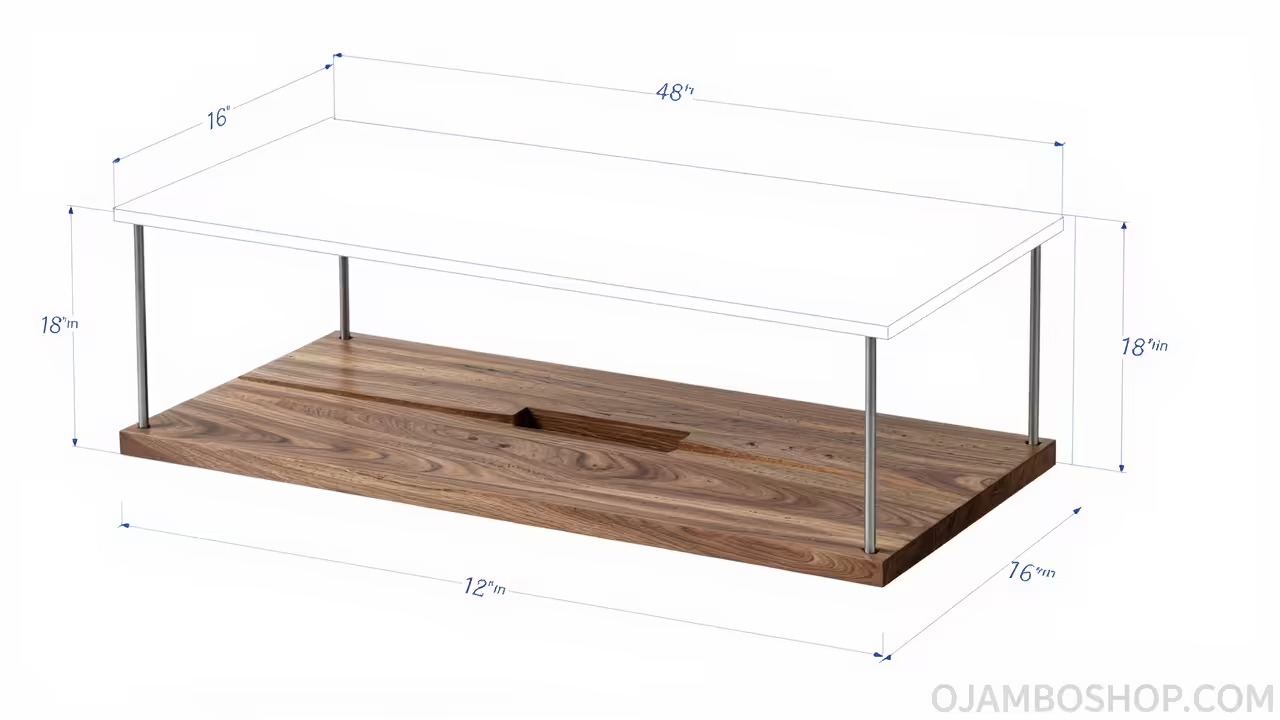
Quick Specs
Dimensions: 48 inches long by 10 inches deep by 2 inches thick. Estimated Cost: $450 – $600 depending on walnut market pricing. Difficulty Level: Intermediate to Advanced. Estimated Build Time: 12 to 16 hours plus drying time for finishes.
Materials and Tools
For the lumber, you will require 8/4 (eight-quarter) kiln-dried American Black Walnut S3S. You should also source 1/2-inch diameter heavy-duty steel floating shelf brackets with at least a 6-inch rod length. High-quality wood glue, 220-grit sandpaper, and a high-solid Osmo or Rubio Monocoat finish are essential for the professional look OJAMBOSHOP.COM demands.
The tool list includes a table saw with a high-tooth count finishing blade and a jointer to ensure perfectly square edges. You will also need a drill press for boring perfectly perpendicular holes into the back of the shelf. A high-quality level, a stud finder, and a plunge router with a 1/2-inch straight bit are necessary for mortising the bracket plates into the wood.
Technical Layout
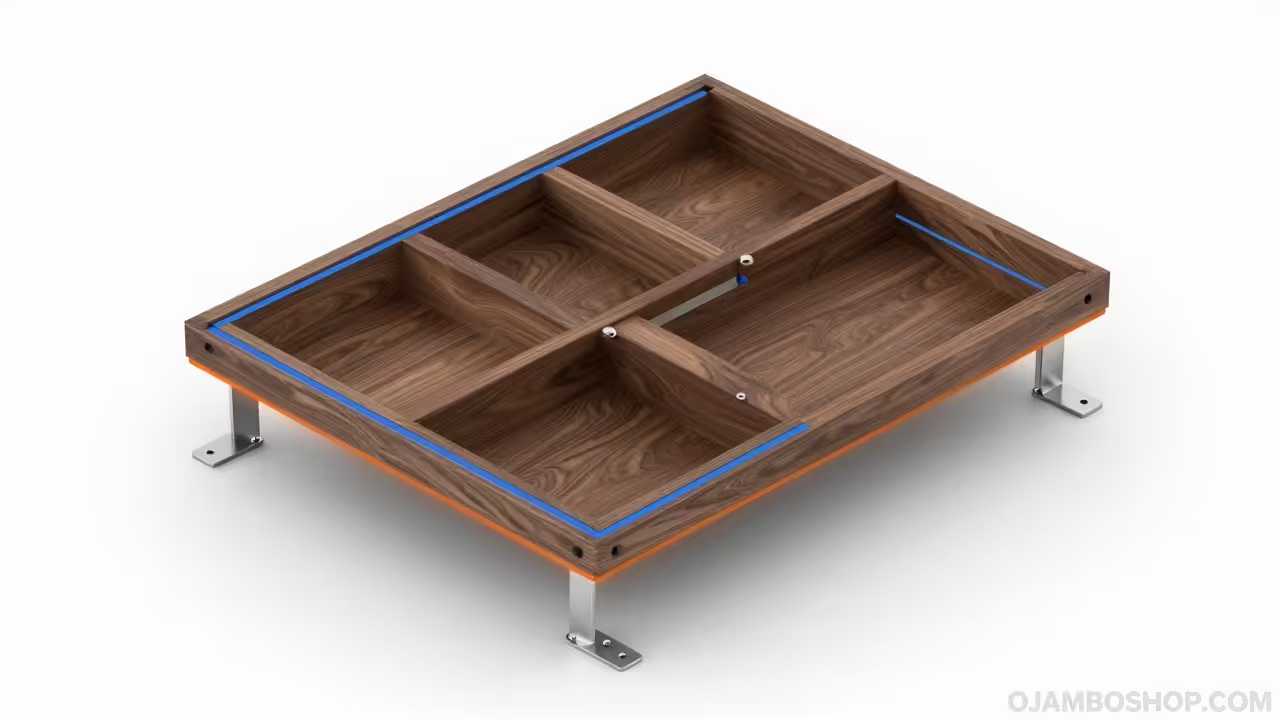
The structural integrity of a heavy-duty floating shelf depends entirely on the physics of leverage and the shear strength of your fasteners. Because walnut is a dense hardwood, the shelf itself carries significant dead weight before you even place a single book upon it. We utilize a blind-shelf support system where steel rods are inserted deep into the heart of the timber. This creates a cantilever effect that transfers the downward force directly into the vertical wall studs.
To achieve a flush fit against the drywall, you must create a shallow mortise on the back edge of the walnut slab. This pocket allows the mounting plate of the bracket to sit recessed within the wood rather than sandwiched between the wood and the wall. By using 3-inch GRK structural screws to anchor the brackets, you ensure the assembly can handle upwards of 75 pounds per linear foot. Precision is non-negotiable here, as a deviation of even one degree during the drilling process will result in a shelf that visibly slopes or fails to slide onto the hardware.
Step-by-Step Instructions
Step 1: Material Selection and Preparation
Begin by inspecting your walnut slabs for moisture content and grain pattern consistency. You want boards that are straight and free of major checks or knots that could compromise the drilling path for the brackets. Use your jointer to create one perfectly flat face and one square edge before running the boards through the planer. This ensures that the final shelf will sit perfectly perpendicular to the wall surface without any unsightly gaps.
Step 2: Cutting to Final Dimensions
Set your table saw to the desired depth of 10 inches and rip the walnut slabs to width. Cross-cut the boards to a uniform length of 48 inches using a miter saw or a cross-cut sled on the table saw. It is vital that the back edge, which will meet the wall, is cut at a perfect 90-degree angle. Even a slight bevel on this edge will cause the shelf to rock or tilt once it is mounted to the steel brackets.
Step 3: Mapping the Wall Studs
Use a high-quality electronic stud finder to locate the centers of the framing members in your wall. Mark these locations clearly with a pencil, then transfer those measurements to the back edge of your walnut shelves. Standard residential construction usually features 16-inch on-center spacing, which should allow for at least three contact points on a 48-inch shelf. Accurate mapping at this stage prevents the need for messy wall repairs or off-center shelf placement later in the process.
Step 4: Drilling the Bracket Holes
This is the most critical phase of the entire build and requires the use of a drill press or a very steady jig. You must bore holes that are slightly deeper than the length of your bracket rods to allow for expansion and adjustment. Ensure the drill bit is perfectly parallel to the top and bottom faces of the shelf to prevent the bit from “blowing out” through the finished surface. Slow and steady pressure, combined with frequent clearing of wood chips, will result in a clean and straight bore.
Step 5: Mortising the Mounting Plates
Each heavy-duty bracket features a flat mounting plate that must be hidden to achieve the true “floating” look. Use a plunge router with a template or a sharp chisel to carve out a recess on the back of the shelf. The depth of this mortise should exactly match the thickness of the steel plate, usually around 1/4 inch. Once completed, the bracket should sit entirely flush with the wood, allowing the shelf to meet the drywall with zero light gap.
Step 6: Sanding and Grain Preparation
Proper sanding is what separates amateur projects from professional-grade furniture. Start with 80-grit sandpaper to remove any machining marks or planer tracks, then progress through 120, 150, and finally 220-grit. Between the final two stages, wipe the wood down with a damp cloth to “raise the grain,” which prevents the wood from feeling fuzzy after the finish is applied. Pay special attention to the end grain, as it will naturally absorb more finish and appear darker than the face grain.
Step 7: Applying the Professional Finish
For American Black Walnut, a hand-rubbed oil or hard-wax finish is the gold standard for durability and depth. Apply the finish in a dust-free environment using an applicator pad or a lint-free cloth, following the direction of the wood grain. Allow the first coat to penetrate for approximately 15 minutes before buffing away any excess material with a clean rag. A second coat applied 24 hours later will provide the necessary protection against moisture and household wear.
Step 8: Final Installation
Screw the steel brackets into the wall studs using the structural screws mentioned in the specs. Use a long spirit level to ensure the brackets are perfectly aligned across the horizontal plane before tightening the fasteners fully. Carefully slide the walnut shelf onto the rods, applying even pressure across the length of the board. If the fit is too tight, a small amount of dry PTFE lubricant on the rods can help the wood slide into place smoothly.
Common Mistakes to Avoid
The most frequent error is failing to use a drill press, which leads to angled holes and shelves that slope toward the floor. Another common pitfall is ignoring the moisture content of the walnut; if the wood is too “green,” it will shrink and crack once it enters a climate-controlled home. Finally, many builders rely on drywall anchors rather than hitting studs, which almost always results in a catastrophic structural failure once the shelf is loaded with books.
Maintenance and Safety
Pro-Tip: When working with heavy hardwoods and steel, always use structural fasteners like GRK or Spax rather than standard drywall screws. Standard screws have high tension strength but very low shear strength, meaning they can snap off under the weight of a heavy walnut shelf. To maintain your shelves, avoid using harsh chemical cleaners or aerosol furniture polishes. Simply wipe them down with a microfiber cloth to remove dust, and occasionally apply a fresh coat of maintenance oil every few years to keep the wood hydrated. Always wear a P100 respirator when sanding walnut, as the fine dust can be a sensitizing irritant to the respiratory system.