
An attached pergola serves as more than just a decorative addition to your home exterior. It creates a seamless transition between your indoor living space and the natural beauty of your backyard. By anchoring the structure directly to your house, you achieve a level of stability and permanence that freestanding units often lack.
This project provides a sophisticated architectural element that offers partial shade while maintaining an open-air feel. For homeowners looking to increase property value, a well-executed pergola is a high-return investment. It defines your patio as a functional room for dining, lounging, and entertaining guests throughout the warmer months.
Building an attached structure requires a deep understanding of load-bearing mechanics and moisture management. As a master carpenter, I have designed these plans to balance aesthetic elegance with rigorous structural standards. We will focus on high-quality joinery and weather-resistant hardware to ensure this structure stands for decades.
Quick Specs
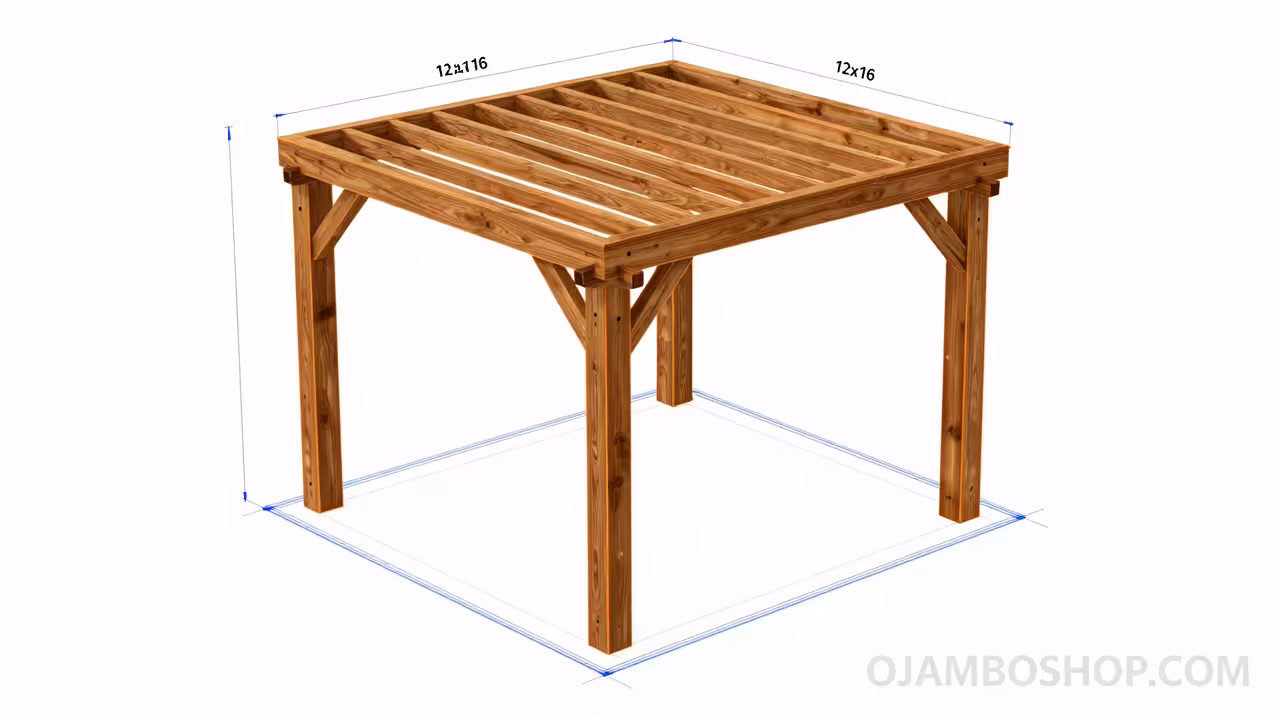
Project Dimensions: 12 Feet Projection by 16 Feet Width
Estimated Cost: 1,800 to 2,500 Dollars Depending on Lumber Grade
Difficulty Level: Advanced Intermediate
Estimated Build Time: 2 to 3 Full Days for a Two-Person Team
Materials and Tools
The longevity of your pergola depends entirely on the quality of your lumber and the corrosion resistance of your fasteners. For this project, we are specifying Western Red Cedar or S4S Pressure Treated Southern Yellow Pine for all structural members. Cedar is naturally resistant to rot and insects while providing a premium visual finish that ages gracefully.
Your lumber list includes two 2x10x16 ledger boards and two 2x10x16 beams to support the primary weight. You will also need thirteen 2x8x14 rafters to allow for a one-foot overhang on the front and sides. The vertical support comes from three 6x6x10 posts which provide the necessary mass to prevent racking or sagging over time.
Hardware requirements are specific to ensure the structure meets local building codes for wind and snow loads. You need 1/2-inch by 7-inch galvanized lag bolts for the ledger and Simpson Strong-Tie post bases for the foundation. Don’t forget the 6-inch structural wood screws for beam-to-post connections and 3-inch stainless steel trim screws for the top slats.
Required tools include a sliding miter saw, a circular saw, and a heavy-duty hammer drill for masonry attachments. You must have a 4-foot level, a string line, and a laser level to ensure the ledger and beams are perfectly aligned. High-quality impact drivers and a socket set will make the hardware installation significantly faster and more secure.
Hardware and Material Comparison
| Component | Standard Option | Professional Grade | Benefit of Pro Grade |
|---|---|---|---|
| Fasteners | Zinc Plated | Stainless Steel | Maximum Corrosion Resistance |
| Post Bases | Hidden Wedge | Elevated Standoff | Prevents Bottom Post Rot |
| Ledger Bolts | Standard Lags | Structural Tension Ties | Superior Lateral Load Path |
| Lumber | Green Treated | Kiln Dried Cedar | Less Warping and Shinking |
| Joist Hangers | Light Gauge | G185 Galvanized | Weather Endurance in Humidity |
Technical Layout
The technical integrity of an attached pergola relies on the successful transfer of weight from the rafters to the ledger and the forward beams. In this 12×16 design, the ledger board acts as the primary anchor point, meaning it must be integrated into the house rim joist. We utilize a staggered bolting pattern every 16 inches to prevent the wood from splitting while maximizing the shear strength of the connection. The forward beam is a double-ply 2×10 assembly that sits atop 6×6 posts, creating a header that resists mid-span deflection.
By calculating a slight 1-to-2-degree pitch away from the house, we ensure that water does not pool against the siding or the ledger flashing. The rafters are spaced 16 inches on center, which is a standard framing interval that provides a balanced visual rhythm and high structural rigidity. Each rafter is secured with hurricane ties to the beam and joist hangers to the ledger, creating a continuous load path. This engineering approach ensures that the structure can withstand significant uplift forces during high wind events or heavy snow accumulation during winter.
Step-by-Step Instructions
Step One: Ledger Installation and Waterproofing
The most critical phase of this build is the attachment of the ledger board to your home. You must first remove the siding in the area where the 2×10 ledger will sit to ensure it flushes directly against the sheathing. Once the area is clear, install a high-quality Z-flashing over the top of the ledger to prevent water from seeping behind the board and rotting your house frame.
Level the board carefully and drill pilot holes for your 1/2-inch lag bolts in a zig-zag pattern. Ensure that your bolts penetrate through the sheathing and deep into the solid rim joist of the house. Use a silicone sealant in every bolt hole before driving the hardware home to create a permanent moisture barrier. This step creates the foundation for the entire project and cannot be rushed or skipped.
Step Two: Setting the Post Bases
With the ledger secure, you must now establish the location of your three 6×6 support posts. Measure out 11 feet and 6 inches from the house wall to the center of your post locations to allow for the beam thickness. Use a string line and a framing square to ensure these points are perfectly square to the house ledger.
If you are building on an existing concrete patio, use a hammer drill to install heavy-duty expansion anchors for your standoff post bases. If you are starting on soil, you must dig 36-inch deep footings and pour concrete piers below the frost line. The standoff bases are essential because they keep the bottom of the wood posts an inch above the concrete to prevent moisture wicking.
Step Three: Notching and Raising the Posts
Measure the height of your ledger board and subtract the depth of your rafters and beams to determine the height of your posts. It is often best to cut the posts slightly long and trim them to the exact level once they are standing. Use a plumb bob or a 4-foot level to ensure the posts are perfectly vertical in both directions before bracing them.
For a professional finish, notch the top of the 6×6 posts to create a saddle for the 2×10 beams to rest in. This “wood-on-wood” connection transfers the weight directly down the post rather than relying solely on the shear strength of the bolts. Secure the posts to the bases using structural screws and add temporary 2×4 diagonal bracing to keep them steady during the next phase.
Step Four: Beam Assembly and Mounting
The main header consists of two 2×10 boards sandwiched together or placed on either side of the notched posts. If you are using the sandwich method, nail the boards together with a staggered pattern using 3-inch galvanized nails. Lift the beam into the notches on top of your posts and check for level across the entire 16-foot span.
Once the beam is positioned correctly, drill through both the beam and the post to install 1/2-inch carriage bolts. Use large washers on both sides to distribute the clamping pressure across the wood fibers. Pro-Tip: Apply a coat of end-grain sealer to the tops of the posts before the beam is attached to prevent the wood from checking or cracking over time.
Step Five: Cutting the Rafter Tails
The visual character of your pergola comes from the decorative cuts on the ends of the rafters. Create a template using a piece of scrap wood or cardboard to ensure every rafter tail is identical. Common designs include a simple 45-degree miter, a scrolled corbel cut, or a modern stepped notch.
Use a jigsaw for intricate curves or a circular saw for straight architectural lines. Once the first rafter is cut, use it as a master pattern to mark the remaining twelve boards. Sand the cut edges smooth to remove any burrs or splinters before you begin the process of lifting them into place on the structure.
Step Six: Rafter Installation and Spacing
Mark the ledger board and the beam at 16-inch intervals starting from the center of the structure and working outward. This ensures that the rafter layout is symmetrical and aesthetically pleasing from both the ground and the house. Use joist hangers on the ledger side to provide a secure, code-compliant connection for each 2×8 rafter.
On the beam side, use 6-inch structural wood screws driven at an angle through the rafter and into the beam. Alternatively, you can use decorative hurricane ties that add a rustic industrial look while providing superior uplift protection. Ensure that each rafter is perfectly square to the ledger as you move down the line to prevent the structure from pulling out of alignment.
Step Seven: Installing the Purlins or Top Slats
The top slats, or purlins, are the 2×2 or 1×2 boards that run perpendicular to the rafters to provide the actual shade. These should be spaced according to how much sun protection you desire, typically between 4 and 6 inches apart. Use a spacer block of wood to maintain a perfectly consistent gap as you work your way across the top of the pergola.
Secure each slat at every rafter intersection using a single stainless steel trim screw. This prevents the slats from warping or “cupping” as they are exposed to the direct sun. If you live in a high-wind area, consider using two screws per intersection for added lateral stability. The purlins also serve to tie the entire rafter system together, creating a rigid structural grid.
Step Eight: Sanding and Final Inspections
Once the structural assembly is complete, go over the entire unit with a random orbital sander using 80-grit sandpaper. Focus on the post corners and any visible stamps on the lumber to ensure a clean, professional appearance. Check every bolt and screw to ensure they are tight and that the wood has not split during the installation process.
Examine the flashing at the house ledger one last time to ensure it is sitting flat and that no gaps exist where water could enter. Clear away any sawdust or construction debris from the patio surface before moving on to the finishing stage. This final walkthrough is the mark of a true master carpenter and ensures the project meets OJAMBOSHOP standards.
Common Mistakes to Avoid
The most frequent error in pergola construction is failing to properly flash the ledger board. Without a metal or vinyl drip edge, water will eventually rot the house rim joist, leading to thousands of dollars in structural repairs. Always prioritize moisture management at the house connection point above all other aesthetic considerations.
Another common mistake is underestimating the depth of the footings for the support posts. A pergola acts like a giant sail during high winds, and shallow footers can allow the structure to lift or shift. Ensure your concrete piers are deep enough to anchor the weight of the wood and resist the specific climate conditions of your region.
Finally, many DIY builders use standard interior screws or non-galvanized nails which will rust and streak the wood within a few months. The chemical reaction between pressure-treated lumber and inferior metals causes rapid corrosion. Always invest in stainless steel or high-grade galvanized hardware to protect both the look and the life of your pergola.
Maintenance and Safety
Wood is an organic material that will expand and contract with the changing seasons. To maintain the structural integrity of your pergola, you should inspect the hardware every spring and tighten any bolts that may have loosened. Apply a high-quality UV-rated wood sealer or stain every two to three years to prevent the fibers from graying and cracking.
Safety during the build is paramount, especially when working on ladders with heavy lumber. Always use a second person to help lift beams and rafters into place to avoid muscle strain or falls. Wear safety glasses when using power saws and a dust mask when sanding treated lumber to avoid inhaling chemical-laden wood particles.
Keep the area around the post bases clear of mulch or soil buildup which can trap moisture against the wood. If you notice any signs of carpenter ant or termite activity, treat the area immediately to prevent internal damage to the posts. With proper care and annual inspections, your attached pergola will provide a beautiful shaded retreat for twenty years or more.