
How to Build a 12×16 Gambrel Roof Barn Shed: The Ultimate DIY Guide
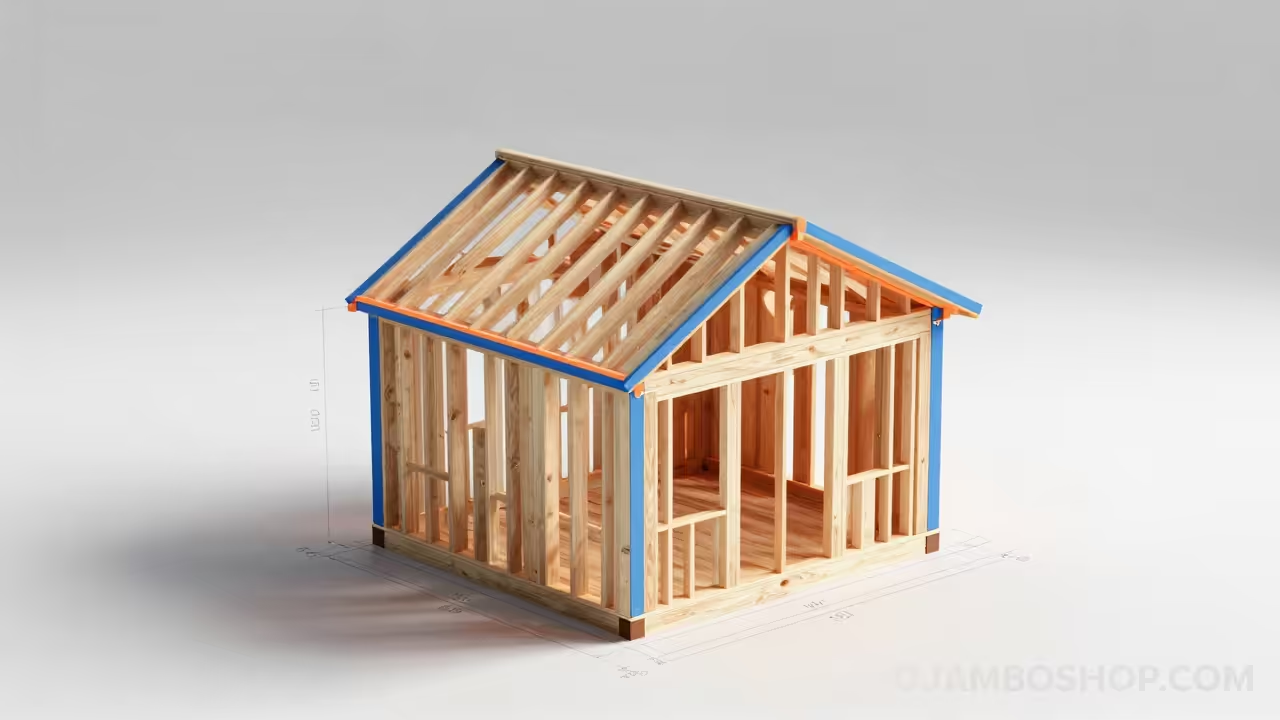
Building a 12×16 gambrel roof barn shed is one of the most rewarding projects a homeowner can undertake. This classic Dutch-inspired design offers a timeless aesthetic that complements almost any landscape while providing unparalleled overhead storage capacity. By choosing the gambrel style, you are effectively doubling your usable loft space without increasing the footprint of the structure on your property.
A well-constructed barn shed does more than just house lawnmowers and seasonal decorations. It serves as a high-value asset that increases your overall property appraisal and provides a dedicated workspace for hobbies or home business needs. When built to professional standards, this 192-square-foot structure will withstand decades of harsh weather while keeping your equipment bone-dry and organized.
Quick Specs
The 12×16 footprint is the “sweet spot” for backyard utility because it offers significant volume without requiring the heavy machinery used for larger pole barns. You can expect a total interior height of approximately 11 feet if you follow these specific blueprints. This height is what allows for the inclusion of a functional loft system for long-term storage of lighter items.
Estimated Cost: $3,500 to $4,800 depending on local lumber prices and siding choices.
Difficulty Level: Intermediate to Advanced (requires comfort with compound miter cuts).
Estimated Build Time: 3 to 4 full weekends for a two-person team.
Primary Use: Heavy equipment storage, workshop space, or an overhead loft “bonus” area.
Materials and Tools
Lumber Requirements: 4×4 Pressure-Treated Skids (5 units at 16 feet); 2×6 Pressure-Treated Floor Joists (13 units at 12 feet); 2×4 Wall Studs (60 units at 92-5/8 inches); 2×4 Rafter Material (40 units at 8 feet); 3/4-inch Tongue and Groove Plywood Flooring (6 sheets); 7/16-inch OSB or Plywood Sheathing (22 sheets); T1-11 or Vinyl Siding (approx. 350 square feet).
Hardware and Roofing: 3-inch Hot-Dipped Galvanized Nails (15 lbs); 2-inch Exterior Wood Screws (5 lbs); Hurricane Ties and Rafter Plates (20 count); Drip Edge and Aluminum Flashing (60 linear feet); 15 lb Roofing Felt or Synthetic Underlayment (3 rolls); Architectural Asphalt Shingles (8 bundles).
Required Tool List: Miter Saw (12-inch preferred for rafter cuts); Circular Saw with Framing Blade; Pneumatic Framing Nailer and Compressor; 4-foot and 8-foot Carpenter Levels; Speed Square and Chalk Line; Impact Driver and Drill Set; Safety Glasses and Hearing Protection.
Material Comparison Table
| Material Type | Pros | Cons | Durability |
|---|---|---|---|
| Pressure-Treated Pine | Budget friendly, rot resistant | Prone to warping/shrinking | High (Ground Contact) |
| Cedar Siding | Naturally beautiful, insect proof | Very expensive, needs stain | High (Above Ground) |
| T1-11 Plywood | Easy to install, structural | Requires frequent painting | Moderate |
| OSB Sheathing | Uniform thickness, low cost | Swells if exposed to water | Low (Must be covered) |
Technical Layout
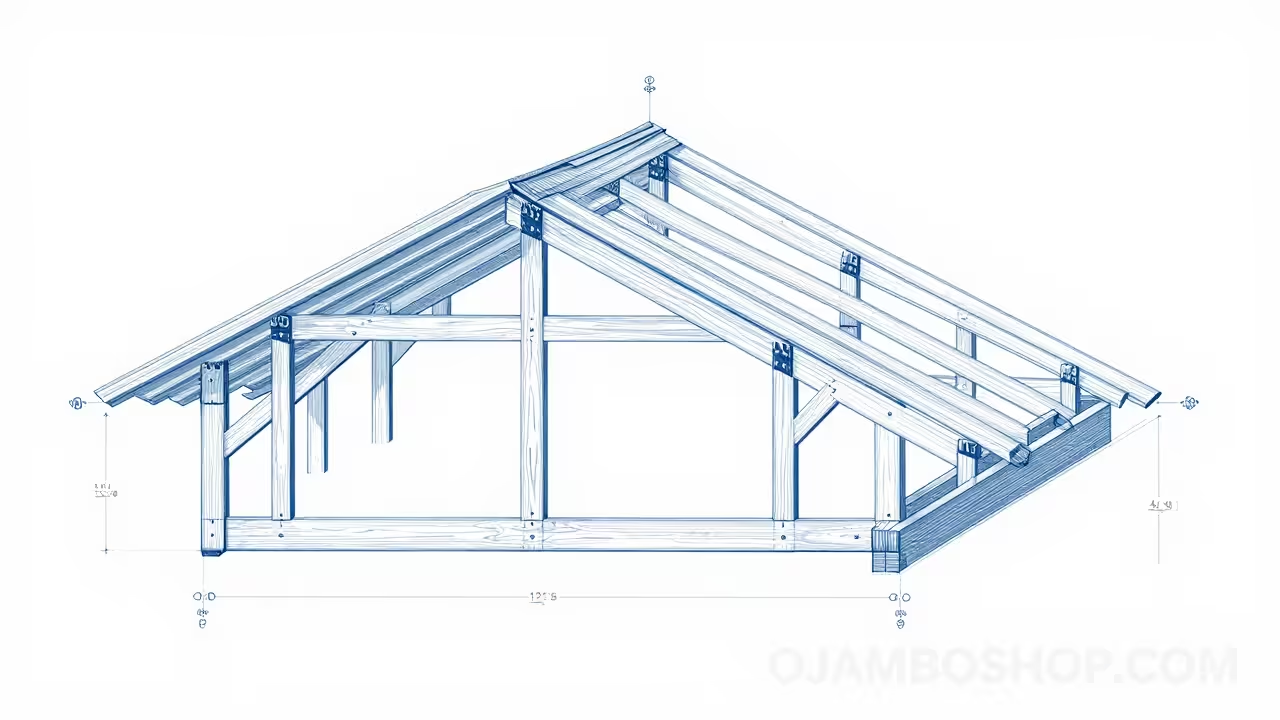
The technical integrity of a 12×16 gambrel shed relies entirely on the geometry of the roof trusses and the spacing of the floor joists. For a structure of this size, we utilize 12-inch on-center spacing for the floor joists to support heavy lawn tractors or workshop machinery. This prevents the 3/4-inch plywood flooring from sagging over time under concentrated loads. The gambrel roof itself is a “free-span” design, meaning it does not require interior support columns, which maximizes your usable floor area.
Each rafter pair is joined by plywood gussets that are glued and nailed to create a rigid, bridge-like structure. The lower rafter typically sits at a 60-degree angle, while the upper rafter transitions to a 30-degree angle. This specific combination optimizes the interior head height while ensuring that snow and rain shed efficiently off the shingles. Pro-Tip: When assembling your trusses on the ground, create a temporary wooden “jig” on the shed floor. This ensures every single rafter pair is identical to the millimeter, preventing a “wavy” roofline once the sheathing is applied.
Step-by-Step Instructions
Step 1: Foundation and Floor Framing
The foundation begins by leveling the ground and laying five 4×4 pressure-treated skids parallel to each other. These skids should be set on a 4-inch bed of compacted 3/4-inch crushed stone to facilitate drainage and prevent moisture from wicking into the wood. Once the skids are leveled, you will build the 12×16 outer rim joist frame using 2×6 pressure-treated lumber.
Install the interior floor joists every 12 inches, securing them with joist hangers or through-nailing. Check the frame for squareness by measuring the diagonals; both measurements must be identical for the rest of the build to go smoothly. Finally, glue and nail the 3/4-inch tongue-and-groove plywood to the joists, ensuring the seams are staggered to provide maximum structural rigidity across the floor plane.
Step 2: Wall Framing and Erection
Standard 8-foot wall heights are recommended for this 12×16 barn to allow for easy installation of pre-hung doors or windows. Build your long 16-foot walls first on the flat shed floor, spacing your 2×4 studs 16 inches on center. Remember to include a double top plate to tie the corners together and provide a solid bearing surface for the roof trusses.
The end walls (12-foot sections) should be built next, accounting for the width of the side walls so the total footprint remains 12×16. If you plan on a double barn door, frame the rough opening with a 2×10 double header to prevent the door from sagging over time. Raise the walls one by one, bracing them with temporary 2x4s until all four sides are plumb, square, and nailed securely to the floor.
Step 3: The Gambrel Truss Assembly
The gambrel roof is the signature feature of this project and requires the most precision. You will need to cut 40 individual rafter pieces: 20 for the lower pitch and 20 for the upper pitch. Using a miter saw, cut the angles precisely so that they meet at the specified transition point without gaps.
Lay out your first pair of rafters on the shed floor to use as a template. Apply high-strength wood glue to the joints and secure them with 1/2-inch plywood gussets on both sides using a pattern of 10 to 12 nails per joint. Repeat this process until you have 10 complete trusses. Once the glue has cured, lift the trusses onto the top plates and space them 24 inches on center.
Step 4: Roof Sheathing and Drip Edge
Starting at the bottom edge of the roof, begin installing your 7/16-inch OSB or plywood sheathing. Ensure that the vertical seams do not line up with the seams of the rafters to maintain structural integrity. Leave a small 1/8-inch gap between sheets to allow for natural expansion and contraction of the wood during humidity changes.
Once the sheathing is fully nailed down, install the aluminum drip edge along the eaves and the rakes. This small piece of hardware is critical as it forces rainwater away from the wood fascia and into the gutters or onto the ground. Cover the entire roof with 15 lb roofing felt, overlapping each row by at least 2 inches to create a secondary water barrier.
Step 5: Exterior Siding Installation
Whether you are using T1-11, cedar lap, or vinyl, the siding must be installed with careful attention to the bottom edge. Maintain at least a 6-inch clearance between the bottom of the siding and the ground to prevent rot from splashing rainwater. Use hot-dipped galvanized nails to prevent rust streaks from ruining your paint job in the future.
If you are using T1-11, ensure that you apply a high-quality exterior caulk to all vertical joints before installing the corner trim. This creates a “belt and suspenders” approach to waterproofing that is essential for a long-lasting shed. Take your time around the door and window openings to ensure the siding fits tightly against the framing.
Step 6: Shingle and Ridge Cap Application
Apply your architectural shingles starting from the bottom and working your way up to the peak. Use four nails per shingle, or six if you live in a high-wind area, placing them just below the tar strip. The transition point where the roof pitch changes from 60 degrees to 30 degrees requires extra care to ensure shingles lay flat.
At the very peak of the gambrel roof, install a ridge vent if you plan on spending time working inside the shed. This allows hot air to escape, significantly lowering the interior temperature during the summer months. Finish the peak with ridge cap shingles, overlapping them in the direction of the prevailing wind for maximum protection.
Step 7: Door and Window Finishing
A 12×16 shed of this volume needs adequate light and ventilation to prevent mold growth. Install at least two 24×36 windows on opposite walls to encourage cross-ventilation. For the main entrance, a set of 60-inch wide double doors is ideal for moving large riding mowers or lumber in and out of the structure.
Build the doors using a “Z-brace” design on the interior to prevent the wood from sagging over time. Use heavy-duty strap hinges that are rated for the weight of the door and the siding. Finish the doors with a high-quality locking latch and barrel bolts on the interior of the inactive door for security.
Step 8: Painting and Weatherproofing
The final step in the construction process is the application of a high-quality exterior paint or stain. Choose a 100% acrylic latex paint for the best durability against UV rays and moisture. Apply one coat of primer followed by two top coats, paying special attention to the end grain of the lumber which absorbs water more readily.
Seal the gap between the shed floor and the ground with a heavy-duty hardware cloth if you have issues with small animals nesting underneath. Finally, install a simple ramp made of pressure-treated 2x6s to make it easier to roll heavy equipment in and out. Your 12×16 gambrel barn is now ready for decades of service.
Common Mistakes to Avoid
One of the most frequent errors is failing to level the foundation skids perfectly before building the floor. If the base is even slightly out of level, the roof trusses will not align properly, and the doors will eventually bind or fail to close. Always spend the extra hour at the beginning of the project using a transit level or a long straight-edge to verify the foundation is flat.
Another mistake is using interior-grade fasteners for the exterior siding or trim. Standard nails will rust within a single season, leaving unsightly black streaks down the side of your barn. Always verify that your fasteners are labeled as “hot-dipped galvanized” or “stainless steel” to ensure they can withstand the elements without corroding.
Finally, many DIY builders neglect to install a proper moisture barrier between the skids and the ground. Simply placing wood on dirt is a recipe for rot, even if the wood is pressure-treated. Using a bed of gravel or concrete blocks is essential for airflow, which keeps the underside of your shed dry and prevents the floor joists from decaying prematurely.
Maintenance and Safety
To keep your 12×16 barn in peak condition, perform a visual inspection every spring and fall. Look for any signs of “checking” or cracking in the siding and apply caulk as needed to prevent water penetration. Clear away any leaves or debris that pile up against the foundation, as these can trap moisture against the wood and lead to rot.
Safety is paramount during the roof phase of the build, especially when working on the steep 60-degree lower pitch. Use a sturdy ladder and consider a safety harness if you are uncomfortable with heights. Always wear eye protection when using a pneumatic nailer, as wood splinters or deflected nails can cause serious injury in a split second.