

A high-performance workshop is defined by its ability to adapt to the project at hand without sacrificing stability or precision. For most craftsmen, the standard stationary table is a relic of the past that consumes valuable square footage while offering minimal utility. Integrating a mobile shop workbench into your workflow transforms a static garage into a dynamic production environment where every tool has a dedicated home.
The value this build adds to your property and productivity is immediate, providing a massive 32-square-foot assembly surface that remains perfectly level on any floor. Beyond its sheer surface area, the internal structural cavities are engineered to house heavy stationary tools like planers and miter saws when they are not in use. Investing your time into this build ensures that your shop remains organized, safe, and ready for professional-level output at a moment’s notice.
Quick Specs
Overall Dimensions: 96 inches long by 48 inches wide by 36 inches high. Estimated Cost: 450 to 600 USD depending on local lumber prices and hardware selection. Difficulty Level: Intermediate; requires basic knowledge of squareness, flush-trimming, and heavy-duty fastener installation.
Estimated Build Time: 12 to 16 active shop hours, typically completed over two full weekends. This timeframe accounts for the necessary curing periods for structural adhesives and the multi-layered assembly of the heavy-duty framing components.
Materials and Tools
Building a structure of this magnitude requires high-density materials to ensure the top does not bow under the weight of heavy projects. You will need twelve 2x4x8 pressure-treated or kiln-dried Douglas Fir boards for the internal framing and four 4x4x8 posts for the primary corner supports. For the work surface and shelving, two sheets of 3/4-inch ACX plywood provide the necessary rigidity while one sheet of 1/4-inch tempered hardboard serves as a replaceable sacrificial top.
The hardware requirements are just as critical, necessitating a five-pound box of 3-inch structural wood screws and a smaller box of 1-5/8-inch screws for the plywood skins. You must also procure four 5-inch heavy-duty polyurethane locking casters with a minimum weight rating of 300 pounds each to handle the fully loaded bench. A high-quality wood glue, such as Titebond II, is mandatory for all primary joinery to prevent the bench from racking over years of movement.
Essential tools for this project include a miter saw for clean crosscuts and a table saw or track saw for ripping down the large plywood sheets. A cordless impact driver is superior to a standard drill for driving structural screws, as it provides the torque necessary to pull the lumber tight. You will also need a 4-foot level, a speed square, several 24-inch bar clamps, and a countersink drill bit to ensure all screw heads sit flush or slightly below the surface.
Technical Layout
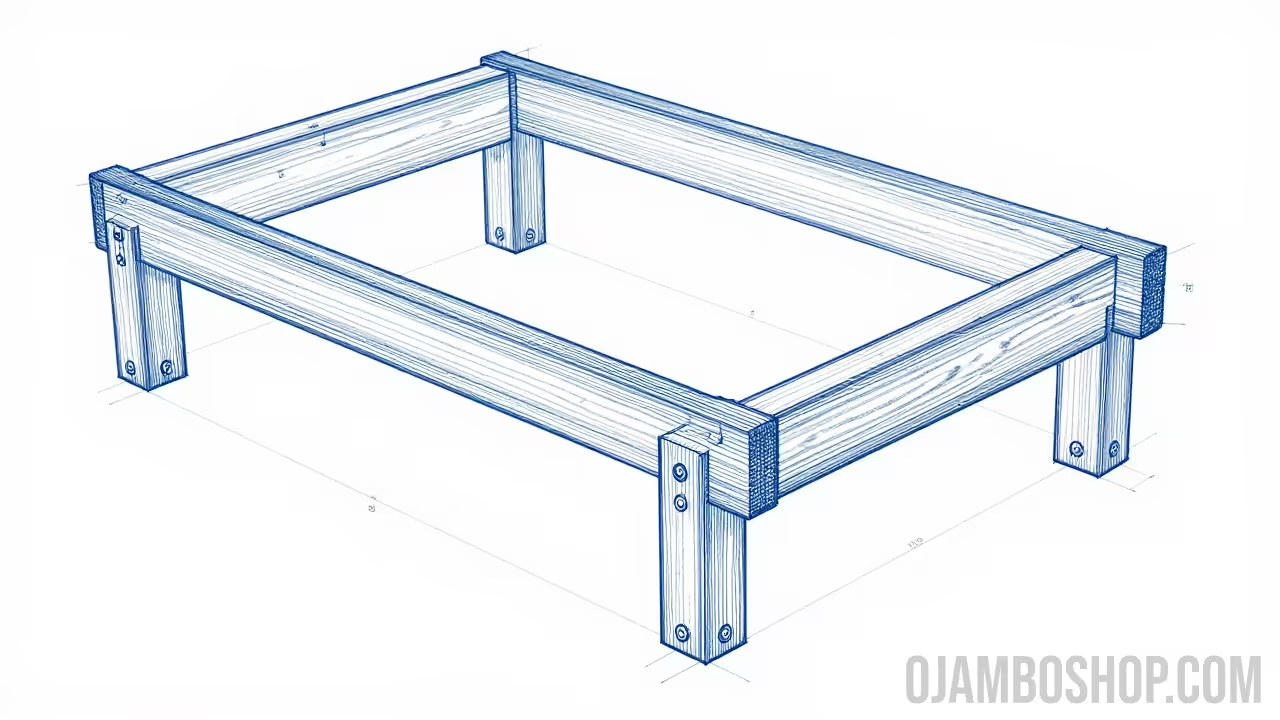
The engineering of the Mobile Shop Workbench centers on a torsion-box inspired frame that prevents the 8-foot span from sagging under its own weight. We utilize a dual-layer rim joist system where the outer 2×4 skin overlaps the inner frame to create a rigid shoulder for the 4×4 legs. This interlocking lap design ensures that the downward force of a heavy project is transferred directly through the vertical grain of the legs rather than relying solely on the shear strength of the fasteners. By spacing our internal joists at 16 inches on center, we create a grid that supports the plywood top in multiple directions simultaneously.
Furthermore, the lower shelf is not merely for storage; it acts as a structural tie-piece that locks the four legs together to prevent lateral racking. When you move a 300-pound bench across a concrete floor, the friction creates immense stress at the leg-to-frame junctions. Our layout addresses this by using 1/2-inch carriage bolts at each corner, creating a mechanical bond that wood screws alone cannot replicate. This combination of internal ribbing and bolted leg assemblies results in a workbench that feels like a permanent floor fixture even when it is rolling.
Step-by-Step Instructions
Phase 1: Cutting the Primary Frame
Begin by selecting the straightest 2×4 boards from your lumber pile to serve as the long 96-inch side rails and the 45-inch cross-members. Use a miter saw to cut four rails at 96 inches and ten cross-members at 45 inches to form the upper and lower frames. It is vital to ensure every cut is perfectly square at 90 degrees to avoid a parallelogram effect during the assembly process. It is better to spend ten extra minutes verifying your saw’s fence than an hour fixing a skewed frame later.
Phase 2: Assembling the Torsion Grids
Lay out your 96-inch rails on a flat floor and mark your cross-member locations at 16-inch intervals starting from the center and working outward. Apply a generous bead of wood glue to the end grain of each cross-member before driving two 3-inch structural screws through the outside of the rails. Check the frame for square by measuring the diagonals; the frame is perfectly square only when the two diagonal measurements are identical. Use bar clamps to hold the pieces in alignment while you drive the fasteners to prevent the wood from shifting.
Phase 3: Notching the Corner Posts
The 4×4 corner posts need to be exactly 28-1/4 inches long to account for the thickness of the casters and the dual-layered plywood top. Using a miter saw or a handsaw, cut a 3.5-inch by 1.5-inch notch at both ends of each post where the upper and lower frames will seat. This housing joint provides a massive surface area for glue and ensures the frame sits on a wooden shelf rather than hanging on screws. If you are using a circular saw, make multiple kerf cuts and clean out the waste with a sharp chisel for a professional fit.
Phase 4: Integrating the Legs and Frame
Stand your four notched legs upright and slide the lower frame into the bottom notches, ensuring it sits exactly 6 inches above the floor for toe-kick clearance. Secure the frame to the legs using wood glue and two 3-inch screws per joint, then repeat this process for the upper frame at the top of the legs. At this stage, the skeleton of the bench should be able to stand on its own without any wobbling or leaning. Use a level to ensure the legs are perfectly plumb before the glue begins to cure and harden.
Phase 5: Installing the Structural Carriage Bolts
Drill two 1/2-inch holes through each corner joint where the 2×4 frame meets the 4×4 leg, staggering the holes to avoid hitting the screws. Insert 1/2-inch by 6-inch carriage bolts through the holes and tighten them with a washer and nut on the interior side of the frame. This step is the secret sauce for shop longevity, as it creates a permanent mechanical clamp that will never loosen even with heavy vibration. You will need a deep-well socket to fully seat the nuts against the interior framing members.
Phase 6: Mounting the Heavy-Duty Casters
Flip the entire frame assembly upside down so you have clear access to the bottom of the four corner posts. Align your 5-inch locking casters in the center of the 4×4 posts and pre-drill holes for 3/8-inch by 3-inch lag bolts to prevent the wood from splitting. Install the lag bolts with a socket wrench, ensuring they are extremely tight, as these four points will bear the entire weight of the bench and your tools. Check that the swivel mechanism of the caster has full 360-degree clearance from the frame.
Phase 7: Skinning the Lower Storage Shelf
Flip the bench back onto its wheels and lock them to prevent the unit from rolling away while you work on the upper sections. Measure and cut your first sheet of 3/4-inch plywood to fit inside the frame or over the top of the lower stretchers depending on your preference. Apply glue to the tops of the lower frame joists and screw the plywood down every 8 inches using 1-5/8-inch screws to finalize the bottom storage deck. This shelf provides essential ballast to keep the center of gravity low for better stability.
Phase 8: Applying the Primary Work Surface
The main top consists of a 3/4-inch plywood sheet that must be perfectly flush with the edges of the 2×4 frame to allow for clamping. Lay the plywood over the top frame, check for square one last time, and secure it with glue and screws driven into the joists below. Sink the screw heads at least 1/8-inch below the wood surface so they do not interfere with the final sacrificial top layer. Using a chalk line will help you find the center of the internal joists for accurate screw placement.
Phase 9: Installing the Sacrificial Top and Trim
To protect your structural plywood, cut a sheet of 1/4-inch tempered hardboard to the exact dimensions of the workbench top. Secure this layer using only a few small finish nails or a light bead of silicone so it can be easily pried off and replaced when it becomes scarred. You may also choose to wrap the edges of the bench in 1×4 hardwood trim to protect the plywood end-grain from impact damage. The trim should be installed slightly proud of the structural top but flush with the hardboard surface.
Phase 10: Final Sanding and Sealing
Use a random orbital sander with 120-grit sandpaper to smooth out all edges, corners, and joints to prevent splinters during future use. Apply two coats of a wipe-on poly or a simple boiled linseed oil finish to the frame and the plywood edges to protect the wood from humidity changes. This finish does not need to be furniture grade but should provide enough of a barrier to prevent glue spills from bonding to the bench. Allow the finish to dry for at least 24 hours before loading the bench with tools.
Common Mistakes
The most frequent error in workbench construction is failing to account for floor irregularities when checking for squareness during the initial framing. If you assemble the frame on a sloped garage floor without using shims or a level, the entire bench will have a built-in twist that makes precise woodworking impossible. Always use a 4-foot level and check the diagonals of your frames multiple times before the glue begins to set. It is helpful to perform the assembly on the most level section of your shop floor.
Another common pitfall is using standard zinc wood screws instead of structural-rated fasteners or carriage bolts for the leg attachments. Standard screws are brittle and can snap under the shear stress of a fully loaded bench being pushed over a door threshold or a crack in the concrete. Investing the extra ten dollars in high-strength lag bolts or carriage bolts ensures the safety of your tools and yourself. Never compromise on the mechanical strength of the primary load-bearing joints in a mobile structure.
Finally, many builders forget to leave a toe-kick or overhang at the bottom of the bench, leading to constant bruised toes while working at the table. By ensuring your lower shelf and frame sit at least 3 to 4 inches back from the vertical plane of the work surface, you allow your feet to tuck under the bench comfortably. This small ergonomic adjustment significantly reduces back strain and makes long hours in the shop much more enjoyable. Think about your body’s position relative to the work surface before you finalize the leg placements.
Maintenance and Safety
To ensure maximum structural integrity and moisture resistance, apply a thin layer of wax or a dedicated Paste Wax to the bottom of the 4×4 legs before installing the casters. This creates a moisture barrier that prevents the end-grain of the wood from wicking up water if your shop floor ever gets damp or flooded. Furthermore, using Star Drive or Torx-head screws instead of Phillips-head will prevent stripping during assembly, allowing you to apply significantly more torque to the joints.
Always wear wrap-around safety glasses when operating power saws and use a high-quality P100 respirator when sanding pressure-treated lumber or plywood adhesives. Keep your work area clear of offcuts that could cause a trip hazard while moving the heavy workbench across the shop. Regularly inspect the caster bolts and carriage bolts every six months to ensure they remain tight, as wood naturally shrinks and expands with the seasons. A drop of blue thread-locker on the carriage bolt nuts can prevent them from vibrating loose over time.
Maintaining your workbench is as simple as wiping down the surface after each project and replacing the sacrificial hardboard top every few years. If the casters become difficult to swivel, a quick spray of dry PTFE lubricant will keep them spinning freely without attracting sawdust. By following these professional protocols, your OJAMBOSHOP.COM mobile workbench will remain a centerpiece of your craftsmanship for decades to come. Ensure that you never exceed the weight rating of your casters by keeping an inventory of the heavy machinery stored on the lower shelf.