
The shift toward efficient, high-utility living has peaked with the rise of the compact barndominium. This 800 square foot 2-bedroom design offers a perfect balance of rustic aesthetics and modern structural integrity for savvy property owners. By utilizing a post-frame or advanced stud-frame approach, you can create a secondary dwelling or a primary residence that outlasts traditional stick-built homes.
Building a small-scale barndominium significantly increases your property value while maintaining a manageable footprint for maintenance and heating. This project focuses on a 20-foot by 40-foot rectangular shell which provides a streamlined construction process for the intermediate DIY builder. With the right planning and execution, this structure serves as a durable, energy-efficient sanctuary that embodies the essence of the small living movement.
Quick Specs
Dimensions: 20′ x 40′ (800 sq ft)
Estimated Cost: $45,000 – $65,000 (Materials only)
Difficulty Level: Advanced DIY / Professional Lead
Estimated Build Time: 4 to 6 months
Materials and Tools
The success of a barndominium depends on the quality of the raw lumber and the specific gauge of the metal exterior components. You will need 2×6 pressure-treated sills, 2×6 wall studs spaced 16 inches on center, and pre-engineered wooden trusses designed for a 4/12 roof pitch. For the exterior skin, 29-gauge steel panels are standard, though 26-gauge offers superior hail resistance and overall structural rigidity for long-term use.
Foundation requirements include 3,500 PSI concrete for a thickened edge slab or pier-and-beam system depending on local frost lines. You must procure high-quality vapor barriers, R-21 fiberglass batts or closed-cell spray foam insulation, and flashing tape for all window and door penetrations. Hardware needs include 3-inch framing nails, 1.5-inch metal-to-wood screws with neoprene washers, and heavy-duty hurricane ties for every truss-to-wall connection.
Essential tools for this build include a high-capacity miter saw, a framing nailer, and a 12-inch sliding compound miter saw for complex trim work. You will also require a laser level for foundation squaring, a metal nibbler or shears for cutting steel panels, and an impact driver for securing the skin. Safety equipment must include fall protection harnesses for roof work, impact-rated eye protection, and heavy-duty work gloves to handle sharp metal edges.
Technical Layout
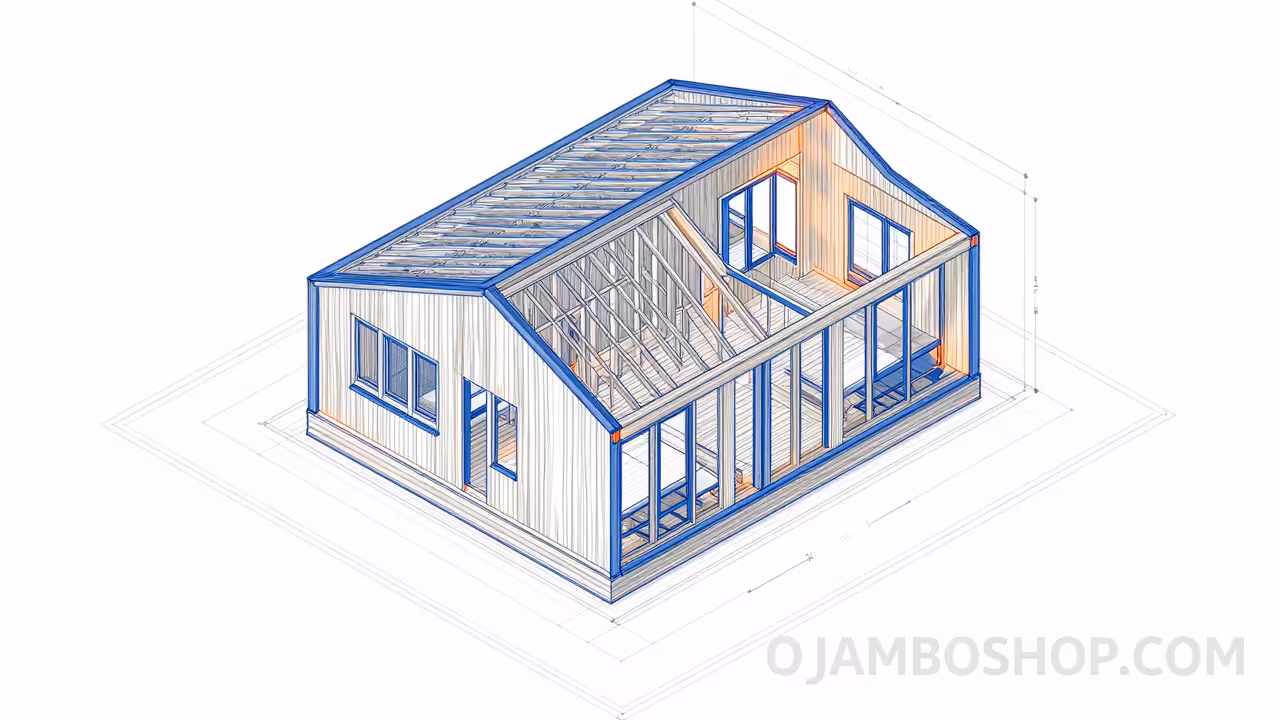
The structural integrity of this 800 square foot barndominium relies on a continuous load path from the roof peak down to the concrete footings. We utilize a 20-foot clear-span truss system which eliminates the need for internal load-bearing walls, allowing for a completely open-concept living area. The exterior walls are framed with 2×6 lumber at 16 inches on center to provide a deeper cavity for high-performance insulation and increased lateral strength against wind loads. Each corner of the building features triple-stud blocking to ensure a rigid attachment point for the exterior metal trim and interior drywall.
The floor plan is divided into two 10-foot by 12-foot bedrooms located at the rear of the structure, leaving a spacious 20-foot by 20-foot area for the kitchen and living room. A central plumbing wet wall carries the utilities for the bathroom and kitchen, which simplifies the slab-on-grade plumbing rough-in significantly. By concentrating the heavy mechanical loads in a single linear run, we reduce material costs and minimize potential leak points within the foundation. This technical layout ensures that the building remains flexible for future interior modifications while maintaining a rock-solid exterior shell.
| Hardware Item | Standard Grade | Professional Grade | Recommendation |
|---|---|---|---|
| Exterior Screws | Zinc Coated | Stainless Steel | Stainless for longevity |
| Roof Underlayment | 15 lb Felt | Synthetic Polymer | Synthetic for tear resistance |
| Wall Sheathing | 7/16 OSB | 1/2 CDX Plywood | CDX Plywood for moisture areas |
| Vapor Barrier | 6-mil Poly | Cross-Laminated | Cross-Laminated for slab work |
| Framing Nails | Smooth Shank | Ring Shank | Ring Shank for uplift resistance |
Step-by-Step Instructions
Phase 1: Site Preparation and Foundation
The project begins with professional land clearing and a precise transit level survey to ensure the building site is perfectly flat. Dig a thickened edge trench 12 inches wide and 18 inches deep around the perimeter to support the weight of the exterior walls and roof. Install your plumbing rough-ins and electrical conduits before pouring a 4-inch reinforced concrete slab with 6×6 wire mesh and a 6-mil vapor barrier. Allow the concrete to cure for at least 7 to 10 days before any heavy framing begins to prevent cracking or structural shifts.
Phase 2: Wall Framing and Squaring
Layout your 2×6 pressure-treated bottom plates and anchor them to the slab using 1/2-inch wedge anchors every 4 feet. Build your wall sections flat on the slab, ensuring all window and door headers are sized correctly for the 20-foot by 40-foot dimensions. Use a chalk line to ensure the plates are perfectly straight before standing the walls and bracing them with temporary 2×4 kickers. Once all four walls are upright, check for square by measuring the diagonals; they must be within 1/8 of an inch for a professional finish.
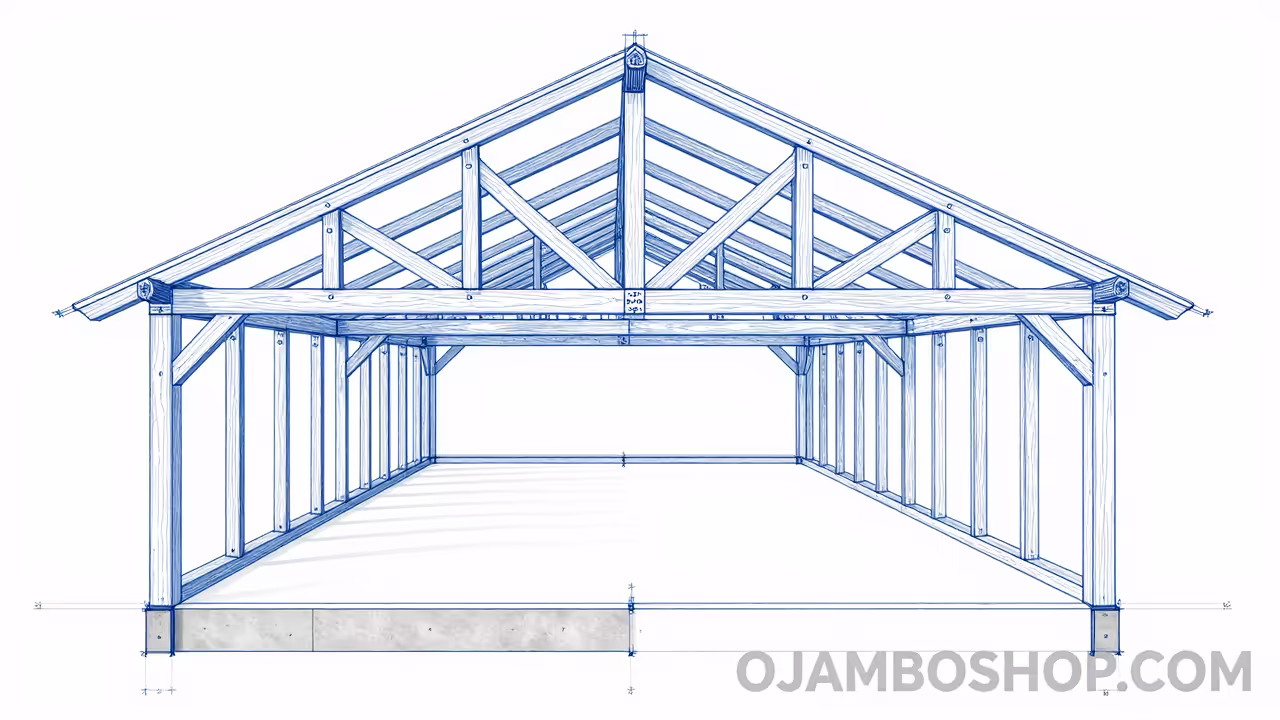
Phase 3: Truss Installation and Sheathing
Set your pre-engineered trusses at 24 inches on center, starting from one gable end and working toward the other. Secure each truss to the double top plate using H2.5 hurricane ties to meet modern wind load building codes. Install 7/16-inch OSB or 1/2-inch plywood sheathing on the roof, followed immediately by a synthetic underlayment to protect the interior from sudden rain. Wall sheathing should be applied next, ensuring that all joints land on a stud and are staggered to increase the shear strength of the building.
Phase 4: Exterior Skin and Roofing
Install the 29-gauge metal roofing panels starting from the leeward side of the building to prevent wind from catching the laps. Use metal-to-wood screws with EPDM washers, driving them into the flats of the metal for the tightest possible seal against the wood purlins. Move to the wall panels, ensuring the vertical ribs are perfectly plumb around the entire perimeter of the 800 square foot structure. Install the corner trim, J-channel around openings, and the ridge cap last to create a fully weather-tight exterior envelope.
Phase 5: Doors and Windows
Set your exterior-grade doors and energy-efficient windows into the rough openings, using high-quality flashing tape on the sills and sides. Ensure there is a 1/4-inch gap around the perimeter for expansion, which should be filled with low-expansion spray foam once the units are leveled. Use a professional-grade silicone sealant behind the window flanges before screwing them into the framing to prevent moisture infiltration behind the metal skin. This step is critical for preventing rot in the wall cavity over the next several decades of the home’s life.
Phase 6: Rough-In Utilities
With the shell dried in, you can now run the internal electrical wiring and PEX plumbing lines through the pre-drilled holes in the studs. Install the HVAC ductwork or prepare the mounting locations for a multi-zone ductless mini-split system, which is ideal for this square footage. Ensure all rough-in inspections are completed by local authorities before you begin the insulation process to avoid having to tear out work later. Take photos of all wall cavities during this phase so you know exactly where the wires and pipes are located for future reference.
Phase 7: Insulation and Drywall
Install R-21 high-density fiberglass batts in the 2×6 wall cavities, ensuring there are no gaps or compressions that would reduce the thermal resistance. Apply a 4-mil poly vapor retarder over the studs if you are in a cold climate to prevent interior moisture from condensing inside the walls. Hang 1/2-inch moisture-resistant drywall on the ceilings first, followed by the walls, using 1-1/4 inch drywall screws. Tape and mud the joints to a Level 4 finish to ensure the small space feels open, bright, and professionally constructed.
Phase 8: Interior Finishing and Cabinetry
Install the interior pre-hung doors and the baseboard trim, using a pneumatic finish nailer for clean, recessed holes that are easy to fill. Set the kitchen cabinetry along the designated wet wall, ensuring the boxes are perfectly level and shimmed appropriately for the countertop installation. Lay the final flooring, such as luxury vinyl plank (LVP), which offers excellent durability and water resistance for a barndominium lifestyle. Install the plumbing fixtures, light switches, and final trim plates to bring the 2-bedroom living space to a functional, aesthetic completion.
Common Mistakes
One of the most frequent errors in DIY barndominium builds is neglecting the proper installation of the vapor barrier under the concrete slab. Without a high-quality barrier, ground moisture will wick through the concrete and damage your interior flooring or create a musty environment within the home. Always overlap your seams by at least 12 inches and use specialized vapor tape to create a continuous seal across the entire building footprint.
Another mistake is failing to account for the thickness of the exterior metal trim when framing the rough openings for windows and doors. Many builders frame to the exact window size, only to find that the metal J-channel and trim pieces overlap the glass or prevent the door from swinging freely. Always add an extra 1/2 inch to your rough opening widths to allow for the thickness of the metal components and the necessary flashing tape.
Finally, many DIYers under-tighten or over-tighten the metal roofing screws, leading to immediate or future leaks. If the neoprene washer is bulging out from the metal, it is too tight and will eventually crack under UV exposure; if it is loose, water will bypass the seal. Aim for a firm seat where the washer slightly compresses but maintains its circular shape to ensure a 40-year waterproof seal.
Maintenance and Safety
Pro-Tip: To significantly extend the life of your barndominium, you must prioritize the management of bulk water at the foundation level. Install a high-quality gutter system with 5-inch K-style troughs and ensure the downspouts discharge at least 10 feet away from the concrete slab. This prevents hydrostatic pressure from building up against your footings and keeps the pressure-treated sill plates from being subjected to constant moisture cycles.
Annual maintenance should include a visual inspection of all exterior metal fasteners to ensure the EPDM washers have not degraded or backed out due to thermal expansion. If you notice any rust on the cut edges of the metal panels, sand them lightly and apply a matching touch-up paint provided by the metal manufacturer. Keep the perimeter of the building clear of high grass or debris to allow for proper airflow and to prevent pests from nesting against the structure.
Safety during the build is paramount, especially when handling large 20-foot metal panels in windy conditions. Never attempt to install the exterior skin or roof panels during high winds, as the metal acts as a sail and can easily pull a builder off a ladder or scaffold. Use scaffolding instead of ladders whenever possible for the wall panels to provide a stable working platform and reduce the risk of falls or fatigue-related accidents.