
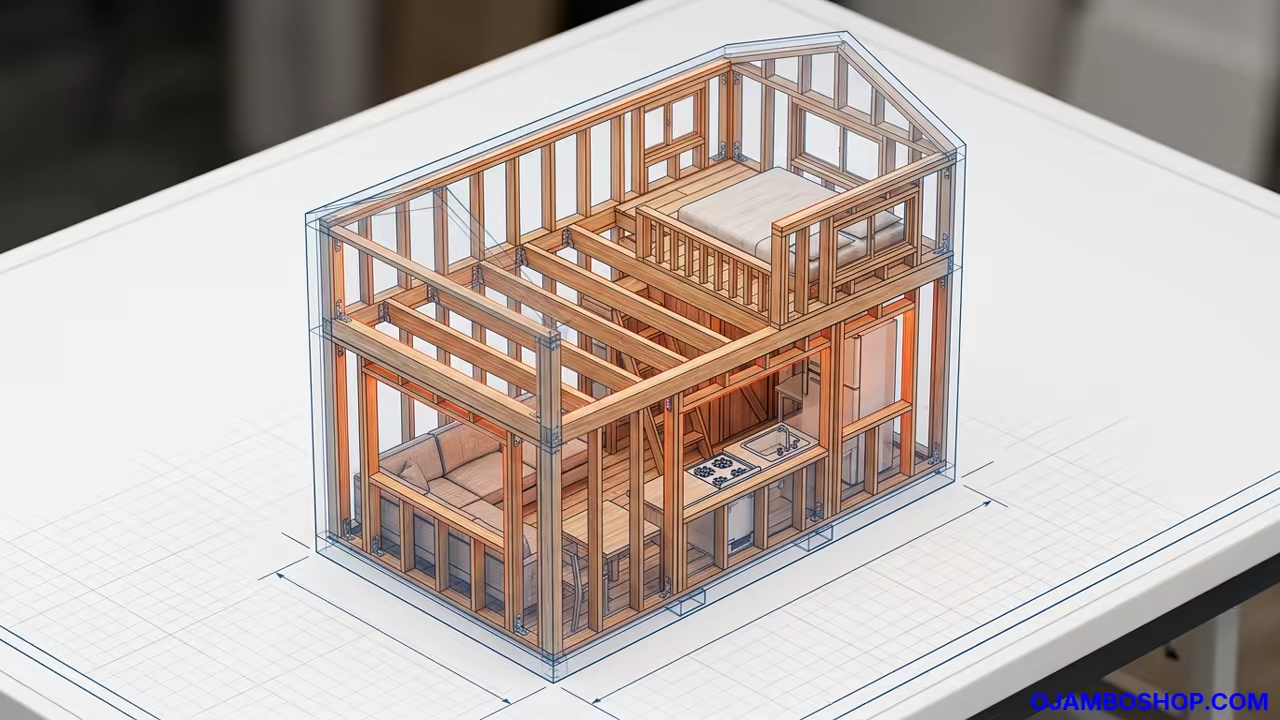
Compact Two Story Tiny Home Master Plan
The dream of independent living often begins with the desire for a manageable and efficient space. A two story tiny home maximizes vertical volume while maintaining a minimal footprint on the land.
This architectural approach allows for a clear separation between social living areas and private sleeping quarters. It transforms a small lot into a functional residence that rivals a traditional cottage.
Disclaimer: I may earn a commission from purchases made through these links at no extra cost to you.


Quick Specs
Footprint is 12 feet by 16 feet per floor. Estimated Cost ranges from 35,000 to 55,000 dollars.
Difficulty Level is Advanced. Estimated Build Time is 8 to 12 months.
Materials and Tools
The framing requires a substantial amount of structural lumber to ensure stability across two levels. You will need 2×6 kiln dried studs for the walls and 2×8 joists for the floor and loft systems.
Exterior sheathing consists of 7/16 inch oriented strand board and a high quality weather resistive barrier. Cedar lap siding provides a natural aesthetic while resisting rot and insect damage over time.
Roofing materials include 26 gauge corrugated steel panels and heavy duty flashing for all junctions. Fasteners should consist of hot dipped galvanized nails and stainless steel screws for all exterior connections.
Essential tools include a miter saw and a circular saw and a pneumatic framing nailer. A laser level is mandatory for ensuring the two story structure remains perfectly plumb.
You will also need a high torque impact driver and a set of professional grade clamps. A heavy duty table saw helps in creating precise rips for the interior finish work.
| Parameter | Description | Value |
|---|---|---|
| Framing | Spruce Pine Fir vs Western Red Cedar | Cedar offers superior rot resistance |
| Flooring | Laminated Planks vs Solid White Oak | Oak provides lifelong durability |
| Roofing | Asphalt Shingles vs Standing Seam Metal | Metal lasts 50 years longer |
| Insulation | Fiberglass Batts vs Closed Cell Spray Foam | Spray foam adds structural rigidity |
| Windows | Single Pane Vinyl vs Argon Filled Double Pane | Double pane reduces energy loss |
Technical Layout
The structural integrity of a two story tiny home relies heavily on the load path from the roof down to the foundation. The second floor joists must be engineered to handle both the dead load of the materials and the live load of occupants.
We utilize 2×8 joists spaced 16 inches on center to prevent floor deflection in the sleeping area. These joists are tied into the main wall plates using heavy duty joist hangers to ensure a mechanical lock.
The wall studs are spaced 16 inches apart to distribute the weight of the upper floor evenly across the base. This creates a rigid box structure that resists lateral movement during high wind events.
Critical load bearing points are reinforced with double studs at every corner and window opening. This prevents the upper floor from sagging over time and maintains the squareness of the entire frame.
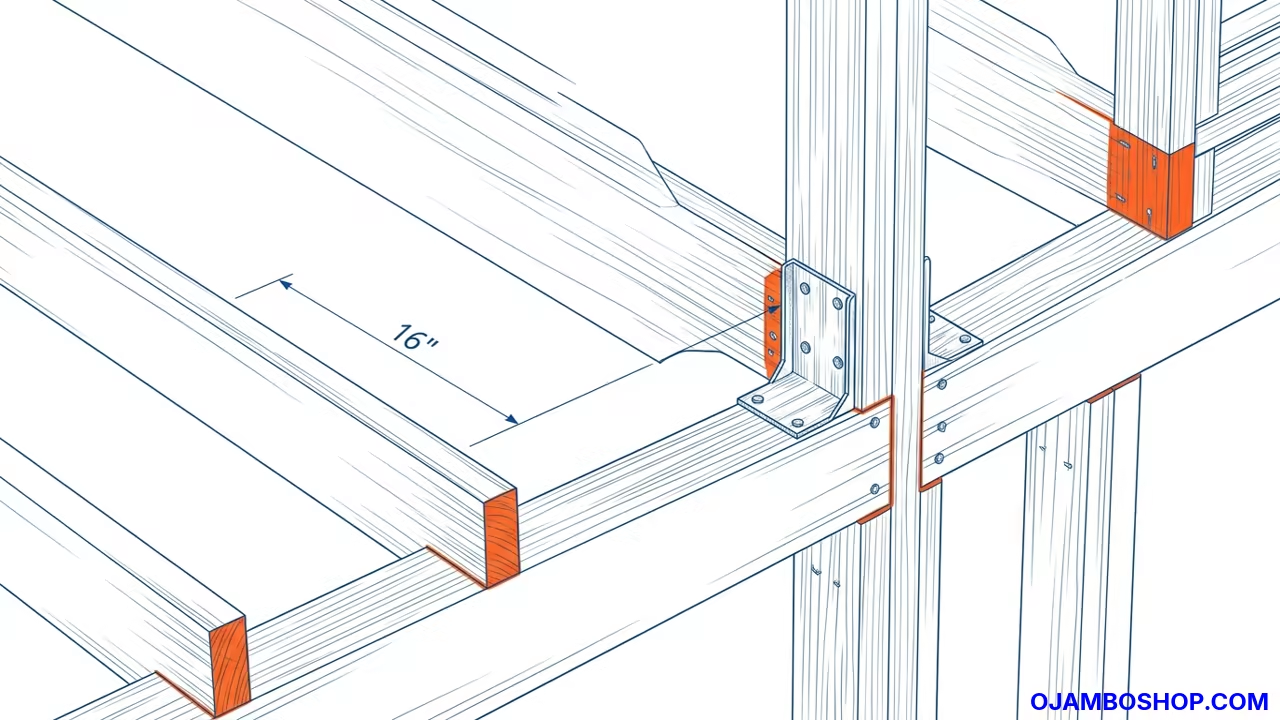
Pro Tip to maximize material longevity install a flashing tape over the sill plate before adding the first layer of wall studs. This prevents capillary action from drawing ground moisture into the framing members which is the primary cause of base rot.
Phase 1 Foundation and Subfloor
The first step involves preparing a level pad using compacted crushed stone or a concrete slab. A stable base prevents the house from settling unevenly which would cause doors and windows to jam.
Heavy duty 4×4 pressure treated skids are laid across the base to elevate the structure from the soil. These skids are leveled using shims and secured with anchor bolts to the ground.
Floor joists are then installed perpendicular to the skids using 2×8 pressure treated lumber. Each joist is notched and seated firmly to create a rock solid platform for the living space.
The subfloor consists of 3/4 inch tongue and groove plywood glued and screwed to the joists. This creates a seamless surface that eliminates squeaks and provides a flat plane for interior flooring.
Phase 2 First Floor Wall Framing
Wall plates are cut to exact lengths and laid out on the subfloor to define the rooms. Studs are positioned every 16 inches and nailed to the top and bottom plates using 3 inch framing nails.
Rough openings for the main entrance and windows are framed with double headers to support the upper floor weight. Every header is sized based on the span to prevent any structural bowing in the ceiling.
The walls are raised one by one and braced with temporary 2×4 supports to maintain verticality. A laser level ensures that each wall is perfectly plumb before the final nailing occurs.
Double top plates are installed to tie the walls together and provide a secure mounting point for the second floor. This creates a continuous loop of strength around the perimeter of the home.
Phase 3 Second Floor Joist System
The second floor begins with the installation of 2×8 joists that span the width of the structure. These joists are fitted into hangers that are pre installed on the first floor wall plates.
Blocking is added between the joists every 4 feet to prevent the lumber from twisting or rolling. This adds significant lateral stability to the upper floor and reduces vibration during movement.
The second floor subfloor is then installed using 3/4 inch plywood to create the upper platform. This surface acts as a diaphragm that locks the first floor walls into a rigid square.
The transition for the stairs is framed out at this stage to allow for safe access to the upper level. Precision cuts are made in the subfloor to accommodate the stair stringers.
Phase 4 Upper Level Wall Construction
The second story walls are framed similarly to the first but often include more window openings for light. Studs are kept at 16 inch spacing to maintain consistency in load distribution.
The upper walls are shorter than the lower walls to keep the total height within transportable or zoning limits. Each wall is carefully squared and braced before being hoisted into place.
The top plates of the second floor serve as the foundation for the roof rafters. These plates are doubled to handle the concentrated weight of the roof peak and snow loads.
Corners are reinforced with three stud arrays to provide a solid nailing surface for exterior sheathing. This ensures the upper level remains stable against wind shear.
Phase 5 Roof Framing and Rafters
A central ridge board is established to define the peak of the roof and the slope of the rafters. Rafters are cut with a precise birdsmouth notch to sit flush on the top plates of the walls.
The pitch is set at 6 inches of rise for every 12 inches of run to allow for efficient rain runoff. Each rafter is secured with hurricane ties to prevent uplift during severe weather.
Ceiling joists are installed horizontally between the rafters to tie the walls together and provide a base for the ceiling. These joists also provide the necessary support for the upper story ceiling finish.
The roof is then sheathed with 1/2 inch plywood to create a solid skin for the roofing material. This skin is nailed every 6 inches along the edges for maximum hold.
Phase 6 Exterior Sheathing and Weatherproofing
Oriented strand board is applied to all exterior walls and the roof to provide structural shear strength. This sheathing prevents the house from leaning or racking over time.
A high performance house wrap is installed over the OSB to keep liquid water out while allowing vapor to escape. This breathable layer is essential for preventing mold and mildew inside the walls.
Z flashing is installed over every window and door opening to redirect water away from the framing. This simple metal detail prevents the most common points of water intrusion in tiny homes.
The corrugated metal roofing is then screwed into the rafters using gasketed screws to ensure a watertight seal. Metal is chosen for its longevity and low maintenance requirements.
Phase 7 Siding and Window Installation
Cedar lap siding is installed starting from the bottom and working upward to overlap each board. This creates a natural water shed that protects the house wrap and sheathing.
Windows are set into the rough openings with a slight slope on the sill to ensure water drains outward. Each window is sealed with professional grade flashing tape around the entire perimeter.
The main entry door is hung and trimmed to provide a secure and airtight seal against the elements. Exterior trim boards are added to the corners and window frames for a finished look.
Final exterior caulking is applied to every joint where two different materials meet. This prevents air leaks and protects the wood from moisture penetration.
Phase 8 Interior Finishing and Systems
Insulation is packed into the wall cavities to create a thermal envelope that reduces heating and cooling costs. Closed cell spray foam is used around the windows and doors for a perfect seal.
Interior walls are finished with lightweight pine tongue and groove planks to save weight and add warmth. These planks are nailed to the studs using small finish nails for a clean look.
The electrical system is run through the studs using Romex wiring and housed in shallow junction boxes. A small sub panel is installed on the first floor to manage the power distribution.
Plumbing lines are run for the kitchen and bathroom and are insulated to prevent freezing in winter. All pipes are pressure tested before the interior walls are closed up.
Common Mistakes
Many builders fail to properly level the foundation which leads to structural racking and sticking doors. A slight tilt at the base becomes a major lean by the time the second story is completed.
Underestimating the weight of the second floor often leads to sagging joists and uneven ceilings. Using 2×6 joists instead of 2×8 for the main span is a frequent error that compromises stability.
Ignoring the importance of flashing around windows leads to hidden rot in the wall plates. Water often seeps behind the siding and destroys the framing long before the owner notices the leak.
Installing insulation without a proper vapor barrier causes condensation to build up inside the walls. This moisture creates a breeding ground for mold and significantly reduces the lifespan of the lumber.
Maintenance and Safety
Regular inspections of the roof flashing and sealant should be performed every six months to prevent leaks. Any gaps in the caulking should be filled immediately to protect the internal framing.
Cedar siding requires a fresh coat of UV protective sealant every three to five years to prevent graying. This maintains the natural color and prevents the wood from cracking under intense sun.
All electrical work must be performed by a licensed professional to ensure the home meets safety codes. Fire extinguishers and smoke detectors should be installed on both the first and second floors.
When working at height on the second story always use a stable scaffolding system rather than a ladder. Safety glasses and hearing protection are mandatory when operating power saws and nail guns.