
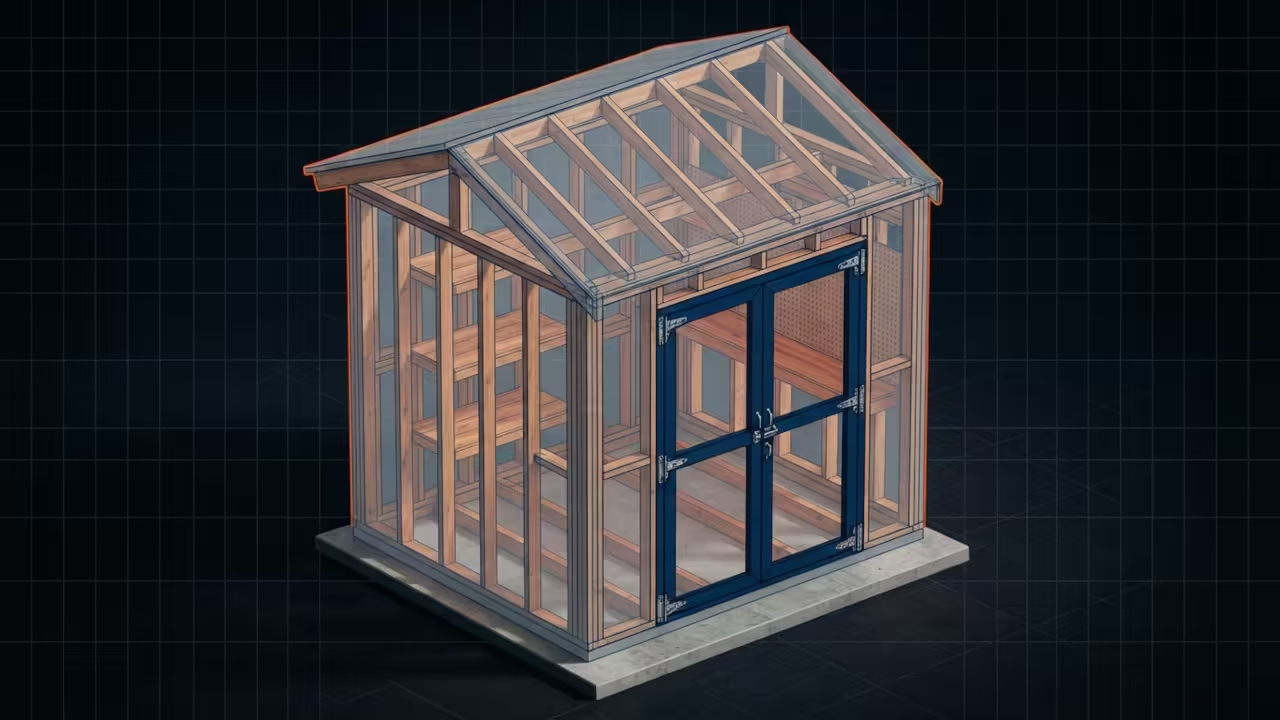
An organized garden tool storage bin transforms a chaotic backyard into a professional workspace.
It keeps expensive equipment safe from moisture and prevents tool degradation.
Homeowners often struggle with leaning tools that eventually fall or rust.
A dedicated structural vault provides the definitive solution for long term tool preservation.
Disclaimer: I may earn a commission from purchases made through these links at no extra cost to you.


Adding a permanent storage structure increases the functional value of any outdoor property.
It allows for a cleaner landscape and a more efficient gardening workflow.
Quick Specs
| Parameter | Description | Value |
|---|---|---|
| Dimensions | Overall footprint size | 48 x 24 x 60 inches |
| Estimated Cost | Total material expense | 600 to 850 USD |
| Difficulty | Required build experience | Intermediate |
| Build Time | Total active labor hours | 16 to 20 hours |
| Parameter | Description | Value |
Materials and Tools
The primary lumber consists of pressure treated 4×4 skids for the foundation.
You will need several 2×4 cedar boards for the main structural framing.
Cedar 1×6 boards are used for the exterior siding and the roof decking.
These materials provide natural rot resistance and a professional aesthetic.
Hardware includes 3 inch exterior grade deck screws and 2 inch galvanized nails.
You will also need heavy duty T hinges and a locking hasp.
Essential tools include a miter saw and a cordless drill with various bits.
A speed square and a 4 foot spirit level are required for accuracy.
You should also have a tape measure and a set of clamps for assembly.
Safety gear including goggles and a dust mask is mandatory for all users.
Technical Layout
The skeletal structure relies on a heavy duty frame of cedar 2×4 members.
These members are spaced sixteen inches on center to distribute the vertical load evenly across the base.
The base consists of pressure treated skids that isolate the cedar from ground moisture and prevent capillary action from drawing water into the frame.
This design ensures the bin remains square and stable over many seasons of use in varying climates.
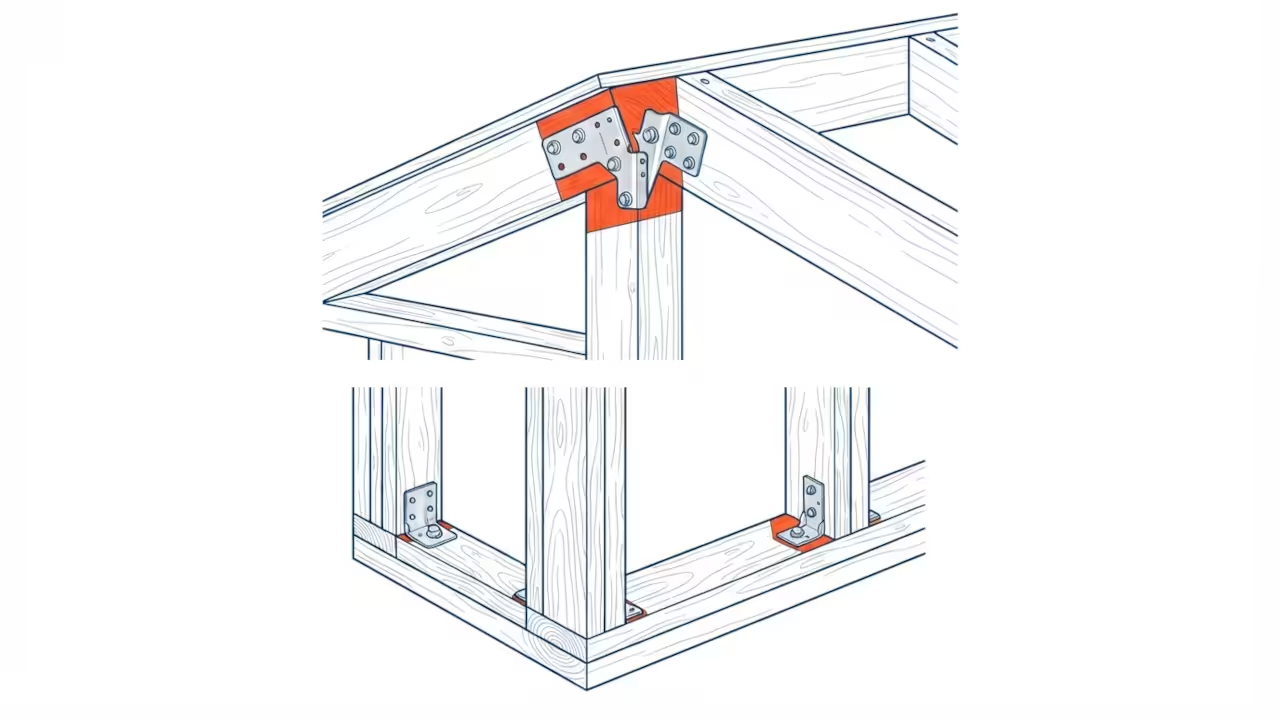
The roof is designed with a slight five degree slope to shed rainwater efficiently.
This angle prevents pooling and protects the interior tools from leaks and dampness.
The rafters are notched to lock securely into the top wall plates for maximum strength.
This mechanical connection prevents the roof from shifting during high wind events or heavy snow loads.
The structural integrity is further reinforced by the use of structural screws at every major intersection.
The side walls feature vertical studs that provide the necessary rigidity for heavy tool loads.
Each stud is connected to the top and bottom plates using pre drilled pilot holes.
This prevents the cedar from splitting while maintaining a tight structural bond.
The result is a rigid box that resists warping under extreme temperature changes.
The framing geometry is optimized to prevent racking and maintain a perfect ninety degree vertical profile throughout the build.
Step by Step Instructions
Phase 1 involves preparing the site to ensure the structure remains level.
Clear a flat area of ground and remove all large rocks or roots that could cause instability.
Lay down a layer of crushed gravel to provide a stable drainage base.
This prevents the wooden skids from sinking into the soft soil over time.
Ensure the perimeter is perfectly square before adding the foundation materials.
Phase 2 focuses on the foundation assembly using the pressure treated 4×4 skids.
Cut two skids to 48 inches and two cross members to 20 inches.
Fasten these into a rectangular frame using 3 inch exterior grade deck screws.
Ensure every corner is exactly ninety degrees using your speed square.
This base provides the critical lift required to keep the cedar away from direct earth contact.
Phase 3 requires the installation of the floor joists and the decking.
Place 2×4 joists every twelve inches across the foundation frame for maximum support.
Attach the cedar 1×6 floorboards perpendicular to the joists with galvanized nails.
Leave a small gap between boards to allow for natural wood expansion and contraction.
This spacing prevents the floor from buckling during high humidity months.
Phase 4 is the construction of the two side wall frames.
Build two identical frames using 2×4 cedar studs spaced sixteen inches apart.
Connect the studs to the top and bottom plates using pilot holes to avoid splitting the grain.
Verify that both frames are identical in height and width before proceeding to the next step.
Use a speed square to ensure all studs are perfectly plumb.
Phase 5 involves assembling the rear wall and the front support structure.
The rear wall is a solid frame that provides lateral stability to the entire bin.
The front frame includes a specific opening for the doors and a heavy header for the lid.
Fasten the side walls to the rear wall using heavy duty screws for a rigid connection.
Ensure the entire assembly is square by measuring the diagonals of the base.
Phase 6 is the installation of the roof rafters and the top ridge.
Cut the rafters with a slight miter to create the five degree slope for water runoff.
Secure the rafters to the top plates using structural screws and high quality wood glue.
This ensures the roof stays attached during heavy snow or rain loads.
Double check that the ridge is centered to avoid an uneven roofline.
Phase 7 consists of applying the exterior cedar siding to the structure.
Attach the 1×6 cedar boards horizontally across the walls and the roof.
Use a small spacer to keep the boards evenly aligned across the surface.
Ensure the siding overlaps the framing slightly to protect the interior from wind and rain.
Fasten the boards with stainless steel trim nails for a clean look.
Phase 8 focuses on the creation of the double doors and the top lid.
Build two door frames that fit snugly within the front opening of the bin.
Construct a heavy lid using 2×4 supports and cedar decking for the top surface.
Attach the lid using heavy duty T hinges for smooth and durable operation.
Ensure the lid has a slight overhang to protect the door opening from rain.
Phase 9 involves the installation of the locking hardware and final adjustments.
Mount the locking hasp to the center of the doors for secure access.
Check all fasteners to ensure they are tight and flush with the wood surface.
Sand any rough edges or corners to prevent splinters during daily tool retrieval.
Test the swing of the doors and the lift of the lid for any friction points.
Phase 10 is the application of the final protective finish and weatherproofing.
Apply a high quality clear sealant to all exterior surfaces of the cedar.
This protects the wood from UV rays and prevents the premature graying of the grain.
Allow the finish to cure for twenty four hours before moving tools inside.
Use a brush for the corners to ensure complete coverage of all joints.
Common Mistakes
Many builders forget to pre drill holes in the cedar which leads to splitting.
Cedar is a soft wood that cracks easily under the pressure of large screws.
Using interior grade screws is a frequent error that results in rapid rust.
Exterior grade fasteners are essential for any structure exposed to rain and humidity.
Neglecting to level the foundation often causes the doors to hang crookedly.
A slight slope in the base can throw off the entire geometry of the bin.
Skipping the gravel base leads to moisture wicking up through the bottom skids.
This creates a damp environment that can cause tools to rust from the bottom up.
Maintenance and Safety
Apply a fresh coat of water repellent sealant every two years to maintain beauty.
Check the hinges for rust and apply a silicone lubricant to the moving parts.
Inspect the foundation skids annually to ensure they have not shifted in the soil.
Tighten any loose screws that may have backed out due to wood shrinkage.
Always wear safety glasses when using the miter saw or the cordless drill.
Use a dust mask when sanding cedar to avoid inhaling fine wood particles.
Distribute the weight of heavy tools evenly across the floor of the storage bin.
Avoid leaning excessively heavy equipment against the side walls to prevent bowing.
Pro Tip for Longevity: Use stainless steel screws instead of galvanized ones for all cedar surfaces.
Stainless steel prevents the black streaks that often appear when galvanized metal reacts with cedar tannins.