
Introduction
Creating a Montessori floor bed for your child is one of the most rewarding woodworking projects you can undertake. This house-shaped design transforms a simple low-profile sleeping platform into an imaginative retreat that encourages independence and sparks creativity. The structure sits close to the floor, allowing toddlers to climb in and out freely while maintaining a sense of security within their own little world.
The house silhouette adds architectural charm to any childrens room while providing practical storage opportunities behind the front facade. Parents appreciate the sturdy construction and clean lines that complement modern nursery aesthetics. Children absolutely adore having their own private castle where they can retreat, read, and dream.
This project uses common lumber sizes available at any home center, keeping material costs reasonable and the build timeline manageable for a single weekend. The plans prioritize structural integrity, child safety, and timeless design over complicated joinery or specialized tools.
Quick Specs
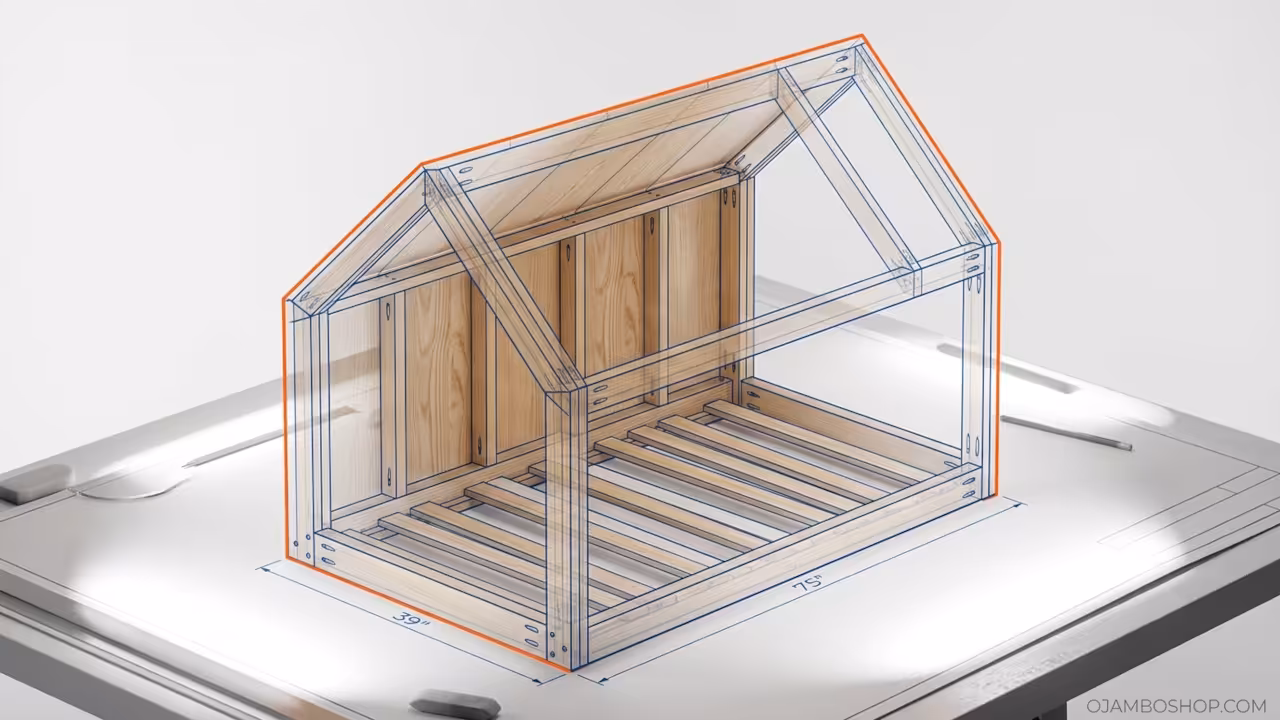
Dimensions: 54 inches wide by 78 inches deep by 48 inches tall at the peak. Estimated Cost: 180 to 250 depending on lumber availability and finish choices. Difficulty Level: Intermediate, suitable for builders with basic framing experience. Estimated Build Time: 12 to 16 hours including drying time between finish coats.
Materials and Tools
Lumber Requirements
- Two-by-four framing studs, 8 feet long, quantity of 14 pieces at select grade
- Four-by-four posts for corner supports, 6 feet long, quantity of 4 pieces
- Three-quarter-inch exterior-grade plywood for the sleeping platform, 1 sheet measuring 4 feet by 8 feet
- One-half-inch exterior-grade plywood for wall sheathing and roof panels, 2 sheets at 4 by 8 feet
- One-by-four pine trim boards for decorative edge work, quantity of 8 pieces at 8 feet each
- One-by-six tongue and groove boards for interior wall paneling, quantity of 12 pieces at 6 feet each
Hardware and Fasteners
- Two-inch wood screws, coarse thread, quantity of 200 pieces
- Three-inch structural wood screws for corner post connections, quantity of 50 pieces
- Two and one-half-inch pocket hole screws, quantity of 100 pieces
- Wood glue, premium carpentry grade, 1 quart
- Corner brackets, 3-inch galvanized steel, quantity of 8 pieces
- Cabinet hinges, 3-inch brass or stainless steel, quantity of 2 pairs
- Sandpaper, 80 grit, 120 grit, and 220 grit, 1 sheet of each
- Water-based polyurethane finish, satin sheen, 1 quart
- Safety gear including respirator mask, safety glasses, and hearing protection
Power Tools Required
- Circular saw or table saw
- Drill driver
- Orbital sander
- Pocket hole jig
- Speed square
- Tape measure
- Clamps
Technical Layout
The structural foundation of this Montessori house bed relies on a rigid rectangular perimeter frame constructed from two-by-four lumber arranged in a box configuration measuring 52 inches wide by 76 inches deep. This outer frame serves as the primary load-bearing skeleton and distributes the weight of the sleeping child evenly across all four corner posts. The two-by-four members are joined at the corners using pocket hole connections reinforced with three-inch structural screws and wood glue for maximum shear resistance.
Four corner posts made from four-by-four lumber extend vertically from each corner of the base frame to a height of 44 inches. These posts are secured to the base frame using two galvanized steel corner brackets on each face, providing rigid vertical support that prevents any lateral movement during use. The posts also serve as mounting points for the roof structure, which consists of two sloping plywood panels that meet at a central ridge beam.
The sleeping platform sits approximately 6 inches above the floor, supported by cross-braced two-by-four joists spaced 16 inches on center. This elevation provides sufficient clearance for storage bins underneath while maintaining the Montessori principle of floor-level accessibility. The three-quarter-inch plywood sleeping surface is screwed securely to the joist framework using two-inch structural screws spaced every 8 inches along each joist to prevent any flexing or squeaking during normal use.
Step-by-Step Instructions
Phase 1: Build the Base Frame
Cut four two-by-four studs to create the outer rectangle. Two pieces should measure 52 inches for the width and two pieces should measure 76 inches for the depth. Assemble the rectangle using pocket holes on the interior faces, driving two and one-half-inch pocket hole screws through each connection. Apply wood glue to all contact surfaces before driving the screws. Verify that all corners form perfect 90-degree angles by measuring both diagonals and confirming they match exactly.
Phase 2: Install Corner Posts
Cut four four-by-four posts to a length of 44 inches each. Position each post vertically at the outer corner of the base frame. Secure each post using two galvanized steel corner brackets mounted on each adjacent face of the post. Drive three-inch structural screws through the bracket holes into both the post and the base frame. Check that each post stands perfectly plumb using a level on two adjacent faces before tightening all screws fully.
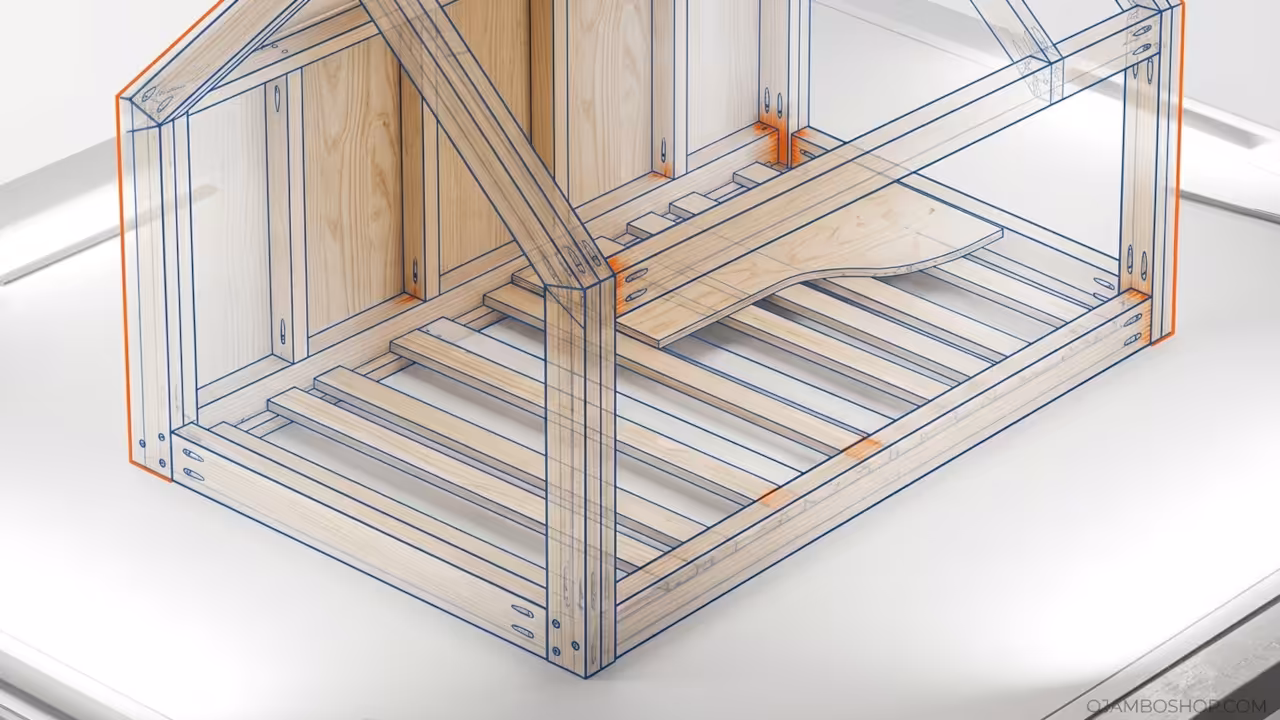
Phase 3: Construct the Sleeping Platform Joists
Cut six two-by-four joists to a length of 74 inches each. Space these joists evenly across the interior of the base frame at 16 inches on center. Screw each joist to the base frame using two two-inch wood screws at each end. Add two cross-bracing members cut from two-by-four stock at 50 inches long, running perpendicular to the main joists at the midpoint for additional rigidity. Screw these braces to the main joists using two screws at each connection point.
Phase 4: Install the Plywood Sleeping Surface
Cut the three-quarter-inch exterior-grade plywood sheet to measure 52 inches wide by 76 inches deep. Position the plywood sheet on top of the joist framework with the smooth face up. Secure the plywood using two-inch structural screws spaced every 8 inches along each joist line. Pre-drill all screw holes to prevent the plywood from splitting during installation. Countersink each screw head slightly below the wood surface for a smooth finished appearance.
Phase 5: Frame the Front Wall
Cut two two-by-four studs to 36 inches for the vertical sides of the front wall. Cut one two-by-four to 50 inches for the top horizontal member and one to 50 inches for the bottom member. Assemble this rectangle using pocket holes and two and one-half-inch screws with wood glue at all joints. Add two diagonal two-by-four braces from the bottom corners to the top center point to create the house peak shape. Cut these braces at a 45-degree angle where they meet at the peak.
Phase 6: Attach the Front Wall
Position the front wall assembly against the front edge of the base frame. Align the bottom member flush with the front edge of the base. Secure the wall using three-inch structural screws driven through the bottom member into the base frame at 12-inch intervals. Add additional screws through the vertical side members into the corner posts for maximum stability. Check for square alignment before final tightening.
Phase 7: Build and Mount the Roof Panels
Cut two pieces of one-half-inch exterior-grade plywood to form the roof. Each panel should measure 30 inches wide at the base and slope upward at a 35-degree angle to a total length of 42 inches along the slope. Cut the ridge edge at a matching angle so the two panels meet perfectly at the peak. Screw the bottom edge of each roof panel to the top of the front wall and the corner posts using two-inch screws spaced every 6 inches.
Phase 8: Add Decorative Trim and Finish
Install one-by-four pine trim boards along all exposed edges of the front wall, roof line, and sleeping platform perimeter. Cut trim pieces at 45-degree miters for clean corner transitions. Secure trim using finish nails and wood glue. Sand the entire structure starting with 80 grit, progressing to 120 grit, and finishing with 220 grit for a silky smooth surface. Apply two coats of water-based satin polyurethane, sanding lightly with 220 grit between coats. Allow 24 hours of drying time between coats and 48 hours before allowing the child to use the bed.
Common Mistakes
Skipping the diagonal measurement check during base frame assembly is the most frequent error builders make. If the diagonals do not match exactly, the entire structure will be out of square, causing the roof panels to gap at the ridge and creating an uneven sleeping surface that can shift over time. Always verify diagonal measurements before proceeding to the next phase.
Using interior-grade plywood for the sleeping platform leads to premature sagging and delamination under repeated loading. Exterior-grade plywood uses waterproof glue bonds that maintain structural integrity even in humid environments. The additional cost is minimal compared to the risk of platform failure and potential injury to your child.
Insufficient screw spacing on the plywood sleeping surface creates flex points that develop squeaks and eventually loosen over months of use. Screws spaced every 8 inches along each joist provide adequate holding power without over-fastening. Under-fastening at 12-inch or 16-inch intervals is a common cost-cutting mistake that compromises long-term durability.
Neglecting to sand between polyurethane coats results in a rough, uneven finish that feels uncomfortable against bare skin. Light sanding with 220 grit between coats removes raised wood grain and creates a perfectly smooth surface. Always vacuum or tack-cloth the surface thoroughly before applying the next coat to prevent dust particles from embedding in the finish.
Maintenance and Safety
Inspect all screw connections every three months and tighten any fasteners that have worked loose from normal use. Children apply dynamic loads through climbing, jumping, and rolling that gradually stress mechanical connections. A quick inspection with a screwdriver takes less than five minutes and prevents minor issues from developing into structural problems.
Reapply a fresh coat of polyurethane finish annually to maintain the protective barrier against moisture, stains, and wear. High-traffic areas along the sleeping platform edges and front wall contact points will show the earliest signs of finish breakdown. Spot-sanding and touch-up coats are sufficient for localized wear, while full re-coating addresses overall finish degradation.
Ensure the bed is positioned at least 3 feet away from windows, blinds with cords, and any hanging decorations to eliminate entanglement hazards. The low profile of the Montessori design minimizes fall risk, but the house structure creates vertical surfaces that could tempt climbing. Regular supervision during the initial adjustment period helps establish safe usage patterns.
Store bedding, blankets, and pillows inside the bed structure rather than piling them on the sleeping surface to maintain a clear, flat sleep area. The space underneath the platform provides excellent storage for toys and books while keeping the sleeping zone uncluttered and safe. Remove any small objects from the sleeping surface nightly to prevent choking hazards during sleep.
Pro-Tip
Use structural screws rated for outdoor applications even though this is an indoor project. These screws feature threaded shanks along their entire length and hardened steel construction that resists stripping and pull-out forces far better than standard deck screws or drywall screws. The premium fasteners cost only 15 percent more but dramatically increase the service life of every connection point, especially at the critical corner post and roof panel mounting locations where dynamic loads are highest.
Hardware Comparison Table
| Fastener Type | Diameter | Length | Best Application | Holding Power |
|---|---|---|---|---|
| Standard Wood Screw | 0.148 inches | 2 inches | General framing and trim | Moderate |
| Structural Wood Screw | 0.200 inches | 3 inches | Corner posts and load-bearing joints | High |
| Pocket Hole Screw | 0.162 inches | 2.5 inches | Blind face-to-face connections | High |
| Finish Nail | 0.098 inches | 1.5 inches | Decorative trim attachment | Low |
| Deck Screw | 0.155 inches | 2 inches | Exterior applications only | Moderate |