
A cedar greenhouse represents the ultimate intersection of aesthetic beauty and functional longevity for any serious gardener. By selecting Western Red Cedar, you are investing in a natural resistance to rot and pests that treated pine simply cannot match over time.
This structure is not just a seasonal gardening tool but a permanent enhancement to your property value and self-sufficiency. A well-built greenhouse extends your growing season by months and provides a controlled environment for delicate starters and high-yield harvests.
Our design focuses on structural rigidity and thermal efficiency to ensure your investment stands up to heavy snow loads and high winds. The combination of timber framing and modern polycarbonate ensures a professional finish that rivals expensive prefabricated kits.
Quick Specs
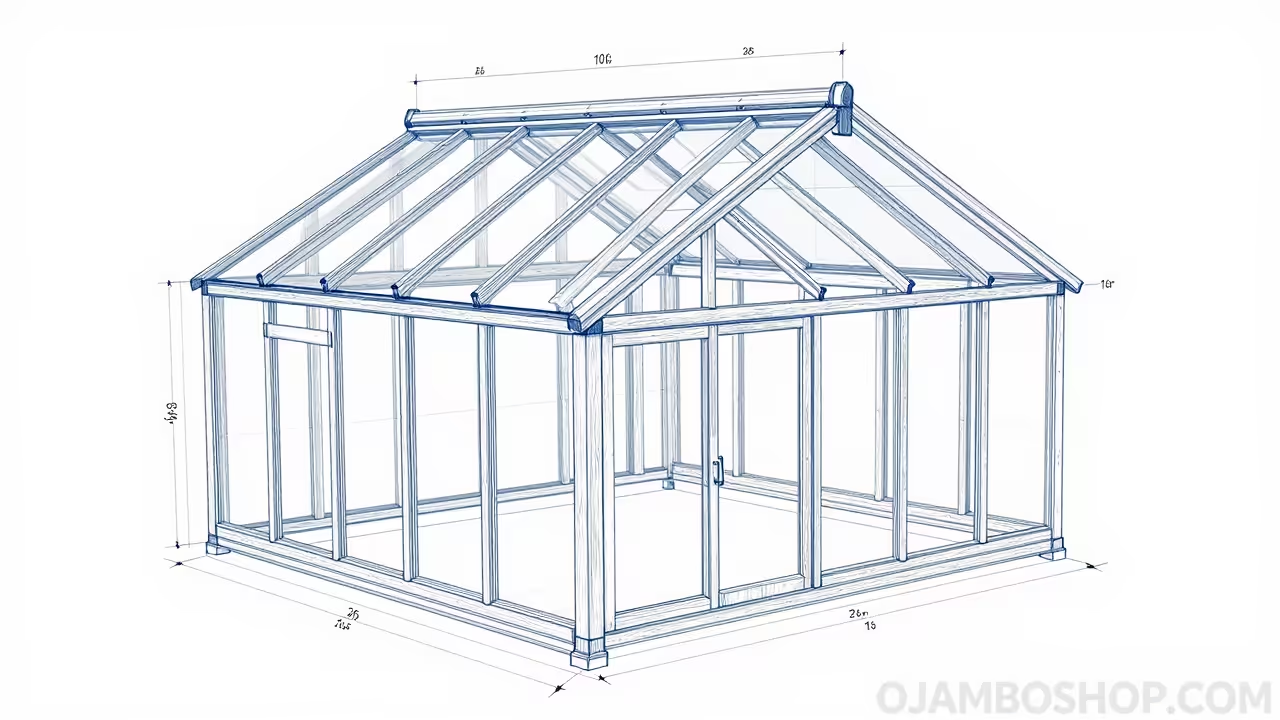
Dimensions: 8ft Width x 10ft Length x 8.5ft Peak Height
Estimated Cost: $1,200 to $1,500 depending on local lumber market rates
Difficulty Level: Intermediate – Requires basic power tool proficiency and framing knowledge
Estimated Build Time: 3 to 4 days for a two-person team
Materials and Tools
Your material choice is the single most important factor in the lifespan of this structure. We utilize 4×4 cedar posts for the foundation and 2×4 cedar for the wall framing and roof rafters. For the glazing, 6mm twin-wall polycarbonate panels offer the best balance of insulation and light transmission.
Hardware requirements include 3-inch stainless steel deck screws for the main frame and 1-inch self-tapping screws with rubber washers for the panels. You will also need heavy-duty galvanized corner brackets and a high-quality exterior wood sealant to preserve the natural cedar hue.
The tool list is standard for a serious DIY project of this scale. You must have a miter saw for precise angle cuts, a circular saw for ripping panels, and a powerful cordless drill with multiple batteries. A 4-foot level, a speed square, and a chalk line are essential for ensuring the structure remains plumb and square throughout the build.
| Material Type | Recommended Grade | Primary Use Case |
|---|---|---|
| Western Red Cedar | Appearance Grade S4S | Main framing, rafters, and door assembly |
| Twin-Wall Polycarbonate | 6mm UV-Coated | Roof and wall glazing for thermal retention |
| Stainless Steel Screws | Grade 305 or 316 | Structural fastening to prevent cedar staining |
| EPDM Washers | UV Resistant | Sealing fastener holes in polycarbonate panels |
| Pressure Treated 4×4 | Ground Contact Rated | Sub-grade foundation posts or base perimeter |
Technical Layout
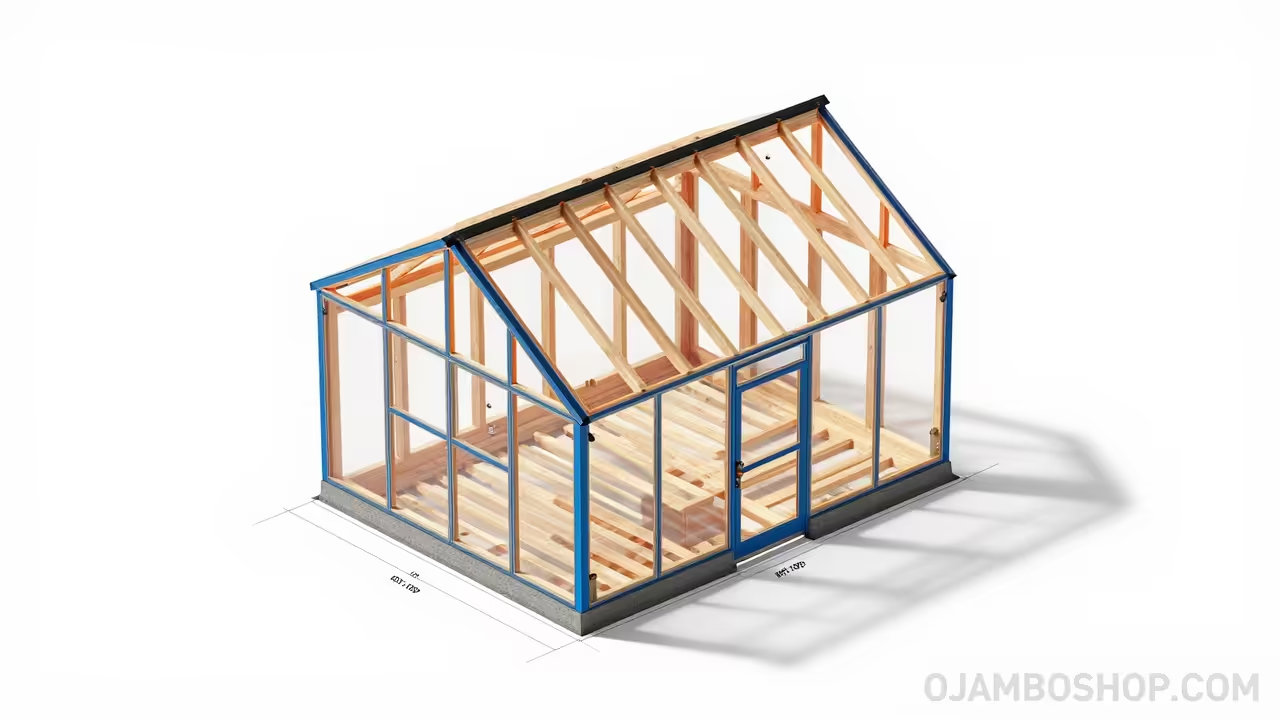
The structural integrity of this greenhouse relies on a modified post-and-beam framing system tailored for lightweight glazing. We utilize a 24-inch on-center stud spacing which aligns perfectly with standard 4-foot polycarbonate sheet widths, minimizing material waste and cutting time. The roof is designed with a 6/12 pitch, or approximately 26.5 degrees, to facilitate efficient snow shedding and water runoff in temperate climates.
Load distribution is handled by the double top plate which ties the wall segments together into a cohesive unit. Each rafter is notched with a birdsmouth cut to sit securely on the top plate, providing a larger surface area for fastening and resisting lateral forces. Lateral stability is further enhanced by the use of 1/2-inch cedar lap siding on the lower 24 inches of the walls, acting as a structural shear skin.
This lower knee wall not only adds rigidity but also protects the lower sections of the greenhouse from impact damage during gardening activities or lawn maintenance. By integrating this solid base, we create a thermal mass that helps stabilize interior temperatures during cold nights.
Step-by-Step Instructions
Phase 1: Foundation and Site Preparation
Begin by clearing a level 10ft x 12ft area to allow for a work perimeter around the finished footprint. Install a perimeter of 4×4 pressure-treated timbers leveled on a bed of compacted gravel to prevent moisture wicking into the cedar frame. Check for square by measuring the diagonals; both measurements must be identical within 1/8 of an inch before proceeding. Anchor the foundation timbers into the ground using 18-inch rebar stakes driven through pre-drilled holes.
Phase 2: Wall Framing
Cut your 2×4 cedar studs to a height of 6 feet to allow for a comfortable interior clearance. Build the long 10-foot side walls first on a flat surface, spacing studs at 24 inches on center to match your panel widths. Attach a single bottom plate and a double top plate using two 3-inch stainless steel screws per joint. Raise the walls onto the foundation and temporarily brace them with scrap wood to ensure they remain perfectly plumb.
Phase 3: End Wall and Door Header
The front end wall requires a 36-inch rough opening for a standard-sized door. Install a 2×6 header above the door opening to support the weight of the rafters and the peak of the roof. The rear wall should mirror the front wall but with a central stud instead of a door opening for added stability. Ensure all four walls are tied together at the corners with overlapping top plates to create a continuous structural loop.
Phase 4: Rafter Fabrication and Installation
Calculate your rafters for a 6/12 pitch, ensuring a 6-inch overhang beyond the side walls to protect the cedar from rain. Use a speed square to mark the plumb cuts at the ridge and the birdsmouth cuts where the rafter meets the top plate. Install a 2×6 ridge board supported by temporary vertical posts at the center of each end wall. Nail the rafters in pairs, one on each side of the ridge board, to balance the tension on the frame.
Phase 5: Knee Wall Siding
Install 2×4 blocking between the wall studs at a height of 24 inches from the base. Apply your cedar lap siding or cedar pickets to this lower section to create a solid knee wall. This adds significant shear strength to the building and prevents the structure from racking during high winds. Use 2-inch stainless steel siding nails to avoid the black streaks that standard galvanized nails can cause when reacting with cedar tannins.
Phase 6: Polycarbonate Panel Preparation
Measure the openings between your studs and rafters before cutting the polycarbonate sheets. Use a circular saw with a fine-tooth blade installed backward to achieve a clean, melt-free cut on the plastic panels. Peel back the protective film about two inches from the edges but leave the rest on to protect against scratches during installation. Identify the UV-protected side of the panel, which must face outward toward the sun to prevent yellowing and brittleness.
Phase 7: Glazing Installation
Starting with the roof, lay the panels over the rafters and secure them using 1-inch screws with EPDM rubber washers. Do not over-tighten the screws; the washer should be compressed but the panel should not be dimpled, allowing for thermal expansion and contraction. Use aluminum H-channel connectors between panels to create a water-tight seal and a professional appearance. Repeat this process for the wall sections, ensuring the ribs of the polycarbonate run vertically for optimal drainage.
Phase 8: Door and Ventilation
Construct a simple 2×4 cedar frame door and clad it with a polycarbonate panel to match the rest of the structure. Install a high-quality automatic vent opener on a roof hatch to prevent the greenhouse from overheating during peak sun hours. These wax-filled cylinders require no electricity and will automatically lift the vent when temperatures reach a specific threshold. Hang the door using three heavy-duty T-hinges and install a gate latch that can be operated from both the inside and outside.
Common Mistakes
The most frequent error in DIY greenhouses is failing to account for thermal expansion in the polycarbonate panels. Plastic expands and contracts significantly more than wood, so if you fasten the panels too tightly or fail to use oversized pilot holes, the panels will eventually crack or buckle. Always leave a 1/8-inch gap in your joinery channels to accommodate these natural shifts in size throughout the changing seasons.
Another common pitfall is neglecting the use of proper fasteners like stainless steel or high-quality coated screws. Cedar contains high levels of tannic acid which reacts with standard zinc-plated or galvanized fasteners, resulting in unsightly black streaks running down the wood. While stainless steel is more expensive upfront, it is the only way to maintain the aesthetic integrity of a cedar structure over a multi-year period.
Lastly, many builders underestimate the importance of ventilation and air circulation. A greenhouse without a roof vent can reach temperatures exceeding 120 degrees Fahrenheit even in moderate weather, which will effectively cook your plants. Ensure you have at least one roof vent and one low-level intake vent to create a chimney effect that draws cool air in and pushes hot air out.
Maintenance and Safety
Pro-Tip: To significantly increase the longevity of your cedar greenhouse, apply a breathable, UV-rated oil finish immediately after construction. Unlike film-forming stains that will eventually peel, an oil-based penetrant feeds the wood fibers and prevents the cedar from turning gray while still allowing the wood to “breathe” moisture out. Focus heavily on the end-grain sections, especially at the base of the posts, as these areas act like straws for moisture.
Always wear wrap-around safety glasses when cutting polycarbonate, as the small plastic shards can be extremely sharp and tend to fly at high velocities. When working on the roof rafters, use a sturdy A-frame ladder on a level surface and never lean your weight directly on the polycarbonate panels. Ensure your work area is free of debris and that all power cords are managed to prevent trip hazards during the framing phase.
Inspect your greenhouse every spring for loose fasteners or settled foundations. If you notice any wood-to-ground contact that was not part of the original design, clear the debris immediately to prevent rot. Periodically wash the polycarbonate panels with a mild soap and a soft cloth to remove dust and algae, which ensures maximum light transmission for your crops.