
Introduction to the Off-Grid A-Frame Lifestyle
The 400 square foot A-frame cabin represents the perfect intersection of architectural minimalism and structural efficiency. For the modern homesteader or weekend warrior, this design offers a high-yield return on investment by adding significant functional value to any rural property.
The steep roofline is not merely an aesthetic choice but a brilliant engineering solution for shedding heavy snow loads and resisting high winds. By minimizing the exterior wall surface area, you significantly reduce the long-term maintenance costs associated with traditional vertical-walled structures.
Building this cabin yourself allows for complete control over the quality of materials and the integrity of the thermal envelope. This guide provides the technical foundation required to move from a raw building site to a fully dried-in, habitable structure.
Quick Specs
Dimensions: 20 feet wide by 20 feet deep with a 24-foot peak height.
Estimated Cost: $12,000 to $18,500 depending on finish grade and local lumber prices.
Difficulty Level: Intermediate to Advanced; requires comfort with heights and heavy timber framing.
Estimated Build Time: 4 to 6 weeks for a dedicated two-person crew.
Comprehensive Materials and Tools List
Your lumber package is the backbone of this project and requires high-quality, straight-grained Douglas Fir or Hemlock for the primary structural members. You will need thirty-two 2×10 rafters at 24-foot lengths to create the signature steep-pitch roof.
The floor system relies on pressure-treated 2×12 joists spaced at 16 inches on center to support the live loads of a loft and living area. For the exterior, 5/8-inch CDX plywood provides the necessary shear strength before applying your choice of metal roofing or cedar shingles.
Hardware requirements include 10-inch structural timber screws, hurricane ties, and a significant quantity of 16d hot-dipped galvanized nails. Do not compromise on the vapor barrier; a high-performance house wrap is essential for preventing interstitial condensation within the steep wall cavities.
Essential tools include a 12-inch sliding miter saw, a high-torque circular saw, and a pneumatic framing nailer for efficiency. You will also need a laser level for the foundation, heavy-duty scaffolding, and a variety of fall-protection gear for the high-altitude rafter work.
| Material Type | Recommended Option | Benefit |
|---|---|---|
| Primary Rafters | 2×10 Douglas Fir | Superior strength-to-weight ratio |
| Floor Joists | 2×12 Pressure Treated | Rot resistance and high span capacity |
| Fasteners | GRK Structural Screws | No pre-drilling and massive pull-out strength |
| Roofing | 26-Gauge Standing Seam | Lifetime durability and superior snow shedding |
| Insulation | Stone Wool Batts | Fire resistant and excellent sound dampening |
Technical Layout and Framing Logic
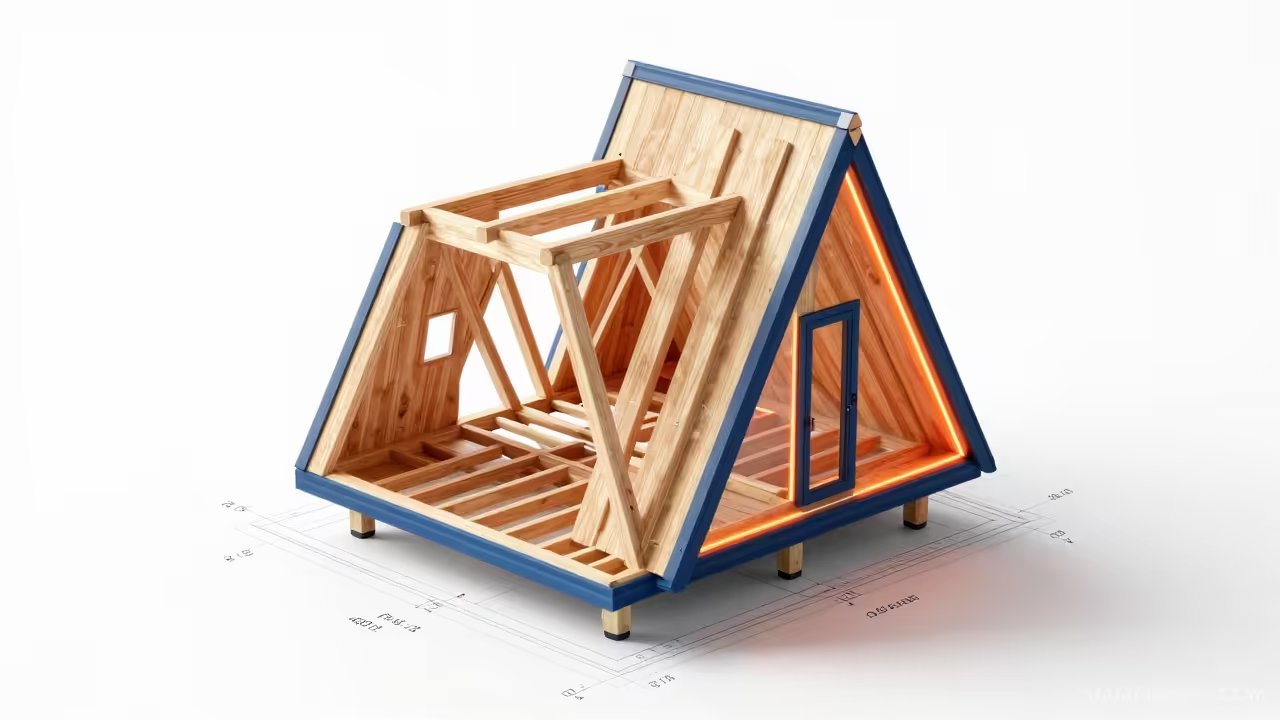
The structural integrity of an A-frame relies on the principle of the equilateral or near-equilateral triangle, where every rafter pair acts as a self-supporting truss once tied to the floor joists. In this 400 square foot design, we utilize a 60-degree roof pitch which creates a total interior height of roughly 22 feet at the center of the ridge beam. The floor joists serve a dual purpose as the bottom chord of the truss, resisting the outward thrust exerted by the heavy rafters. This eliminates the need for traditional load-bearing interior walls, allowing for an open-concept floor plan that feels much larger than its footprint suggests.
Because the rafters function as both the walls and the roof, the connection points at the sill plate and the ridge are the most critical junctions in the entire building. We utilize a birdsmouth cut at the base of each rafter to ensure full bearing on the floor platform, secured with Simpson Strong-Tie H1.81Z hurricane ties on both sides. At the peak, rafters are mitered and joined with 3/4-inch plywood gussets or a structural ridge beam depending on local snow load requirements. This creates a rigid diaphragm capable of withstanding extreme lateral forces from wind while supporting the weight of the roofing material and potential snow accumulation.

Step-by-Step Instructions
Phase 1: Site Preparation and Foundation
The longevity of your A-frame starts with a perfectly level and well-drained foundation. For an off-grid build of this scale, a thickened-edge concrete slab or a post-and-pier system is often the most cost-effective and structurally sound choice. If using piers, ensure you dig below the frost line in your specific region to prevent seasonal heaving. Once the piers are poured and the brackets are set, install your 4×12 pressure-treated beams to create the primary support grid for the cabin.
Phase 2: Floor Joist Installation
The floor system is essentially the “tension tie” for the entire structure. Install your 2×12 joists at 16 inches on center, ensuring that every joist is perfectly crown-up to prevent sagging over time. Block the joists every 8 feet to prevent twisting and to provide a solid nailing surface for the subfloor. Once the framing is complete, glue and nail 3/4-inch tongue-and-groove plywood to the joists to create a rigid working platform.
Phase 3: The Master Rafter Template
Consistency is the most important factor when cutting A-frame rafters. Create one perfect master rafter with the 60-degree peak cut and the birdsmouth seat cut at the bottom. Test this master against a second rafter on the floor to ensure the peak matches perfectly and the overall width is exactly 20 feet. Once verified, use this master as your only template for the remaining thirty rafters to ensure total uniformity.
Phase 4: Raising the Gable Ends
Raising the first and last rafter pairs is the most dangerous and rewarding part of the process. Assemble the first pair on the floor, including the temporary collar ties, and lift it into place using a winch or a large crew. Brace the gable end plumb and square in both directions using long 2x4s anchored to the ground or the floor platform. Repeat this process for the rear gable, ensuring the ridge heights are perfectly level with one another before proceeding.
Phase 5: Rafter Iteration and Ridge Connection
With the gable ends secure, install the remaining rafter pairs one by one. Use a string line stretched between the peaks to ensure every rafter is perfectly aligned with the ridge. Pro-Tip: Use 5/16-inch by 8-inch structural timber screws at the peak instead of standard nails. These fasteners provide significantly higher shear strength and will prevent the peak from opening during extreme temperature fluctuations or high-wind events.
Phase 6: Sheathing and Shear Walls
Sheathing the A-frame transforms it from a skeleton into a rigid structure. Start from the bottom and work your way up, staggering the vertical seams of your plywood sheets by at least 4 feet. Nail the sheathing every 6 inches along the edges and every 12 inches in the field to meet standard engineering codes. This plywood skin acts as a massive shear wall that prevents the cabin from racking or leaning under pressure.
Phase 7: The Thermal Envelope
In an off-grid setting, heat retention is your highest priority. Install a high-quality synthetic roof underlayment immediately after sheathing to protect the wood from moisture. Apply a layer of rigid foam insulation over the sheathing if you are building in a cold climate to create a thermal break. This prevents the wooden rafters from conducting cold air directly into the living space, which is a common flaw in older A-frame designs.
Phase 8: Roofing and Exterior Trim
Metal roofing is the gold standard for A-frames because of its weight and durability. Install 26-gauge standing seam panels, ensuring that the fasteners are properly seated with neoprene washers to prevent leaks. Install your gable end trim and soffit venting to allow for proper airflow behind the roof deck. Good ventilation is critical in an A-frame to prevent ice damming in the winter and overheating in the summer months.
Phase 9: Interior Loft and Utilities
With the structure dried in, you can frame the interior loft which typically covers half of the 400 square foot footprint. Use 2×8 joists for the loft floor, ensuring they are properly ledgered into the main rafters. Run your off-grid utilities including propane lines, DC electrical wiring, and plumbing stacks before insulating. This is the stage where you also install your high-efficiency wood stove, ensuring all clearances to combustibles are strictly followed.
Phase 10: Final Finishes and Treatment
The final phase involves installing the interior wall cladding, usually tongue-and-groove pine or cedar. This adds a layer of warmth and structural stiffness to the interior of the cabin. Seal the exterior wood trim with a high-UV penetrative oil to prevent greying and rot. Your A-frame is now ready for off-grid living, providing a durable and stylish shelter for years to come.
Common Mistakes to Avoid
The most frequent error in A-frame construction is neglecting the lateral thrust at the base of the rafters. Without proper hurricane ties and a solid connection to the floor joists, the weight of the roof can literally push the walls outward over time. Another common mistake is failing to account for the thickness of the roofing material when cutting the birdsmouth. Always calculate your cuts based on the actual dimensions of the lumber and the finished roof stack-up to ensure everything lines up at the peak.
Lastly, many builders overlook the importance of a continuous air barrier. Because A-frames have so many angled junctions, air leaks are common at the floor-to-wall transition; use high-quality expanding foam and flashing tape to seal every gap.
Maintenance and Safety Protocols
Safety is paramount when working on a 60-degree roof pitch. Always use a roof jack system and a safety harness when installing sheathing and metal panels at the higher elevations. Treat your cabin’s exterior every 3 to 5 years with a professional-grade wood preservative. Pay close attention to the bottom edges of the rafters where moisture is most likely to collect and cause premature decay.
Ensure your wood stove chimney is cleaned annually to prevent creosote buildup, which is a leading cause of structure fires in small cabins. Keep a 30-foot defensible space around your off-grid cabin to protect it from potential wildfires in wooded areas.