
Introduction to the Professional Enclosed Potting Bench
The modern backyard is more than just a patch of grass; it is a functional extension of the home. For the serious gardener, a dedicated workspace is not a luxury but a fundamental necessity for organizational efficiency.
Building an enclosed potting bench provides a centralized hub for soil management, seed starting, and tool protection. This structure prevents the common clutter associated with seasonal gardening while offering a weather-resistant environment for sensitive supplies.
Investing your time into a high-quality build adds tangible value to your property through improved aesthetics and utility. By following professional framing standards, you ensure this structure remains a staple of your landscape for decades to come.
Quick Specs
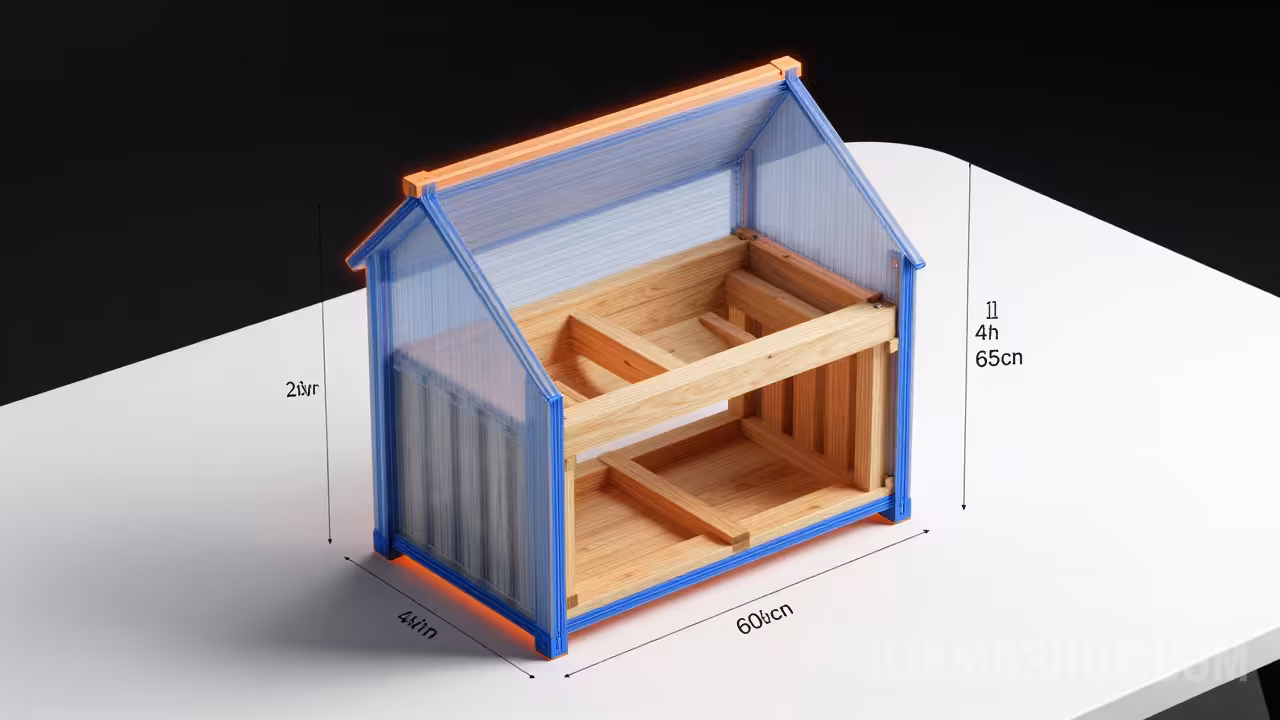
Dimensions: 60 inches Wide x 24 inches Deep x 65 inches Total Height
Work Surface Height: 36 inches (Ergonomic Standard)
Estimated Cost: $350 – $500 (Depending on Lumber Choice)
Difficulty Level: Intermediate
Estimated Build Time: 12 to 16 Hours (Spread over two days)
Materials and Tools
Quality construction begins with the right selection of raw materials and professional-grade fasteners. For this project, we recommend Western Red Cedar or Pressure-Treated Pine for their natural resistance to rot and insect infestation.
Lumber List
- 4 pieces: 4×4 x 8′ Post Grade Lumber (Main Support Legs)
- 6 pieces: 2×4 x 8′ Dimensional Lumber (Framing and Joists)
- 4 pieces: 2×2 x 8′ Balusters (Shelf Supports and Internal Cleats)
- 10 pieces: 1×6 x 8′ Tongue and Groove or Decking (Surface and Enclosure)
- 2 pieces: 1×4 x 8′ Trim Boards (Finish Work and Door Frames)
- 1 sheet: 1/2″ Exterior Grade Plywood (Optional for Interior Shelving)
Hardware and Fasteners
| Hardware Item | Specification | Primary Use |
|---|---|---|
| Structural Screws | 3-inch Ceramic Coated | Main Frame Assembly |
| Trim Nails | 1.5-inch Stainless Steel | Exterior Siding and Trim |
| Door Hinges | 3.5-inch T-Strap Black | Enclosure Door Swing |
| Magnetic Catch | Heavy Duty Exterior | Securing Enclosure Doors |
| Wood Glue | Waterproof (Titebond III) | All Joint Connections |
Required Tools
A successful build requires a standard suite of woodworking tools including a miter saw for precise cross-cuts and a circular saw for ripping panels. You will also need a cordless drill/driver set, a 4-foot level to ensure structural integrity, and a speed square for checking 90-degree transitions.
Technical Layout and Framing
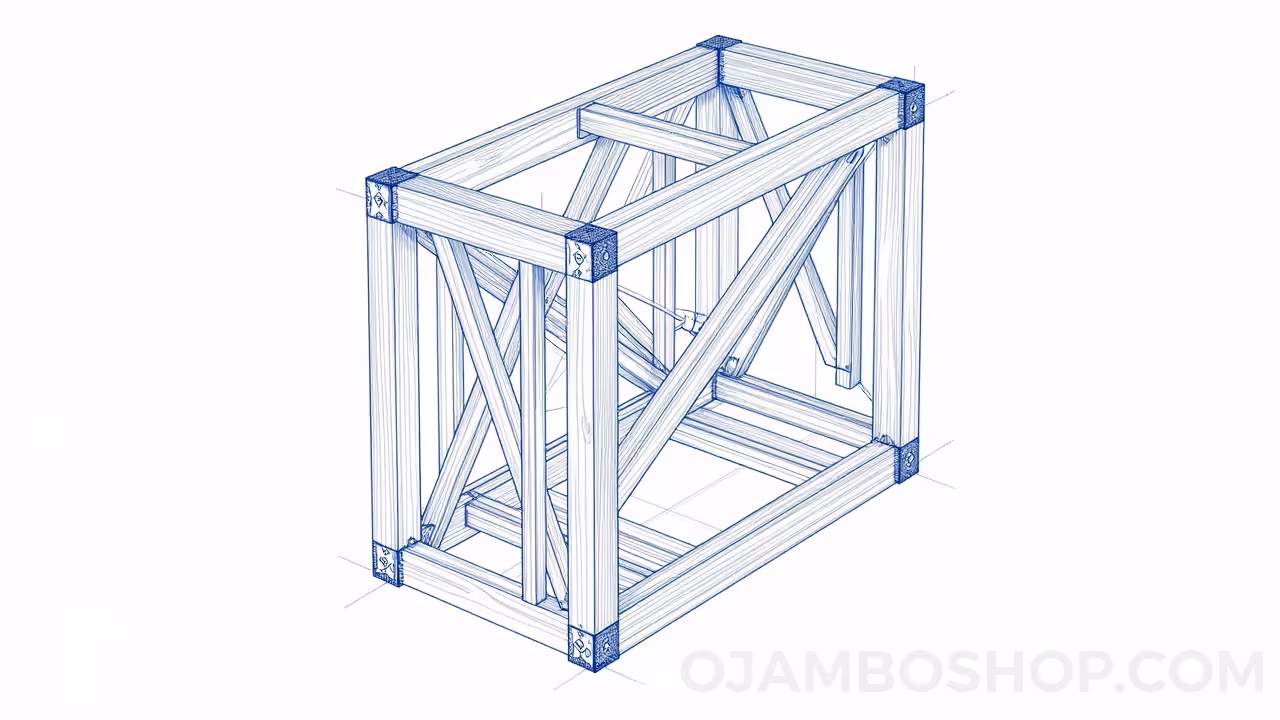
The structural integrity of the Enclosed Potting Bench relies on a classic post-and-beam architecture modified for a smaller footprint. We utilize 4×4 posts as the primary vertical members because they provide a stable foundation that resists racking under the weight of heavy ceramic pots and saturated soil. The horizontal work surface is supported by a 2×4 “box frame” that is notched into the posts or secured with structural lags to ensure the load is transferred directly to the ground.
Because this bench is an enclosed design, the rear and side walls act as shear panels once the siding is applied. This creates a rigid box effect that prevents the bench from wobbling over time. The roof pitch is set at a 15-degree angle to ensure proper water runoff while maintaining a compact profile against a fence or house wall. All weight-bearing joints are reinforced with waterproof wood glue and staggered fastener patterns to prevent splitting along the grain of the cedar.
Step-by-Step Instructions
Phase 1: Foundation and Post Preparation
Begin by cutting your four 4×4 posts to their required lengths, accounting for the 15-degree slope at the top for the roofline. The front posts should stand at 60 inches while the rear posts reach 65 inches to create the necessary pitch for drainage. Use a miter saw to ensure these angles are consistent across both sets of legs. Once cut, mark the height for the main work surface at exactly 36 inches from the bottom of each post.
Phase 2: Building the Main Work Frame
The work frame is a 60-inch by 24-inch rectangle constructed from 2×4 lumber. Measure and cut two long rails at 57 inches and three joists at 21 inches to account for the thickness of the material. Assemble the frame using 3-inch structural screws, placing one joist in the center for added support. Check for square by measuring the diagonals; they must be identical before you proceed to the next step.
Phase 3: Attaching the Frame to the Posts
Position the assembled work frame between the 4×4 posts at your 36-inch marks. Use clamps to hold the frame in place while you pre-drill holes to prevent the wood from splitting. Drive two 3-inch screws through the frame into each post, ensuring the entire assembly remains level. This frame defines the footprint of your bench and provides the base for the enclosed storage area below.
Phase 4: Constructing the Lower Storage Base
Repeat the framing process for a lower shelf located 6 inches above the ground. This lower frame adds significant lateral stability to the legs and serves as the floor for your enclosed cabinet. Cut and install 2×2 cleats along the inner perimeter of this frame to support the flooring material. Ensure this lower shelf is perfectly parallel to the upper work surface to keep the enclosure doors aligned.
Phase 5: Installing the Work Surface and Flooring
Cut your 1×6 decking boards to 60-inch lengths for the main work surface. Install them across the top frame, leaving a 1/8-inch gap between boards for debris to fall through during gardening tasks. For the lower enclosure floor, use solid plywood or tightly fitted boards to prevent pests from entering the storage area. Secure all surface boards with 2-inch stainless steel trim nails for a clean, professional appearance.
Phase 6: Siding the Enclosure
Apply the 1×6 tongue and groove boards to the sides and rear of the bench. Start from the bottom and work your way up, ensuring each board is level before nailing it into the 4×4 posts. The rear siding should extend from the bottom shelf all the way to the top of the rear posts. This creates a solid backboard that protects your tools from driving rain and wind.
Phase 7: Framing and Hanging the Doors
Measure the front opening of the lower storage area and subtract 1/2 inch from the total width and height for clearance. Build two simple door frames using 1×4 lumber and skin them with the same siding used for the walls. Attach the T-strap hinges to the doors first, then hold them in place with shims to maintain a consistent gap. Screw the hinges into the 4×4 posts and install the magnetic catches to keep the doors closed.
Phase 8: Installing the Sloped Roof
The roof is the final structural component that protects the entire unit. Install three 2×4 rafters across the top of the posts, spanning from front to back. Cover these rafters with 1×6 boards or a solid piece of exterior plywood topped with metal flashing or shingles. Ensure the roof overhangs the front and sides by at least 2 inches to direct water away from the cabinet doors.
Common Mistakes to Avoid
One frequent error is failing to use stainless steel or ceramic-coated fasteners. Standard interior screws will react with the tannins in cedar or the chemicals in pressure-treated lumber, leading to unsightly black streaks and eventual structural failure. Always invest in high-quality, exterior-rated hardware to ensure the longevity of your build.
Another mistake is neglecting to pre-drill pilot holes when working near the ends of boards. Even durable softwoods like cedar are prone to splitting when a large fastener is driven into the end grain. Taking the extra thirty seconds to drill a pilot hole will maintain the aesthetic integrity of your trim and framing.
Builders often forget to level the ground before beginning the assembly process. If the foundation is uneven, the entire structure will rack, causing the doors to bind and the roof to sit crooked. Use concrete pavers or a gravel bed to create a stable, level base before standing up your 4×4 posts.
Pro-Tip for Structural Longevity
To significantly extend the life of your potting bench, apply a coat of end-grain sealer to the bottom of the 4×4 posts. The end grain of a post acts like a bundle of straws, wicking moisture up from the ground into the heart of the wood. By sealing these ends or using “post feet” to elevate the wood slightly off the surface, you prevent the primary cause of rot in outdoor structures.
Maintenance and Safety
Safety should always be your primary concern during the construction phase. Always wear impact-resistant safety glasses when using power saws and a dust mask when cutting pressure-treated lumber to avoid inhaling chemical-laden sawdust. Maintain a clean workspace to prevent tripping hazards, especially when handling long lengths of 4×4 lumber.
To maintain the bench, apply a high-quality UV-rated transparent stain every two to three years. This prevents the wood from turning grey and helps maintain the natural oils that repel water. Regularly check the door hinges for signs of rust and apply a silicone-based lubricant to keep the movement smooth and silent throughout the seasons.