
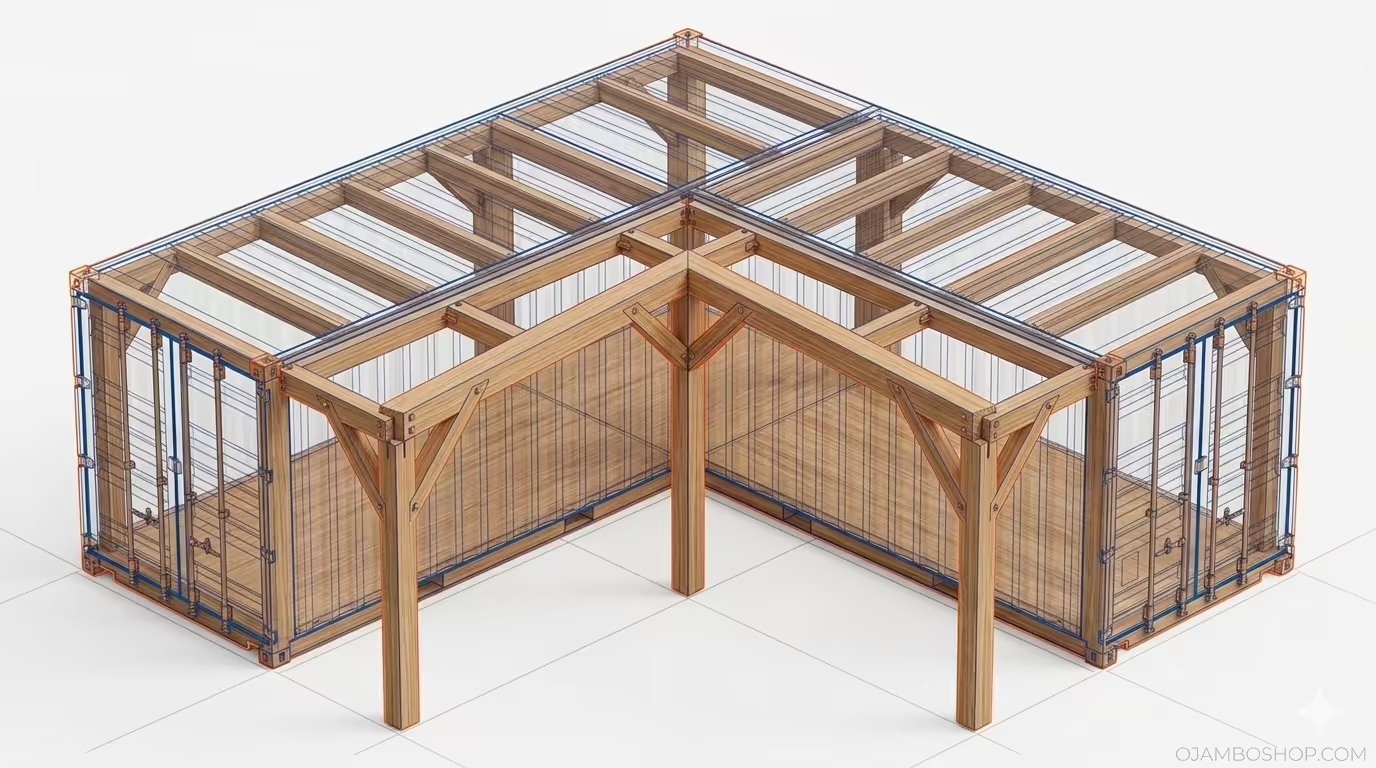
The Evolution of the L-Shaped Multi-Container Layout
The rise of the small living movement has transformed how we perceive residential architecture and property value. By utilizing two 40-foot high-cube shipping containers in an L-shaped configuration, builders can create a functional 640 square foot living space that rivals traditional stick-built homes. This layout provides a natural separation between private quarters and communal areas, making it a superior choice for modern backyard ADUs or primary residences.
Investing in a container-based structure offers more than just aesthetic appeal; it provides a fortress-like durability that standard timber framing cannot match. The Corten steel shells are designed to withstand extreme maritime environments, ensuring your home remains structurally sound for decades. When executed correctly, this project significantly increases property equity while maintaining a compact, sustainable footprint that appeals to eco-conscious homeowners.
Successfully completing an L-shaped build requires a blend of metal fabrication and traditional carpentry skills. As a master carpenter, I have seen these projects fail due to poor planning, but those who follow a rigid technical protocol find the process incredibly rewarding. This guide is designed to take you from a raw dirt lot to a fully finished, high-performance home that stands the test of time and weather.
Quick Specs
Dimensions: 40 feet by 32 feet (L-Configuration)
Estimated Cost: $35,000 to $55,000 (Excluding Land)
Difficulty Level: Advanced / Professional DIY
Estimated Build Time: 4 to 6 Months
Materials and Tools
Your material list is the backbone of the project, and quality should never be sacrificed for price in a structural build. You will need two 40-foot high-cube containers, ideally “one-trip” units to ensure the steel is free of significant rust or structural warping. For the interior, procure 2×4 kiln-dried studs for non-load-bearing walls and 2×6 pressure-treated lumber for any exterior decking or transitional roofing components.
The hardware requirements are extensive and include 1/2-inch anchor bolts for the foundation, self-tapping metal screws for framing, and high-performance closed-cell spray foam insulation. You will also need specialized marine-grade caulking and structural adhesive to seal the joint where the two containers meet. Ensure you have a surplus of 5/8-inch moisture-resistant drywall and luxury vinyl plank flooring to handle the high-traffic demands of a 640 square foot space.
Regarding tools, a standard carpentry kit will not suffice for the heavy-duty demands of container modification. You must have an 18-inch plasma cutter or a heavy-duty angle grinder with a minimum of fifty reinforced cutting discs for window and door apertures. A MIG welder is essential for reinforcing the structural headers once the corrugated steel walls are removed. Additionally, you will need a rotary laser level, a 12-inch miter saw, a cordless impact driver, and a pneumatic framing nailer.
Technical Layout and Structural Reinforcement
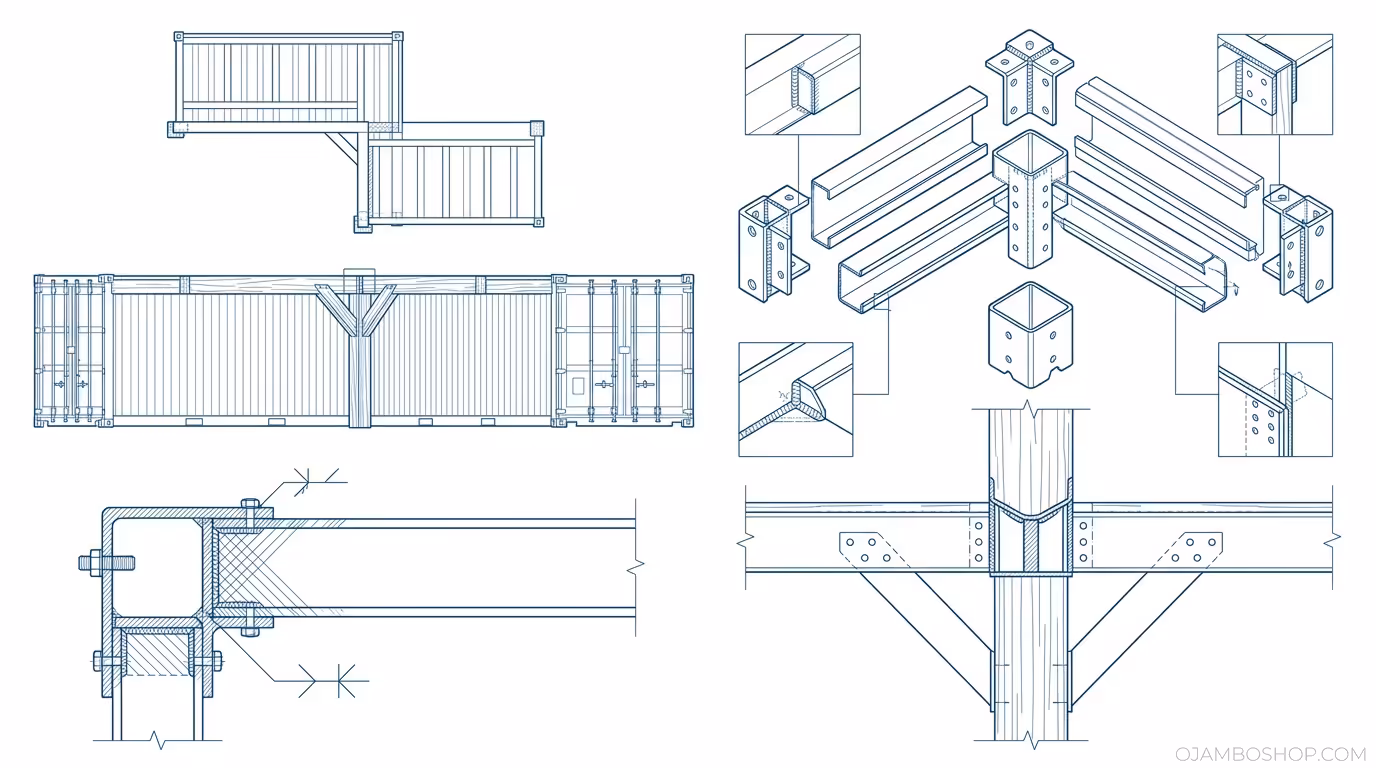
The technical success of an L-shaped container layout hinges entirely on the structural integrity of the corner intersection. When you remove a 40-foot section of corrugated steel to join the two units, you are effectively removing the vertical load-bearing capacity of that wall. To compensate for this loss, a heavy-duty steel C-channel or I-beam must be welded across the top rail of the opening. This beam transfers the roof load to the corner castings, which are the only points designed to carry weight in a shipping container.
Furthermore, the floor joists at the intersection must be mechanically tied together to prevent independent shifting or “racking” of the two units. We utilize a custom-fabricated steel plate system that bolts through the bottom rails of both containers, creating a unified diaphragm. This prevents the common issue of drywall cracking at the seam during seasonal temperature fluctuations. The interior framing must be decoupled from the steel skin by 1/4 inch using foam gaskets to minimize thermal bridging and acoustic vibration. By treating the two containers as a single monolithic structure, you ensure that the L-shape remains rigid even under high wind loads or seismic activity.
Step-by-Step Instructions
Step 1: Foundation and Site Preparation
The foundation is the most critical phase because a container that is out of level by even 1/4 inch will cause doors to bind and windows to leak. For an L-shaped 640 square foot layout, I recommend a reinforced concrete pier foundation at every corner casting and at the junction points. Excavate below the frost line in your region to prevent seasonal heaving from throwing the containers out of alignment. Once the piers are poured and cured, use a rotary laser level to ensure all mounting plates are perfectly planar across the entire 40×32 foot footprint.
Step 2: Container Placement and Squaring
Hiring a professional crane operator is non-negotiable for placing the two 40-foot units precisely onto your foundation pins. Position the first container (Unit A) and secure it to the anchors before swinging the second container (Unit B) into the 90-degree perpendicular position. Use heavy-duty come-alongs and bottle jacks to micro-adjust the units until the gap between them is uniform from top to bottom. Once squared, tack-weld the corner castings together to prevent any movement during the subsequent cutting and framing phases.
Step 3: Cutting and Structural Reinforcement
Mark your openings for the interior pass-through, windows, and the main entry door using a chalk line and a square. Use your plasma cutter to remove the corrugated steel panels, making sure to leave at least 4 inches of the original top rail intact for welding. Immediately after cutting the large interior opening, install your steel headers and vertical supports to prevent the roof from sagging under its own weight. This is the stage where you must be most diligent with your welds, ensuring full penetration and grinding them smooth to prevent future oxidation.
Step 4: Exterior Weatherproofing and Sealing
The seam where the two containers meet is the most common point of failure for DIY builders. Use a combination of backer rod and high-movement polyurethane sealant to fill the gap before welding a steel transition strip over the joint. Apply a marine-grade epoxy primer to all raw metal edges created during the cutting phase to prevent rust from forming under your exterior finish. If you plan on adding a secondary roof pitch, install your flashing and drip edges now to ensure the structure is shed-ready before interior work begins.
Step 5: Interior Framing and Thermal Breaks
Framing the interior of a container requires a different approach than traditional residential construction. We use 2×4 lumber or light-gauge steel studs, but we never fasten them directly to the exterior steel skin without a thermal break. Install 1/2-inch foam strips between the studs and the metal to prevent heat transfer, which otherwise leads to condensation and mold. Ensure your layout accounts for the 640 square foot limit, optimizing for an open-concept kitchen and living area in the long axis of Unit A.
Step 6: Rough-In Plumbing and Electrical
Run your electrical conduits and PEX plumbing lines through the center of your framed walls to keep them protected. Since you cannot easily run utilities through the steel floor, most builders utilize a “wet wall” configuration where all plumbing stays on one side of the structure. Use metal electrical boxes and ensure all wiring is shielded, as the steel container acts as a giant conductor if a wire ever chafes. Once the rough-in is complete, have a certified inspector check your work before you seal the walls with insulation.
Step 7: Insulation and Vapor Barrier
Closed-cell spray foam is the gold standard for container living because it provides a high R-value and acts as a built-in vapor barrier. Apply at least 2 inches of foam directly to the interior steel walls, ensuring every corrugation is filled and sealed. This prevents “sweating” where warm interior air meets the cold steel shell, which is the primary cause of structural rot in metal buildings. Once the foam has expanded and cured, shave off the excess so that it is flush with your framing members for drywall installation.
Step 8: Interior Finishes and Flooring
Install your 5/8-inch drywall using standard techniques, but use an elastic mud compound at the junction where the two containers meet to allow for minor expansion. For the flooring, a luxury vinyl plank is ideal because it is waterproof and can handle the slight flex of a container floor. Install your cabinetry and fixtures, ensuring all heavy items are anchored directly into the wall studs rather than just the drywall. This ensures that the interior remains stable and the 640 square feet of space feels like a premium residential environment.
Step 9: Exterior Cladding or Painting
Depending on your budget, you can either paint the steel with a high-reflectivity elastomeric coating or install wood siding over a furring strip system. If you choose siding, ensure there is a 1-inch air gap between the steel and the cladding to allow for drainage and ventilation. This “rain screen” system protects the metal from direct sun exposure and helps regulate the interior temperature. Finally, install your exterior lighting and any decking to bridge the gap between the L-shaped wings of the home.
Common Mistakes to Avoid
The most frequent error I see is the failure to properly reinforce the roof after cutting large openings for windows or doors. Without a header, the roof will eventually bow, leading to standing water and catastrophic leaks that are difficult to repair. Another mistake is using fiberglass batt insulation, which allows moisture to reach the steel skin and causes hidden rust. Finally, many builders forget to account for the “racking” of the containers, leading to a structure that is not perfectly square and causing lifelong issues with door operation.
Material Comparison Table
| Component | Professional Choice | Budget Alternative | Longevity |
| :— | :— | :— | :— |
| Insulation | Closed-Cell Spray Foam | Rigid Foam Boards | 50+ Years |
| Interior Studs | Light-Gauge Steel | Kiln-Dried 2×4 Pine | 40+ Years |
| Exterior Sealant | Polyurethane Marine Grade | Standard Silicone | 15+ Years |
| Floor Coating | Luxury Vinyl Plank (LVP) | Painted Plywood | 20+ Years |
| Structural Header | Steel I-Beam | Double-Stacked C-Channel | 75+ Years |
Pro-Tip for Structural Longevity
To ensure your L-shaped build lasts a lifetime, you must address the galvanic corrosion that occurs when dissimilar metals or treated lumber touch the steel container. Always use a high-quality rubberized flashing tape or EPDM gasket as a physical barrier between your pressure-treated exterior wood and the Corten steel. The chemicals in pressure-treated wood, specifically copper, will aggressively corrode the container walls if moisture is present. By isolating these materials, you prevent the electrochemical reaction that leads to premature rust-through in your structural channels.
Maintenance and Safety
Maintaining a 640 square foot container home is straightforward but requires a biannual inspection of the roof and corner castings. Check for any signs of paint failure or rust spots and treat them immediately with a wire brush and a zinc-rich primer. Keep the gutters and drainage paths clear of debris to prevent water from pooling against the bottom rails of the unit. Proper maintenance ensures that your investment continues to appreciate and remains a safe environment for your family.
Safety is paramount during the build process, especially when using plasma cutters and welders in a confined metal space. Always wear a respirator to protect yourself from the toxic fumes released when cutting through the original container paint. Keep a fire extinguisher within reach at all times, and never cut into the steel without a spotter nearby to watch for hot sparks. Use heavy-duty work gloves and eye protection throughout every phase of the construction to avoid common site injuries.