
The Architectural Value of a Cedar Garden Gazebo
Adding a 10×10 cedar garden gazebo to your property is an investment that transcends simple landscaping. This structure acts as an outdoor sanctuary that defines the aesthetic character of your entire backyard environment.
Cedar is prized by master carpenters for its internal tannins which provide a natural defense against rot and decay. A well-constructed gazebo offers a functional space for family gatherings while simultaneously increasing the market appeal of your home.
By choosing a 10×10 footprint, you are selecting the most versatile dimension for residential construction. It provides ample room for a six-person dining set or a comfortable lounge area without crowding the surrounding garden beds.
Constructing this project yourself allows for a level of structural over-engineering that retail kits simply cannot match. You will gain a deep understanding of timber framing and joinery while creating a centerpiece that will last for decades.
Quick Specs
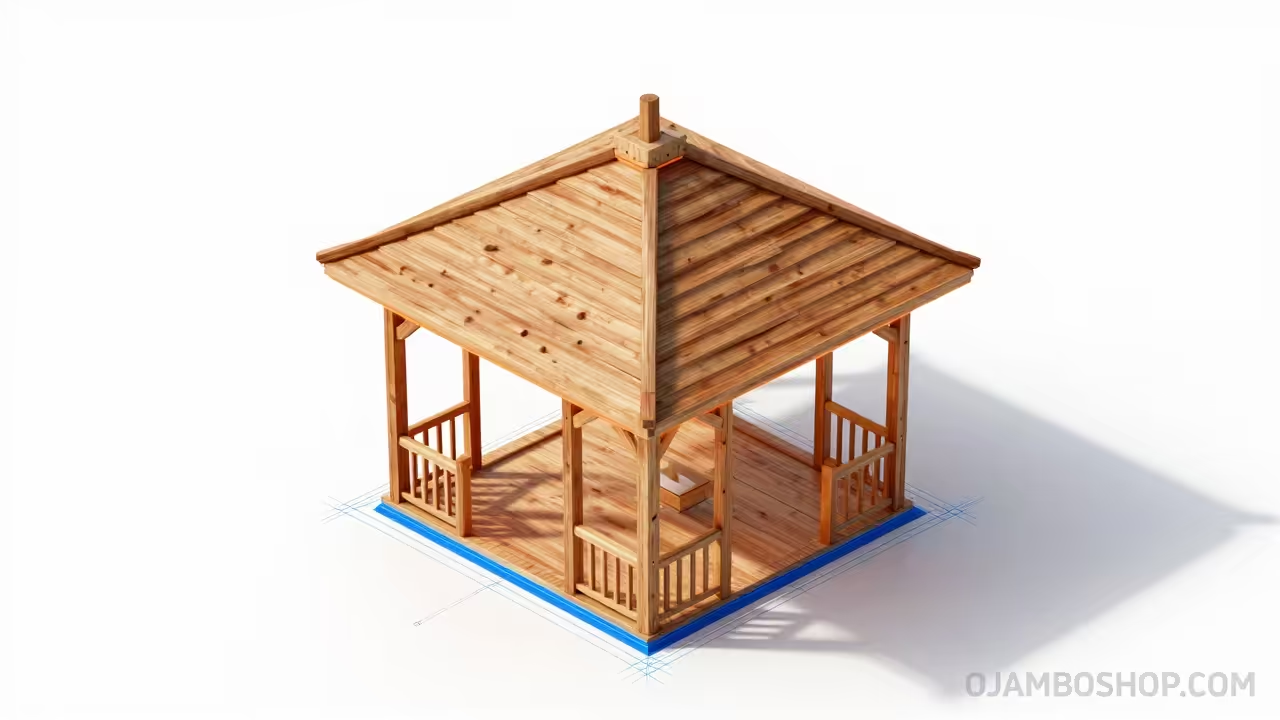
The footprint of this structure is a perfect square measuring 120 inches by 120 inches. This size is ideal because it minimizes lumber waste as many cedar boards are sold in ten-foot increments.
The estimated material cost ranges between 1,800 and 2,600 dollars depending on the grade of cedar and the roofing material. Investing in high-quality stainless steel hardware will increase the initial cost but drastically reduce long-term maintenance needs.
This project is rated as an advanced-intermediate build due to the complexity of the hip roof rafters and compound miter cuts. A dedicated DIY builder can expect to complete the framing and roofing over the course of three to five weekends.
Materials and Tools
Lumber List:
* Eight 4x4x10 Western Red Cedar Posts (to be doubled or used as singles)
* Four 2x8x10 Cedar Boards for the primary header beams
* Four 2x8x10 Cedar Boards for the secondary interior header beams
* Eight 2x6x12 Cedar Boards for the primary hip and common rafters
* Twelve 2x4x10 Cedar Boards for jack rafters and structural bracing
* Fifty 1x6x12 Cedar Tongue and Groove boards for the roof deck
* Four 1x8x12 Cedar Boards for the exterior decorative fascia
* One 6x6x2 Cedar block for the central king post hub
| Hardware Item | Material Finish | Primary Application | Longevity Rating |
|---|---|---|---|
| Structural Screws | Stainless Steel | Post-to-beam and rafter-to-plate joins | Extreme |
| Coated Deck Screws | Ceramic Green | General bracing and non-load-bearing trim | High |
| Common Nails | Hot-Dipped Galvanized | Roof decking and thin trim boards | Moderate |
| Hex Bolts | Zinc Plated | Not recommended for cedar due to tannin staining | Low |
Essential Tool List:
* Sliding Compound Miter Saw with a 12-inch blade
* High-torque Impact Driver with various hex and star bits
* 4-foot and 2-foot professional spirit levels
* Heavy-duty 100-foot chalk line for site layout
* Speed square and a large steel framing square
* Two 8-foot A-frame ladders for overhead assembly
* Power planer for smoothing out any uneven joint transitions
Technical Layout
The technical foundation of a 10×10 gazebo relies on the principles of a post-and-beam skeleton designed to manage both vertical compression and lateral shear. In this specific blueprint, we utilize a double-header system where the 4×4 vertical posts are sandwiched between two 2×8 horizontal beams. This creates a structural “shoulder” that allows the weight of the roof to be transferred directly down the grain of the post rather than relying solely on the shear strength of the fasteners. By locking the headers in place with 6-inch stainless steel through-bolts, the frame becomes a rigid box that resists the natural tendency of wood to twist over time.
The roof system is a classic hip design with a 6:12 pitch, which translates to a 26.5-degree slope. This angle is steep enough to shed heavy rain and snow efficiently while remaining low enough to allow for safe installation by a DIY builder. Each rafter is notched with a “birdsmouth” cut where it meets the top plate, providing a flat bearing surface that prevents the roof from sliding outward under pressure. The central king post acts as the compression hub for the entire upper assembly, ensuring that the four hip rafters meet at a perfect mathematical point.

Step-by-Step Instructions
Step 1: Site Layout and Footing Excavation
The first phase of the build is the most critical for ensuring the structure does not lean or sink over time. Use batter boards and mason string to mark the four corners of your 10×10 square, checking the diagonals to ensure they are identical.
Dig four holes at the corner locations to a depth that exceeds the local frost line to prevent seasonal heaving. Fill these holes with high-strength concrete and insert adjustable galvanized post bases while the mixture is still wet.
Use a long straight-edge board and a level to verify that all four post bases are at the exact same elevation. Even a quarter-inch difference at the base can result in significant alignment issues once you reach the roof peak.
Step 2: Preparing and Setting the Cedar Posts
Select your straightest 4×4 cedar posts and trim them to a uniform height of 96 inches for a standard ceiling clearance. Treatment of the bottom end-grain with a wax-based sealer is recommended to prevent moisture wicking from the concrete.
Lift the posts into the galvanized bases and secure them loosely with temporary 2×4 braces driven into the ground. Use your level to ensure the posts are perfectly plumb on all four sides before tightening the base bolts.
Double-check the distance between the posts at both the top and the bottom to ensure the structure remains a perfect square. If the posts are flared outward or leaning inward, the header beams will not seat properly in the next phase.
Step 3: Installing the Double-Header System
Measure and cut your 2×8 cedar headers to exactly 120 inches, ensuring the ends are cut at a crisp 90-degree angle. Position the first header against the outside of the posts so the top edge is flush with the top of the post.
Clamp the header in place and verify it is level before driving three 4-inch structural screws through the beam and into the post. Repeat this process for the interior header on the opposite side of the same posts.
This sandwiching technique creates a massive amount of surface area for the roof load to rest upon. Complete this process for all four sides of the gazebo until you have a continuous double-beam perimeter encircling the vertical posts.
Step 4: Cutting the Master Hip Rafters
The hip rafters are the backbone of the roof and require precise compound miter cuts at 45 degrees for the cheek and 26.5 degrees for the pitch. Start by cutting one master rafter and testing its fit against the king post and the corner of the header.
Once the fit is perfect, use this master rafter as a template to cut the remaining seven rafters to ensure complete uniformity. Label each rafter to keep track of your cuts as you prepare for the assembly phase.
Pro-Tip: When working with cedar, always pre-drill your holes near the ends of the boards to prevent the wood from splitting. Cedar is a softwood with a straight grain that is prone to cracking when large diameter screws are driven near the edge.
Step 5: Raising the Roof Hub
The king post assembly requires at least two people to ensure safety and accuracy during the initial lift. Mount the 6×6 king post hub to the first two opposing hip rafters while they are still on the ground.
Lift this “A-frame” section into place, resting the rafter tails on the corners of the header beams. Have an assistant hold this steady or use a temporary vertical support post to keep the peak centered and level.
Install the remaining two hip rafters to create the four-way pyramid shape that defines the gazebo roof. Once these four corners are locked in, the structure becomes incredibly stable and the temporary supports can be safely removed.
Step 6: Installing Jack Rafters
Jack rafters fill the gaps between the hip rafters and the headers, providing the necessary support for the roof decking. These rafters require a compound miter cut where they meet the hip rafters at a 45-degree angle.
Space the jack rafters at 24 inches on-center to provide a balance between structural strength and material efficiency. Secure the bottom of each jack rafter to the header using metal hurricane ties for maximum wind resistance.
Check the plane of the roof by laying a straight board across the rafters; it should touch every rafter without any gaps. If a rafter is sitting too high, use a power planer to shave it down until the roof surface is flat.
Step 7: Applying the Tongue and Groove Decking
The roof decking is what gives the gazebo its high-end architectural feel from the inside looking up. Start at the bottom eave and install the 1×6 tongue and groove boards with the finished side facing downward.
Blind-nail the boards through the tongue at a 45-degree angle so that no nail heads are visible from the ground. This creates a clean, seamless wood ceiling that highlights the natural beauty of the western red cedar.
Trim the boards at the hips so they meet in a clean line, leaving a small gap for the hip flashing to be installed later. Work your way methodically toward the peak, ensuring each row is level and tightly seated into the previous one.
Step 8: Fascia and Corner Bracing
Install the 1×8 cedar fascia boards around the perimeter of the roof to hide the rafter tails and the edges of the decking. Miter the corners of the fascia at 45 degrees to create a professional, furniture-grade finish.
Cut eight decorative knee braces from 4×4 cedar at 45-degree angles to install at each post-to-header junction. These are not merely decorative; they provide the essential lateral bracing that prevents the structure from swaying in high winds.
Fasten the braces using countersunk structural screws, and fill the holes with cedar plugs for a hidden fastener look. This step adds a massive amount of rigidity to the frame and completes the classic gazebo silhouette.
Step 9: Finishing the Roof Surface
Install a high-temperature ice and water shield over the entire wood deck to provide a secondary layer of waterproofing. This is especially important for cedar roofs where moisture can sometimes seep through the primary roofing material.
Install your chosen roofing, such as cedar shakes or architectural shingles, following the manufacturer’s specific overlap requirements. Ensure that metal flashing is used on all four hips to prevent water from penetrating the mitered wood joints.
Finish the peak with a custom metal ridge cap or a decorative wooden finial to give the structure a focal point. A properly sealed roof peak is the most important factor in preventing internal rot of the king post.
Step 10: Sanding and Preservative Application
Remove any rough spots or lumber yard stamps by sanding the posts and headers with 100-grit sandpaper. This opens the pores of the wood, allowing it to better absorb the protective stain or sealer you choose to apply.
Apply a high-solids, oil-based wood preservative that contains UV inhibitors to prevent the cedar from turning gray. Be sure to saturate the end-grain of the posts and the joints where water is likely to sit during rainstorms.
Conduct a final walkthrough of the structure, checking every bolt and screw for tightness after the wood has acclimated. Your 10×10 garden gazebo is now complete and ready to provide years of shaded enjoyment in your backyard.
Common Mistakes to Avoid
One common error is neglecting to use stainless steel or high-quality coated fasteners when working with cedar. The natural acids in the wood will cause standard steel nails to corrode and leave permanent black stains on the lumber.
Another mistake is failing to account for the weight of the roof when choosing the foundation method. Simple deck blocks sitting on top of the soil are rarely sufficient for a permanent 10×10 gazebo and can lead to settling.
Finally, many builders forget to treat the “hidden” cuts with sealer before assembly, such as the bottoms of the posts. Any raw wood that is not treated before it is bolted together becomes a prime target for trapped moisture and rot.
Maintenance and Safety
Always utilize a secondary person when lifting the header beams and the roof rafters to avoid injury or damage to the wood. Wear a dust mask when sanding cedar, as the fine dust can be an irritant to the respiratory system.
Inspect the structure every spring for any signs of loose hardware or wood movement caused by the freeze-thaw cycle. Re-applying a clear sealer every two to three years will keep the cedar looking new and prevent the wood from checking.
Keep the area around the post bases clear of mulch and soil to ensure proper airflow and drainage. This simple maintenance step can add a decade or more to the functional life of your backyard garden gazebo.