
Introduction to the A-Frame Poultry Revolution
Integrating a high-quality chicken coop into your property provides more than just fresh eggs for your kitchen table. A well-constructed A-frame structure offers a unique blend of structural efficiency and aesthetic appeal that enhances any backyard landscape.
The triangular geometry of the A-frame is naturally resistant to high winds and heavy snow loads. This makes it a superior choice for homesteaders living in diverse climates who require a durable, low-maintenance housing solution for their flock.
By building this coop yourself, you ensure the use of premium materials that commercial kits often lack. This project adds tangible value to your home while providing a safe, predator-proof environment for your feathered investments.
Quick Specs for the Master Builder
This specific design is optimized for a medium-sized flock of 6 to 8 hens, providing ample vertical space and floor area. We have balanced the footprint to ensure it remains manageable for a single weekend of construction.
Dimensions: 8 feet long by 6 feet wide by 7 feet high.
Estimated Cost: 450 to 600 dollars depending on local lumber prices.
Difficulty Level: Intermediate.
Estimated Build Time: 16 to 20 hours for a solo builder.
Comprehensive Materials and Tools List
Selecting the right lumber is the foundation of a project that will last for decades rather than seasons. We recommend pressure-treated timber for the base frame and cedar or exterior-grade plywood for the siding and nesting boxes.
Lumber Requirements:
* 4 pieces of 4x4x8 pressure-treated timber for the foundation skids.
* 12 pieces of 2x4x8 kiln-dried studs for the main A-frame rafters.
* 6 pieces of 2x4x10 for horizontal bracing and floor joists.
* 3 sheets of 3/4 inch exterior-grade plywood for flooring and nesting boxes.
* 2 sheets of 1/2 inch plywood or T1-11 siding for the enclosed coop ends.
* 50 linear feet of 1×3 cedar trim for a professional finished look.
Hardware and Roofing:
* 1 roll of 1/2 inch hardware cloth (3 feet by 25 feet).
* 2 boxes of 3-inch exterior wood screws.
* 1 box of 1-1/4 inch galvanized staples for the wire mesh.
* 2 pairs of heavy-duty gate hinges and locking slide bolts.
* 6 linear feet of ridge cap for the peak of the roof.
* Metal roofing panels or asphalt shingles to cover 64 square feet.
Required Tools:
* Miter saw or circular saw for precise compound cuts.
* Cordless drill and impact driver set with various bits.
* Level (4-foot preferred) and a speed square for checking angles.
* Heavy-duty staple gun or pneumatic fencing stapler.
* Measuring tape, carpenter’s pencil, and a chalk line.
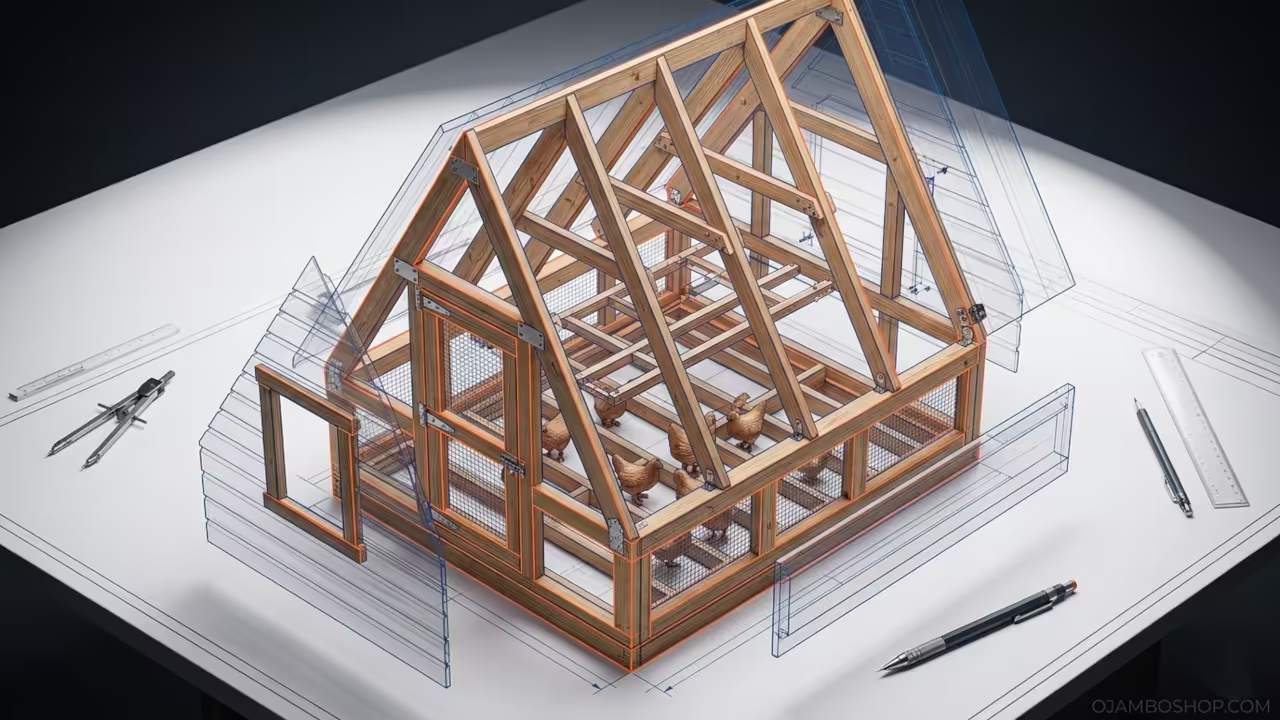
Technical Layout and Structural Integrity
The technical brilliance of the A-frame design lies in its geometric stability and the distribution of weight along the rafters. For a coop housing 6 to 8 hens, the interior volume must manage heat dissipation while maintaining structural rigidity against lateral forces. We utilize a 60-degree pitch for the main rafters, which creates an equilateral triangle profile that maximizes interior head height for the birds. The floor is elevated 24 inches off the ground to create an integrated shaded run underneath the living quarters.
Load-bearing strength is achieved by sandwiching the floor joists between the main rafters, creating a rigid “A” assembly that resists racking. We utilize 2×4 collar ties at the upper third of the structure to prevent the rafters from spreading under the weight of metal roofing. This design ensures that the center of gravity remains low, which is vital if you choose to add wheels for a mobile tractor configuration. By focusing on tight joinery at the peak and the base, the coop becomes a monolithic unit capable of withstanding significant environmental stress.
Hardware and Fastener Comparison Table
| Fastener Type | Application | Benefit | Longevity |
|---|---|---|---|
| Zinc Plated Screws | Interior Nesting Boxes | Low cost | Moderate |
| Stainless Steel Screws | Exterior Siding | Rust proof | Maximum |
| Galvanized Nails | Trim Work | Discrete | High |
| Structural Lag Bolts | Foundation Skids | High shear strength | Permanent |

Step-By-Step Construction Phases
Phase 1: Foundation and Skid Assembly
Begin by laying out your two 4×4 pressure-treated skids on a level surface exactly 6 feet apart. Cut four 2×4 floor joists to 5 feet 9 inches and secure them between the skids to create a 6×8 foot rectangular base. Ensure the assembly is perfectly square by measuring the diagonals; they must be identical before you drive your final structural screws. Use 3-inch exterior screws to bond the joists to the skids, pre-drilling holes to prevent splitting the timber ends.
Phase 2: Cutting and Setting the A-Frame Rafters
You will need to cut 12 rafters from your 2×4 lumber, each measuring approximately 7 feet in length with a 30-degree plumb cut at the top. Set the first pair of rafters at the front of the coop, joining them at the peak with a temporary gusset to hold the angle. Repeat this process for the remaining rafters, spacing them 24 inches on center along the length of the 8-foot base. Secure the bottom of each rafter to the floor joists using hurricane ties or heavy-duty wood screws driven at an angle.
Phase 3: Installing the Interior Flooring
Measure the interior footprint between the rafters and cut your 3/4-inch plywood to fit snugly over the floor joists. It is critical to use a single sheet where possible to minimize seams where moisture and waste can accumulate over time. Secure the plywood with 2-inch screws every 8 inches along the joists to create a solid diaphragm for the entire structure. Consider applying a pet-safe epoxy or deck sealant to the plywood now, before the walls are installed, to protect against rot.
Phase 4: Enclosing the Upper Coop Section
The top 5 feet of the A-frame will serve as the protected sleeping and nesting area for your hens. Cut your 1/2-inch plywood or siding to match the triangular profile of the front and back ends of the structure. Install a 2×2 nailer along the interior of the rafters to provide a surface for the siding to bite into securely. Leave an opening in the front panel for a chicken door and an opening in the rear for a large clean-out access panel.
Phase 5: Nesting Box and Roosting Bar Installation
Build two nesting box units, each containing three individual 12×12 inch compartments, and mount them along the interior side walls. Position the roosting bars approximately 8 inches higher than the nesting boxes to encourage the birds to sleep on the bars rather than in the nests. Use 2-inch diameter natural wood branches or 2x4s with the edges rounded off to provide a comfortable grip for the hens’ feet. Ensure there is at least 10 inches of roosting space per bird to prevent territorial squabbles during the night.
Phase 6: Securing the Lower Run Area
The bottom 24 inches of the structure remain open to provide the birds with access to fresh ground and dust baths. Wrap this entire lower section with 1/2 inch hardware cloth, burying the mesh 6 inches into the ground if the coop is stationary. Use galvanized staples every 4 inches to ensure the mesh cannot be pulled away by determined predators like raccoons or foxes. This “hardware cloth skirt” is the most important defense your flock has against nighttime attacks.
Phase 7: Roofing and Weatherproofing
Install your horizontal purlins across the rafters to provide a mounting surface for your chosen roofing material. If using metal panels, ensure they overlap by at least one full corrugation to prevent wind-driven rain from entering the coop. Install the ridge cap at the peak using specialized roofing screws with rubber washers to create a watertight seal. This phase is vital because a dry coop is a healthy coop; moisture is the primary cause of respiratory issues in poultry.
Phase 8: Doors, Latches, and Final Trim
Construct the main human access door and the smaller chicken ramp door using leftover plywood and 1×3 cedar trim. Use heavy-duty hinges and install high-quality slide bolts that can be locked with a carabiner to thwart clever predators. Attach the 1×3 cedar trim to all corners and around door frames to cover raw plywood edges and provide a professional finish. Check all interior surfaces for protruding screws or sharp edges that could injure the birds during their daily movements.
Common Mistakes to Avoid
One frequent error is using standard chicken wire for the run instead of heavy-duty hardware cloth. Chicken wire is designed to keep chickens in, but it will not keep predators out; most large predators can tear through it with ease.
Another mistake is neglecting proper ventilation at the very peak of the A-frame. Ammonia fumes from droppings rise, and without a vent at the highest point, these gases will trap moisture and heat, leading to illness.
Builders often fail to treat the end grains of their lumber, especially where the rafters meet the ground skids. Always apply a wood preservative to these cut ends to prevent “wicking” moisture into the heart of the board.
Maintenance and Safety Protocols
To ensure the longevity of your A-frame coop, apply a high-quality exterior stain or UV-resistant paint every two to three years. This prevents the wood fibers from breaking down under intense sunlight and shedding water effectively during storms.
Pro-Tip: When assembling the main structural joints, use a combination of waterproof wood glue and structural screws. This creates a “chemically welded” bond that significantly increases the racking resistance of the triangular frame over time.
Always wear appropriate safety gear including impact-rated eye protection and a dust mask when cutting pressure-treated lumber. The chemicals used to preserve the wood should not be inhaled or allowed to come into contact with your eyes during the building process. Regularly inspect the hardware cloth for any signs of sagging or detached staples.