
Adding a permanent fire pit pavilion to your property is one of the most effective ways to transform an underutilized backyard into a high-value social hub. This structure provides essential overhead protection from the elements while creating a dedicated architectural anchor for your outdoor living space.
A well-constructed pavilion does more than just shield you from a light drizzle or the midday sun. It defines a specific zone for relaxation and increases the overall market appeal of your home by providing a sophisticated, “resort-style” atmosphere in a residential setting.
The 12×12 footprint of this specific design is engineered for optimal flow around a central heat source. It allows for comfortable seating clearances while maintaining a manageable structural scale that fits most suburban lots without overwhelming the existing landscape.
Quick Specs
- Dimensions: 12 feet by 12 feet (Post-to-Post)
- Estimated Cost: $2,500 – $3,800 (Depending on lumber grade)
- Difficulty Level: Intermediate to Advanced
- Estimated Build Time: 3 to 4 Days (2-person crew)
- Roof Pitch: 6:12
Materials and Tools
Building a structure of this magnitude requires high-quality, pressure-treated lumber or naturally rot-resistant species like Western Red Cedar. The following list ensures structural integrity and a professional aesthetic finish.
Lumber List:
– (4) 6×6 x 10′ Structural Posts
– (4) 2×10 x 14′ Header Beams
– (2) 2×8 x 12′ Ridge Boards
– (18) 2×6 x 10′ Common Rafters
– (4) 2×6 x 12′ Hip Rafters
– (12) 2×4 x 8′ Bracing and Purlins
– (24) 1×6 x 12′ Tongue and Groove Roof Decking
– (8) 2×10 x 3′ Decorative Knee Braces
Hardware and Fasteners:
– (4) Heavy-Duty 6×6 Post Bases (Bolt-down or Wet-set)
– (16) 1/2″ x 8″ Galvanized Carriage Bolts with Washers
– (1) 5lb Box 3″ Stainless Steel Wood Screws
– (1) 5lb Box 2.5″ Siding Nails for Decking
– (4) Boxes Hurricane Ties (RT7 or similar)
– (1) Roll Synthetic Roof Underlayment
– (5) Bundles Architectural Asphalt Shingles or Metal Roofing Panels
Required Tools:
– Circular Saw and Miter Saw
– Impact Driver and Power Drill
– Post Hole Digger or Auger
– 4-foot and 8-foot Spirit Levels
– Speed Square and Framing Square
– Ladders (8′ and 10′)
– Chalk Line and Measuring Tape
Technical Layout
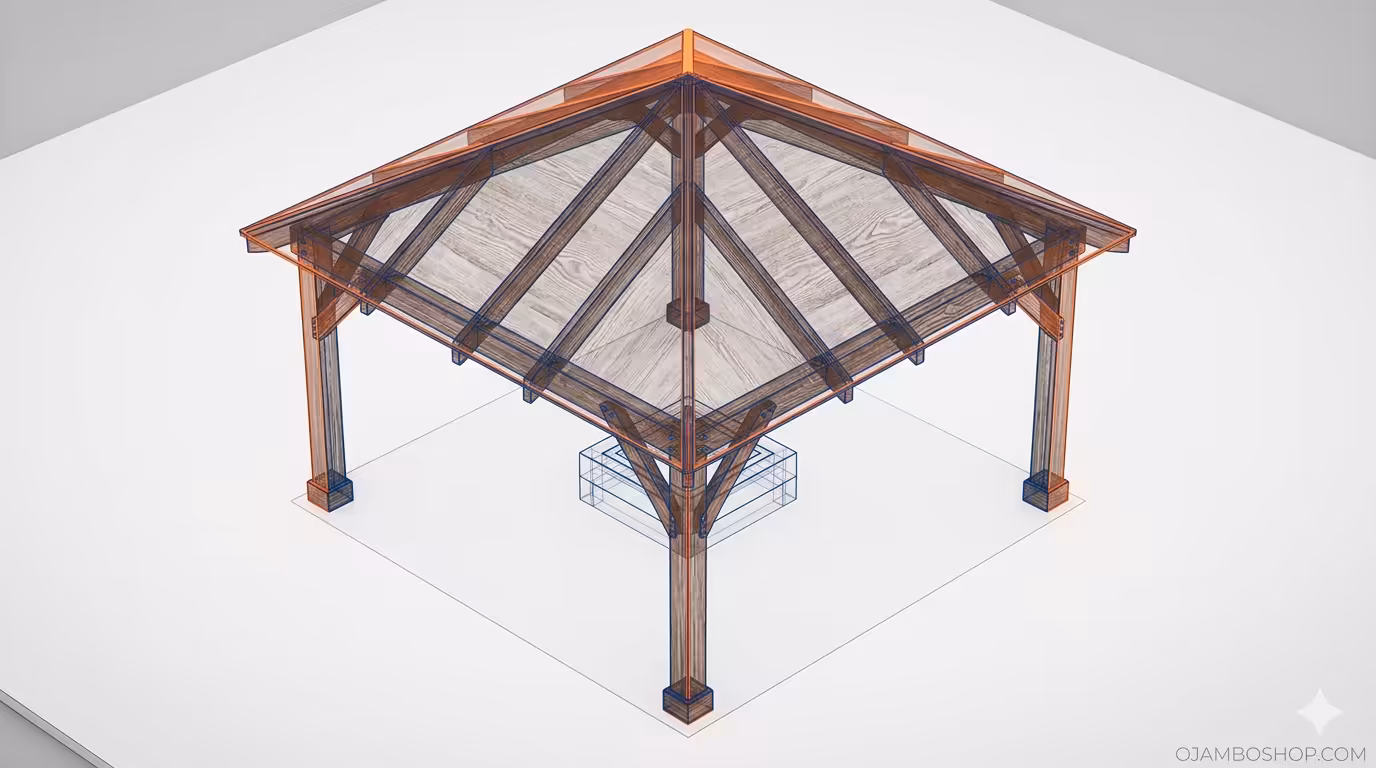
The structural integrity of this 12×12 pavilion relies on a double-header beam system supported by 6×6 load-bearing posts. By sandwiching the posts between two 2×10 beams, we create a rigid “box” frame that effectively resists lateral shearing forces and distributes the weight of the roof evenly. The 6:12 roof pitch is specifically chosen to facilitate efficient water runoff and snow load management while maintaining a classic architectural profile that complements most residential homes.
Every connection point in this framing plan utilizes mechanical fasteners and structural notches to ensure long-term stability. The rafters are spaced at 16 inches on center, which exceeds standard code requirements for a structure of this size, providing an extra margin of safety for heavy roofing materials like slate or thick-gauge metal. We incorporate 45-degree knee braces on every post-to-beam transition to eliminate swaying, which is the most common point of failure in DIY backyard structures.
Material Comparison Table
| Material Type | Durability | Aesthetic | Cost Factor | Maintenance |
|---|---|---|---|---|
| Pressure Treated Pine | High | Moderate | Low | Annual Sealing |
| Western Red Cedar | Very High | Excellent | High | Optional Staining |
| Rough Sawn Oak | Extreme | Rustic | Very High | Heavy Sealing |
| Douglas Fir | Moderate | High | Moderate | High Protection |
Step-by-Step Instructions
Step 1: Foundation and Post Setting
Precision is critical during the foundation phase to ensure the rest of the build proceeds smoothly. Start by marking your four post locations using the 3-4-5 triangle method to ensure the footprint is perfectly square. Dig your holes to a depth of 36 inches, or below your local frost line, to prevent the structure from heaving during winter months.
Set your 6×6 posts into the holes or onto pre-poured concrete piers using heavy-duty galvanized post bases. Use temporary 2×4 bracing to hold the posts perfectly plumb in both directions while the concrete cures. Ensure that the distance between the outside edges of the posts measures exactly 12 feet on all four sides before proceeding.
Step 2: Cutting and Installing Header Beams
Once the concrete has fully set, typically after 24 hours, cut your 2×10 header beams to a length of 14 feet. This allows for a 12-inch overhang on each side of the posts, providing a professional look and extra weather protection. Level the beams across the tops of the posts, ensuring they are perfectly horizontal before securing them.
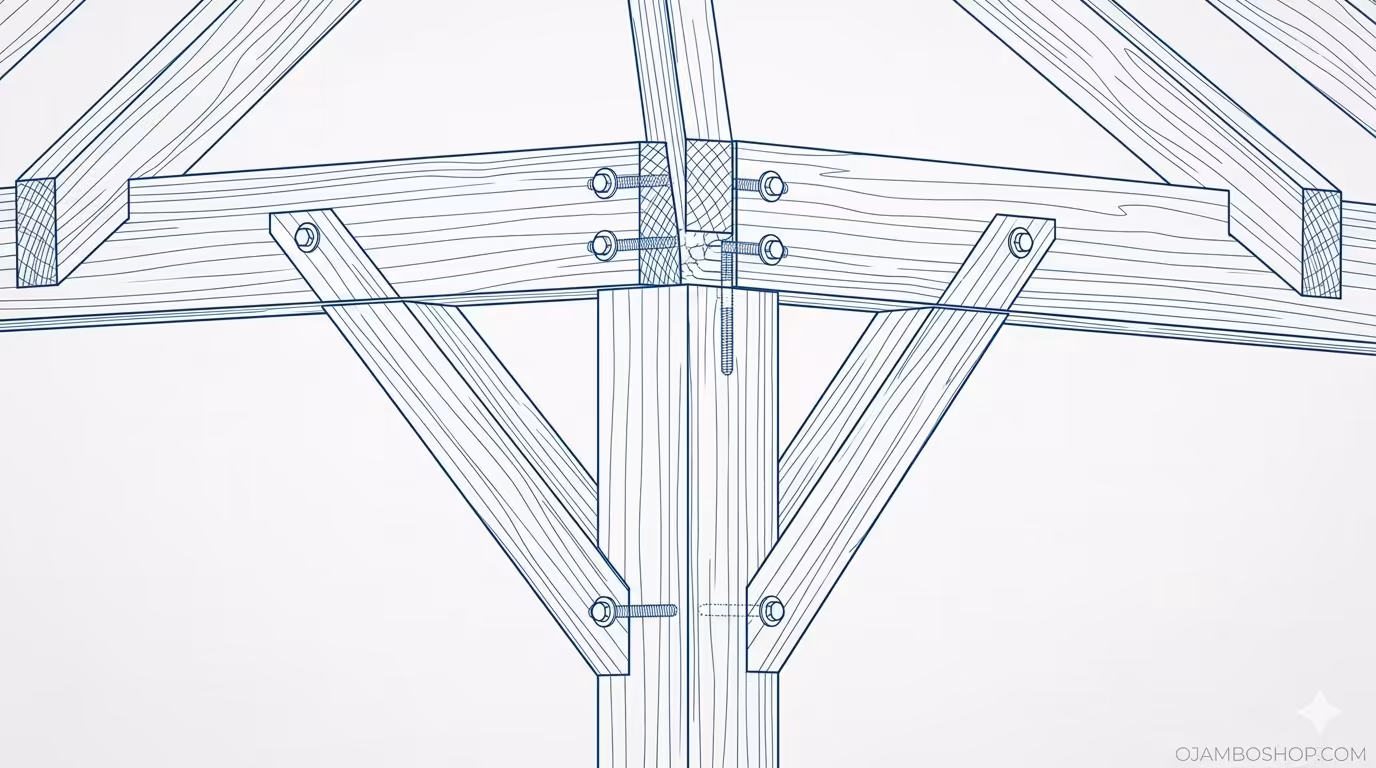
Secure the beams to the posts using 1/2-inch carriage bolts, drilling two holes per post-to-beam connection. It is essential to use washers on both sides to prevent the bolt heads from sinking too deep into the wood over time. Tighten the bolts firmly, but be careful not to crush the wood fibers, as this can invite moisture into the center of the post.
Step 3: Installing Knee Braces
Knee braces are vital for the lateral stability of the pavilion, especially in high-wind areas. Cut your 2×10 decorative braces at a 45-degree angle on both ends, ensuring a snug fit between the post and the header beam. These should be installed on every post, typically extending 24 to 30 inches down from the beam.
Fasten the braces using 3-inch structural wood screws, pre-drilling the holes to prevent the timber from splitting. Pro-Tip: To enhance the structural integrity of your pavilion, use “TimberLOK” style heavy-duty screws instead of standard lag bolts. These specialized fasteners offer superior shear strength and do not require pre-drilling, which saves time and creates a much tighter wood-to-wood bond that won’t loosen during seasonal expansion.
Step 4: Rafter Preparation and Birdsmouth Cuts
The roof framing begins with cutting the common rafters with a specific “birdsmouth” notch where they sit on the header beams. For a 6:12 pitch, the plumb cut at the ridge will be at a 26.5-degree angle. Measure the rafter length carefully from the ridge board to the outer edge of the header beam, accounting for your desired eave overhang.
Use one rafter as a master template to mark and cut all subsequent rafters to ensure absolute consistency. Any variation in the birdsmouth depth will cause the roofline to appear wavy and make the installation of the roof decking significantly more difficult. Test fit the master rafter on all four corners of the frame before mass-producing the remaining pieces.
Step 5: Setting the Ridge and Common Rafters
With the help of an assistant, lift the 2×8 ridge board into position and secure the central common rafters. The ridge board should be perfectly level and centered between the two parallel header beams. It is helpful to use temporary vertical supports to hold the ridge board at the correct height while you nail the rafters into place.
Install the rafters at 16 inches on center along the length of the ridge. Use hurricane ties at every point where a rafter meets a header beam to ensure the roof cannot be lifted by strong upward wind gusts. Check the alignment frequently with a string line to ensure the ridge remains straight and does not bow under the weight of the rafters.
Step 6: Hip Rafters and Jack Rafters
For a hip roof design, install the four hip rafters extending from the corners of the header beams to the ends of the ridge board. These rafters require complex compound miter cuts, as they must transition between two different planes. Take your time with these measurements, as the hip rafters provide the primary aesthetic lines for the entire roof structure.
Fill in the remaining roof sections with jack rafters, which are shorter rafters that bridge the gap between the hip rafters and the header beams. These should also be spaced at 16 inches on center to maintain a uniform load distribution. Ensure all rafters are flush with the top edge of the hip rafters to create a flat surface for the roof decking.
Step 7: Roof Decking and Underlayment
Beginning at the bottom edge of the eaves, install the 1×6 tongue and groove decking with the finished side facing downward. This creates a beautiful “beaded” ceiling effect when viewed from inside the pavilion. Secure each board with two 2.5-inch siding nails at every rafter intersection to prevent the boards from cupping or warping.
Once the decking is complete, cover the entire roof surface with a high-quality synthetic underlayment. Start at the bottom and overlap each subsequent row by at least 4 inches to ensure a water-tight seal. This underlayment acts as a secondary moisture barrier and protects the wood decking from any leaks that might develop in the primary roofing material over time.
Step 8: Finishing and Roofing
Install your chosen roofing material, such as architectural shingles or metal panels, following the manufacturer’s specific guidelines. If using shingles, ensure you install a starter strip at the eaves and use matching hip and ridge shingles for a cohesive look. For metal roofs, use gaskets on every screw to prevent leaks and allow for the metal’s thermal expansion.
Apply a high-quality exterior stain or sealant to all exposed wood surfaces to protect against UV damage and moisture intrusion. Pay special attention to the end grain of the posts and the tops of the beams, as these areas are most susceptible to water absorption. Re-applying a clear sealer every two years will significantly extend the lifespan of your pavilion.
Common Mistakes
One frequent error is failing to account for the weight of the roofing material when selecting the header beam size. Using 2×8 beams instead of 2x10s on a 12-foot span can lead to visible sagging over time, which compromises both the look and the safety of the pavilion.
Another mistake is neglecting to check for squareness at every stage of the build. If the foundation posts are even an inch out of square, the roof rafters will not fit correctly, and the shingles will appear crooked. Constant measurement is the hallmark of a master carpenter.
Finally, many DIYers skip the use of structural hardware like hurricane ties and post bases. In a significant storm, the wind creates an uplift force that can easily tear a roof off a structure that is only held together by standard framing nails. Always use galvanized mechanical fasteners for all critical joints.
Maintenance and Safety
Personal protective equipment is non-negotiable when working with heavy timbers and power tools. Always wear safety glasses, hearing protection, and sturdy work boots throughout the construction process. When working on ladders or the roof, ensure they are on stable ground and have a second person available to spot you for added safety.
Inspect your pavilion annually for any signs of wood rot, insect damage, or loosening hardware. Tighten the carriage bolts as the wood seasons and shrinks slightly over the first year. Keeping the roof clear of debris and ensuring that water drains away from the post bases will prevent the most common causes of structural decay.
Properly treating the wood is the best defense against the elements. If you chose pressure-treated lumber, allow it to dry for several weeks before applying a stain. If using cedar, apply a UV-resistant oil immediately to maintain its natural color and prevent it from turning a weathered gray.