
Building a pet-centric tiny home represents a significant shift in the small living movement toward true functional accessibility. Most tiny houses rely on vertical lofts that prove difficult for aging pets or owners with mobility concerns. By focusing on a single-level footprint, you create a seamless environment that prioritizes safety and shared space.
This project adds immense value to any property by serving as a high-end guest suite or a dedicated studio. The architectural focus remains on durable materials and integrated pet features that do not compromise aesthetic appeal. You are not just building a shed; you are constructing a fully permitted residential-grade structure.
The design incorporates specific zones for feeding, resting, and hygiene that are built directly into the framing. This proactive approach to design ensures that the living space remains organized and easy to clean. As a master carpenter, I have refined these plans to balance structural integrity with modern minimalist living requirements.
Quick Specs
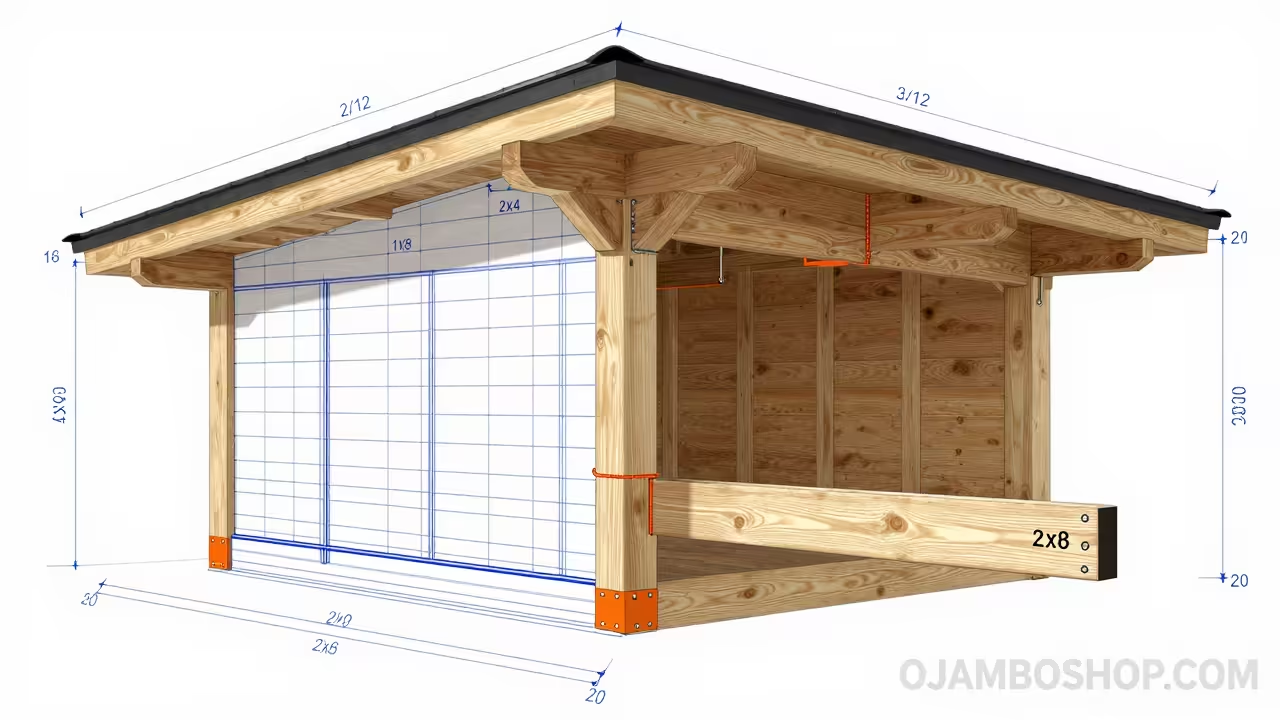
The footprint for this build is exactly 12 feet by 24 feet, providing 288 square feet of usable interior space. We have selected a 3/12 shed roof pitch to simplify construction while maintaining excellent water shedding capabilities. This height allows for 9-foot front walls that taper down to 7 feet at the rear for a modern look.
The estimated cost for raw materials, including framing, insulation, and basic finishes, ranges between $18,000 and $24,000 depending on regional lumber prices. This budget covers high-quality subflooring and professional-grade moisture barriers necessary for long-term habitation. You should expect a total build time of approximately 320 man-hours for a skilled DIY team.
The difficulty level is rated as Advanced-Intermediate due to the integrated plumbing and electrical requirements. While the framing is straightforward, the precision required for the built-in pet stations demands careful measuring and cutting. Following these blueprints strictly will ensure the structure meets standard residential building codes for small dwellings.
Materials and Tools
Lumber and Sheet Goods:
– 2×6 Pressure-treated floor joists
– 3/4-inch Tongue and groove OSB subflooring
– 2×4 Kiln-dried studs for exterior and interior walls
– 2×8 Rafters for the shed roof assembly
– 1/2-inch CDX plywood for roof sheathing
– 7/16-inch OSB for exterior wall sheathing
Hardware and Protection:
– 3-inch Framing nails (30-degree clipped head)
– 2-1/2-inch Deck screws for subfloor attachment
– Tyvek HomeWrap moisture barrier
– Grace Ice and Water Shield for roof eaves
– Metal hurricane ties for every rafter-to-wall connection
– Galvanized drip edge and flashing
Essential Tools:
– Miter saw and circular saw with framing blades
– Pneumatic framing nailer and air compressor
– 4-foot and 8-foot spirit levels
– Impact driver and cordless drill set
– Chalk line and speed square
– Heavy-duty stapler for house wrap installation
Technical Layout
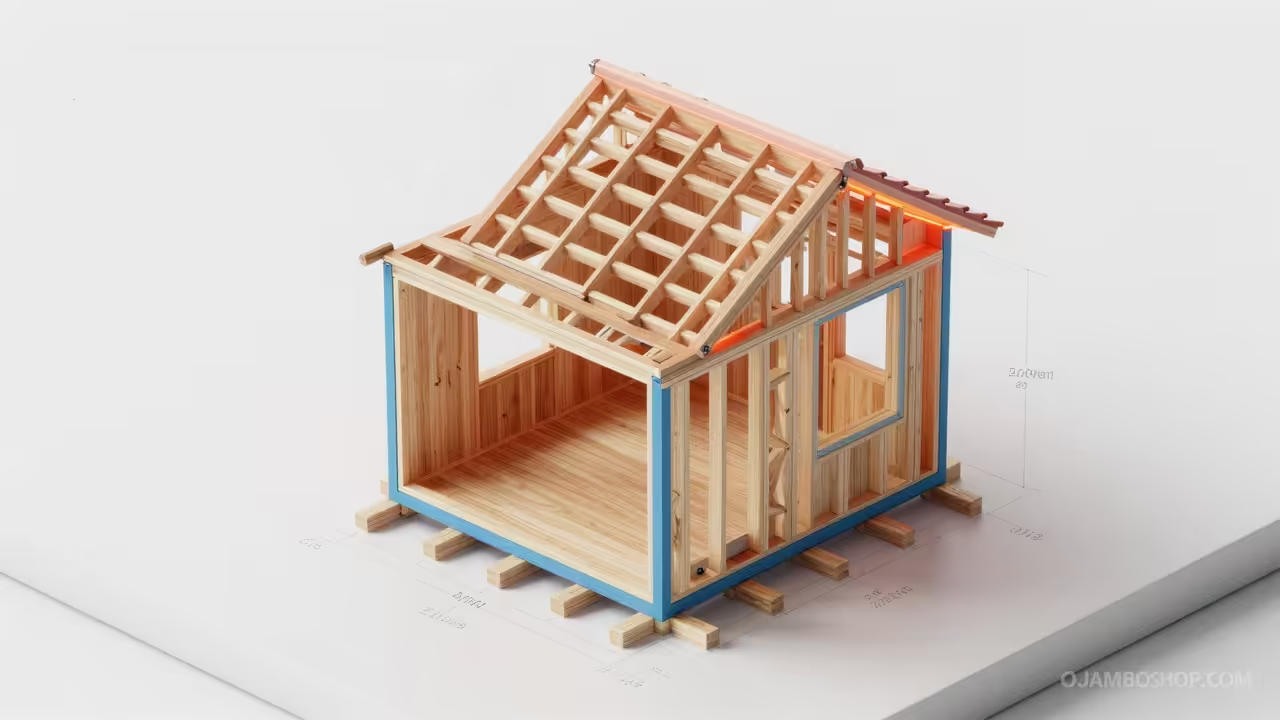
The framing for this pet-centric tiny home utilizes an advanced “Advanced Framing” technique to maximize insulation pockets while maintaining high structural loads. We use 16-inch on-center spacing for all load-bearing exterior walls to support the 12-foot span of the 2×8 roof rafters. The floor system is the most critical component, as it must support the weight of built-in cabinetry and potential tile flooring in pet wash areas. We utilize double headers over all window and door openings to prevent settling, which can lead to sticking doors in small structures.
The integrated pet station is framed directly into the wall cavity between the 16-inch studs, requiring specific fire-blocking and header supports. This ensures that the built-in kennel or feeding station does not compromise the shear strength of the exterior wall. By using a shed roof design, the load is transferred primarily to the taller front wall and the shorter rear wall. This eliminates the need for complex ridge beams or internal load-bearing partitions, allowing for a completely open-concept living area. All connections are reinforced with Simpson Strong-Tie hardware to ensure the building can withstand high wind loads and minor seismic activity.
Step-by-Step Instructions
Phase 1: Foundation and Floor Framing
Begin by leveling your site and installing a gravel pad or concrete piers spaced every 8 feet. Lay out your 2×6 pressure-treated rim joists and floor joists at 16 inches on center. Use a chalk line to ensure the frame is perfectly square by measuring the diagonals until they are identical. Install bridging between the joists to prevent rotation and improve the stiffness of the floor. Secure the 3/4-inch subflooring using construction adhesive and 2-1/2-inch deck screws for a squeak-free finish.
Phase 2: Wall Framing and Pet Nooks
Assemble your walls on the flat subfloor before raising them into position. Frame the front 9-foot wall and the rear 7-foot wall first, followed by the two 12-foot side walls. Incorporate the rough openings for the “Pet Nook” which should be framed like a standard window with a header and jack studs. Ensure all corners are overlapping and nailed securely with three 3-inch nails every 12 inches. Plumb and brace each wall as it is raised to maintain a perfectly vertical structure.
Phase 3: Roof Rafter Installation
Cut your 2×8 rafters with a 3/12 pitch birdsmouth cut to sit flush on the top plates. Space the rafters at 24 inches on center, lining them up with the wall studs where possible for direct load transfer. Install hurricane ties at every junction where a rafter meets a wall plate to satisfy wind-lift building codes. Attach the 1/2-inch CDX plywood sheathing starting from the bottom edge and working toward the high point. Leave a 1/8-inch gap between plywood sheets to allow for natural wood expansion.
Phase 4: Exterior Sheathing and Weatherproofing
Apply the 7/16-inch OSB sheathing to the exterior walls using 8d nails spaced 6 inches along the edges. Wrap the entire structure in a high-quality moisture barrier, ensuring you overlap the seams by at least 6 inches. Tape all seams with specialized house wrap tape to create an airtight seal against wind and rain. Install the metal drip edge along the roof perimeter before laying down the underlayment. Finish the roof with architectural shingles or standing seam metal panels for maximum longevity.
Phase 5: Door and Window Installation
Install the pre-hung exterior door and energy-efficient windows into the rough openings. Use high-quality flashing tape around all openings to prevent water from penetrating the wall cavity. Ensure the windows are level and shimmed correctly so they operate smoothly without binding. Fill the gaps between the window frames and the studs with low-expansion spray foam. This step is crucial for maintaining the thermal envelope of the small living space.
Phase 6: Rough Plumbing and Electrical
Run your PEX water lines and electrical circuits through the wall studs according to your local codes. Dedicate a specific circuit for the pet area if you plan on installing heated floors or specialized lighting. Install the drain lines for the kitchen sink and the optional pet wash station with a 1/4-inch per foot slope. Ensure all penetrations through the top or bottom plates are sealed with fire-rated caulk. Pressure test the plumbing lines before moving on to the insulation phase.
Phase 7: Insulation and Interior Walls
Install R-15 mineral wool batts in the wall cavities and R-30 in the roof rafters. Mineral wool is preferred for pet-centric builds because it is naturally mold-resistant and provides superior sound dampening. Cover the insulation with a 6-mil poly vapor barrier if you are building in a cold climate zone. Install interior partitions for the bathroom or storage area using standard 2×4 framing. Ensure that all electrical boxes are flush with the face of the studs.
Phase 8: Interior Finishes and Pet Features
Hang 1/2-inch drywall or use cedar tongue-and-groove planks for a more rustic, durable interior finish. Install the built-in pet station in the pre-framed nook, using moisture-resistant plywood for the base. Apply a low-VOC paint or sealer to all interior surfaces to keep the environment healthy for your animals. Install durable flooring like luxury vinyl plank which is waterproof and scratch-resistant against pet claws. Add the baseboards and window trim to complete the professional look of the interior.
Hardware and Material Comparison
| Material Type | Durability | Cost | Maintenance | Best Use Case |
|---|---|---|---|---|
| Pressure Treated | High | Medium | Low | Floor Joists and Sill Plates |
| Kiln-Dried Pine | Medium | Low | High | Interior Wall Framing |
| Cedar Planking | High | High | Medium | Exterior Siding and Trim |
| Vinyl Siding | Medium | Low | Low | Budget Exterior Finishing |
| Mineral Wool | High | Medium | None | High Performance Insulation |
Common Mistakes
The most frequent error in tiny home construction is failing to ensure the foundation is perfectly level. Even a quarter-inch deviation over 24 feet will cause the roof rafters to misalign and doors to hang improperly. Always use a transit or a long spirit level to verify your footings before building the floor frame.
Another common mistake involves neglecting the moisture barrier around pet-specific areas like wash stations. Pets introduce significant humidity and splashing, which can rot the wall studs if the area isn’t properly tanked. Use a liquid-applied waterproofing membrane behind any tile or wet zones to protect the structure.
Many builders also undersize the roof rafters for a 12-foot span, leading to visible sagging over time. While 2×6 boards might seem sufficient, 2×8 rafters provide the necessary depth for thick insulation and the strength to handle snow loads. Never compromise on structural lumber dimensions to save a few dollars in the short term.
Maintenance and Safety
Pro-Tip: For maximum material longevity, always use hot-dipped galvanized fasteners for any lumber that contacts the exterior environment. Standard steel nails will corrode when they react with the chemicals in pressure-treated wood, eventually causing structural failure. Applying a high-quality wax-based sealer to the end-cut of every board will also prevent moisture from wicking into the grain.
Always wear a high-quality respirator when cutting pressure-treated lumber or handling fiberglass insulation. The dust from treated wood contains copper and other biocides that are harmful if inhaled over long periods. Keep a clean workspace to avoid trip hazards, especially when maneuvering long 24-foot plates or heavy roof sheathing.
Regular maintenance should include an annual inspection of the roof flashing and window seals. Small structures are more susceptible to damage from minor leaks because the water has less space to dissipate. Recaulk any gaps in the exterior siding every two years to maintain the integrity of the weather barrier.