
The concept of a hidden passage has transitioned from the realm of mystery novels into a sophisticated architectural feature for the modern home. A well-executed Murphy door serves as both a functional storage solution and a seamless entry point to a private office or safe room. By replacing a standard interior door with a structural bookcase, you effectively reclaim lost wall space while increasing the overall appraisal value of your residence.
Integrating a magnetic latch system elevates this project from a standard carpentry task to a high-end technical installation. This specialized hardware ensures the door remains flush with the surrounding trim, preventing the tell-tale sagging often seen in amateur builds. As a master carpenter, I can attest that the secret to a successful hidden door lies in the precision of the pivot point and the rigidity of the internal cabinetry.
This guide provides a comprehensive blueprint for constructing a professional-grade hidden door bookcase designed to last for generations. We will focus on structural integrity, silent operation, and a finish that blends perfectly with your existing interior design. Whether you are looking to create a hidden pantry or a secluded library, these plans offer the technical foundation required for a flawless execution.
Quick Specs
The finished unit measures 36 inches in width by 80 inches in height with a cabinet depth of 8.25 inches. Total estimated material cost ranges between 450 and 700 dollars depending on the wood species and hardware kit selected. This project is rated at an advanced difficulty level due to the tight tolerances required for the pivot hinge and magnetic alignment. Expect a total build time of 16 to 20 hours excluding the time required for wood stain or paint to cure fully.
Materials and Tools
Lumber Requirements: 3 sheets of 3/4 inch Birch Plywood for the main cabinet and shelves; 2 lengths of 1×4 Poplar for the face frames and decorative trim; 1 sheet of 1/4 inch Baltic Birch for the structural back panel; 1 piece of 2×4 kiln-dried lumber for the internal header reinforcement.
Hardware and Fasteners: 1 heavy-duty 360-degree pivot hinge kit rated for 500 pounds; 1 electromagnetic latch or high-pull neodymium cabinet catch; 2 packages of 1-1/4 inch pocket hole screws; 1 box of 2-inch finish nails for the decorative trim; 1 bottle of industrial-grade wood glue.
Required Tools: Table saw or track saw for long, straight rip cuts; Miter saw for precise cross-cuts on the face frame and trim; Pocket hole jig for hidden joinery; Power drill and impact driver set; Router with a 1/4 inch rabbeting bit for the back panel; Digital level and laser level for plumb installation; Pneumatic finish nailer.
Technical Layout
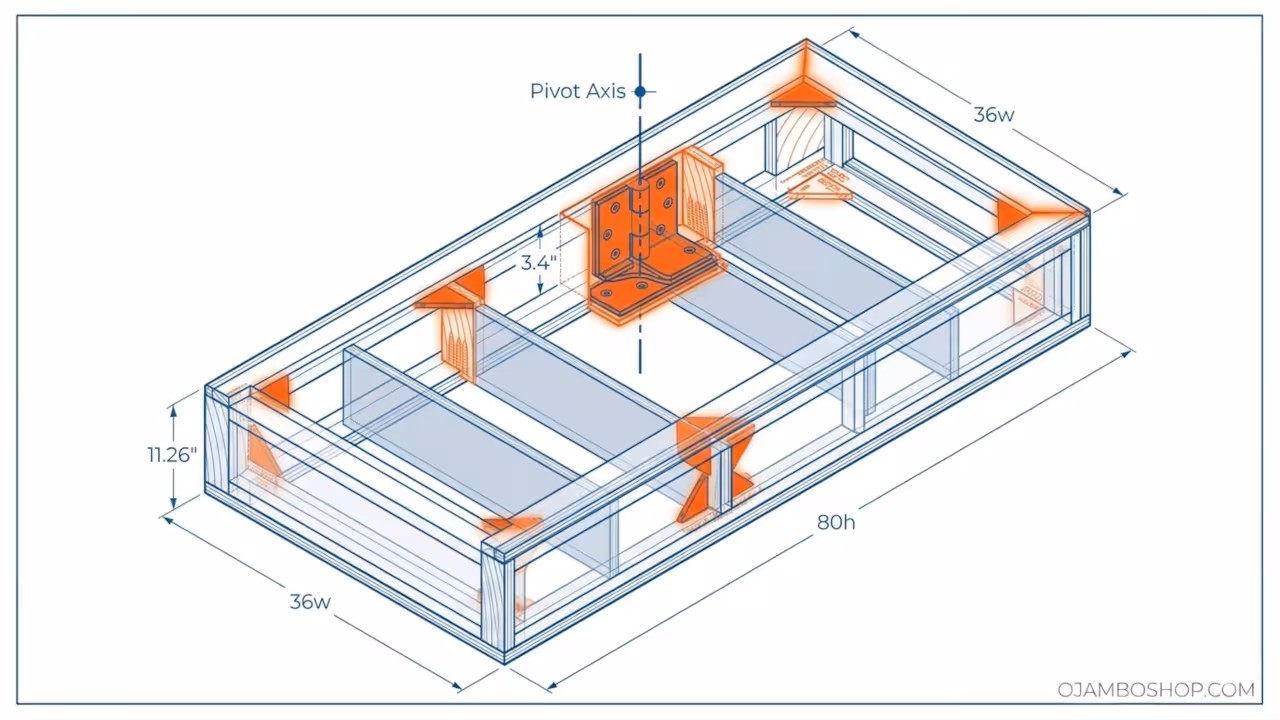
The structural integrity of a Murphy door hinges entirely on the distribution of weight across the vertical axis of the pivot point. Unlike a standard door that hangs from side-mounted hinges, a hidden bookcase door transfers its entire load downward onto a bottom-mounted steel pivot plate. This prevents the weight of the books from pulling the door out of square over time. We utilize a torsion-box design for the base of the cabinet to ensure the bottom shelf does not bow under the concentrated pressure of the hardware.
The side gables are constructed from 3/4 inch plywood, reinforced with a 1/4 inch back panel that is fully glued and backed into a recessed rabbet. This creates a shear wall effect that stops the unit from racking during its swing cycle. The top pivot is stabilized by a reinforced header beam that must be tied directly into the wall studs. This ensures that the upper pin remains perfectly centered, allowing for a consistent 1/8 inch gap between the bookcase and the door jamb. Without this rigid framing, the door would eventually drag on the floor or bind against the drywall.
Hardware Comparison Table
| Hardware Type | Weight Capacity | Ease of Install | Security Level | Best Use Case |
|---|---|---|---|---|
| Ball Bearing Pivot | 300 lbs | Moderate | Low | Standard Bookcase |
| Heavy Duty Steel Pivot | 500 lbs | Advanced | Medium | Solid Hardwood Door |
| Magnetic Latch (Passive) | N/A | Easy | Low | Daily Access Closet |
| Electromagnetic Latch | N/A | Advanced | High | Safe Room or Office |
Step-by-Step Instructions
Phase 1: Site Preparation and Framing
Begin by removing the existing door and the interior casing carefully to avoid damaging the surrounding drywall. Measure the rough opening at the top, middle, and bottom to ensure the space is square and plumb. If the opening is out of alignment, you must shim the jack studs until the width is consistent throughout. Install a double 2×4 header if the existing framing does not provide enough meat for the top pivot plate. Ensure the floor is perfectly level across the entire swing path of the door.
Phase 2: Cabinet Box Construction
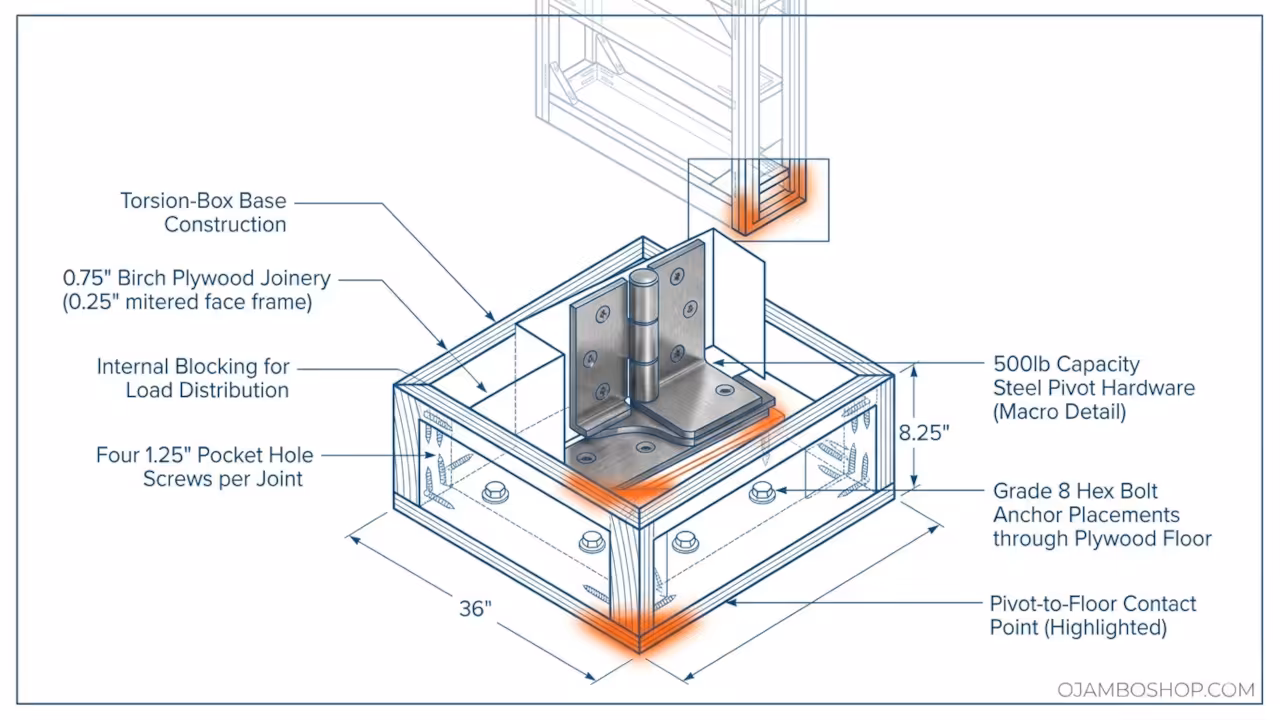
Rip your 3/4 inch plywood into 8-1/4 inch strips to form the sides, top, and bottom of the bookcase. Use a pocket hole jig to create joinery on the underside of the top and bottom shelves so the screws remain invisible. Apply a liberal bead of wood glue to every joint before driving the 1-1/4 inch screws home. Check for squareness by measuring the diagonals; the two measurements must be identical within 1/16 of an inch. Install two fixed middle shelves to provide lateral stability to the long side gables.
Phase 3: Backing and Reinforcement
Cut the 1/4 inch plywood backing to fit into the rabbeted grooves you routed into the back edges of the cabinet. Apply glue to the entire perimeter of the rabbet and lay the back panel into place. Use 1-inch staples or finish nails every 4 inches to secure the back to the gables and fixed shelves. This back panel is not just aesthetic; it acts as the primary defense against the unit sagging or twisting. Allow the glue to dry for at least four hours before moving the cabinet box.
Phase 4: Pivot Hardware Installation
Locate the exact center of the pivot point on the bottom of the bookcase according to the hardware manufacturer’s template. Drill the through-bolt holes for the bottom pivot plate and secure it with heavy-duty machine bolts. On the floor of the rough opening, install the floor plate using lag bolts that penetrate at least 2 inches into the floor joists. Repeat this process for the top pivot pin, ensuring it is perfectly plumb with the bottom plate. A laser level is highly recommended for this specific task to ensure a smooth rotation.
Phase 5: Face Frame Fabrication
Measure the front edges of your cabinet and cut the 1×4 Poplar to create a traditional face frame. Use pocket holes on the back of the stiles and rails to assemble the frame before attaching it to the cabinet. The face frame should overhang the cabinet sides by 1/4 inch to hide the gap between the door and the jamb. Sand the joints flush using 120-grit sandpaper followed by 220-grit for a smooth finish. Attach the frame to the cabinet using glue and 2-inch finish nails driven through the side gables.
Phase 6: Hanging the Door
With the help of an assistant, lift the bookcase and seat the bottom pivot hardware onto the floor plate. Carefully tilt the unit into the opening while aligning the top pivot pin with the header plate. Most professional pivot kits include an adjustable top pin that can be retracted or extended with a hex key. Once the door is seated, test the swing to ensure it clears the floor and the jambs. Adjust the shims on the top plate if the door does not hang plumb in the closed position.
Phase 7: Magnetic Latch Integration
Mark the location for the magnetic latch on the side of the cabinet opposite the hinges. For a manual magnetic catch, recessed the magnets into the cabinet side and the door jamb so they sit flush. If using an electromagnetic lock, you will need to drill a wire chase through the header and connect it to a 12V power supply. The strike plate must be perfectly aligned with the magnet to ensure the door stays closed under the pressure of the weight. Test the release mechanism multiple times to ensure the door pops open slightly when triggered.
Phase 8: Trim and Casing
Install the exterior casing around the door to hide the rough opening and the pivot hardware. The trim on the hinge side must be attached to the door itself rather than the wall to allow for the swing clearance. Use a 45-degree miter on the corners for a professional appearance that matches the rest of your home. Ensure the gap between the door trim and the wall trim is no more than 1/16 of an inch. Fill all nail holes with wood putty and perform a final light sanding over the entire unit.
Phase 9: Final Finishing
Apply a high-quality wood conditioner if you are working with porous woods like pine or birch to prevent blotching. Stain the unit to match your existing cabinetry, applying at least two coats for depth of color. Finish the project with three coats of polyurethane or lacquer to protect the wood from the friction of daily use. Once the finish is dry, install adjustable shelves using steel shelf pins. Load the shelves with books starting from the bottom up to maintain a low center of gravity.
Common Mistakes
One of the most frequent errors is failing to account for the weight of the books when choosing a pivot hinge. Standard door hinges will fail almost immediately under the 300 to 500-pound load of a full bookcase. Another common mistake is neglecting the floor levelness; if the floor rises even 1/8 of an inch along the swing path, the door will bind and scratch your flooring. Finally, builders often forget to leave a wire chase for the magnetic latch, leading to unsightly external wiring that ruins the secret aesthetic.
Maintenance and Safety
To ensure the long-term structural integrity of your Murphy door, use Grade 8 hex bolts for the pivot hardware rather than standard lag screws. Standard screws can shear under the constant lateral torque of a heavy swinging door, whereas Grade 8 bolts offer superior tensile strength. I also recommend applying a dry graphite lubricant to the pivot bearings once a year to prevent squeaking and reduce wear on the metal components.
Safety is paramount during the installation phase, especially when handling the heavy cabinet box. Always use a second person to help lift and align the door into the pivot plates to avoid back strain or dropping the unit. Ensure that your magnetic latch has a manual override or a fail-safe mode so that the door can be opened from the inside in the event of a power failure. Use a dust mask and eye protection when cutting plywood, as the glues used in manufacturing can release irritating particulates.
Check the alignment of your door every six months, as seasonal humidity changes can cause the wood to expand or contract. If the door begins to rub against the jamb, you can usually rectify the issue by adjusting the top pivot pin or lightly sanding the edge of the face frame. Keeping the shelves balanced with weight distributed evenly will prevent the cabinet gables from warping over time. With proper care, this hidden door will remain a functional and impressive feature of your home for decades.