
The modernist flat-roof tiny house represents the pinnacle of efficient, high-utility small living for the contemporary homeowner. By utilizing a 450 square foot footprint, this structure provides a sophisticated balance between minimal environmental impact and maximum interior comfort.
Adding a secondary dwelling of this caliber significantly increases property value while offering versatile space for guests or rental income. The clean lines and overhanging eaves define a structural aesthetic that is both timeless and remarkably functional for modern lifestyles.
Constructing a small-scale home requires a disciplined approach to spatial planning and structural integrity. This guide serves as your professional roadmap, translating complex architectural concepts into actionable steps for the dedicated DIY builder or aspiring carpenter.
Quick Specs
The following specifications define the baseline for this 450 square foot modernist build. Ensure your site preparation aligns with these dimensions before purchasing your first load of lumber.
Dimensions: 15 feet by 30 feet (450 sq ft total)
Estimated Cost: $35,000 to $55,000 depending on finish grade
Difficulty Level: Advanced / Professional
Estimated Build Time: 450 to 600 man-hours
Materials and Tools
A successful build starts with the right inventory of high-grade materials and professional-grade tools. Quality lumber and fasteners are the literal backbone of your new tiny home and should never be compromised.
Lumber and Sheathing:
* 2×6 Pressure-Treated Sill Plates
* 2×10 Floor Joists (16 inches on center)
* 2×6 Wall Studs (16 inches on center)
* 2×12 Roof Rafters for flat-roof span
* 3/4 inch Tongue and Groove Subflooring
* 1/2 inch CDX Plywood Wall Sheathing
* 5/8 inch Fire-Rated Roof Sheathing
Hardware and Fasteners:
* 3-inch 16d Framing Nails (Galvanized)
* 2.5-inch Decking Screws for subfloor
* Hurricane Ties and Joist Hangers
* EPDM Rubber Roofing Membrane
* Tyvek HomeWrap Moisture Barrier
* R-21 Fiberglass Batt Insulation
Technical Layout
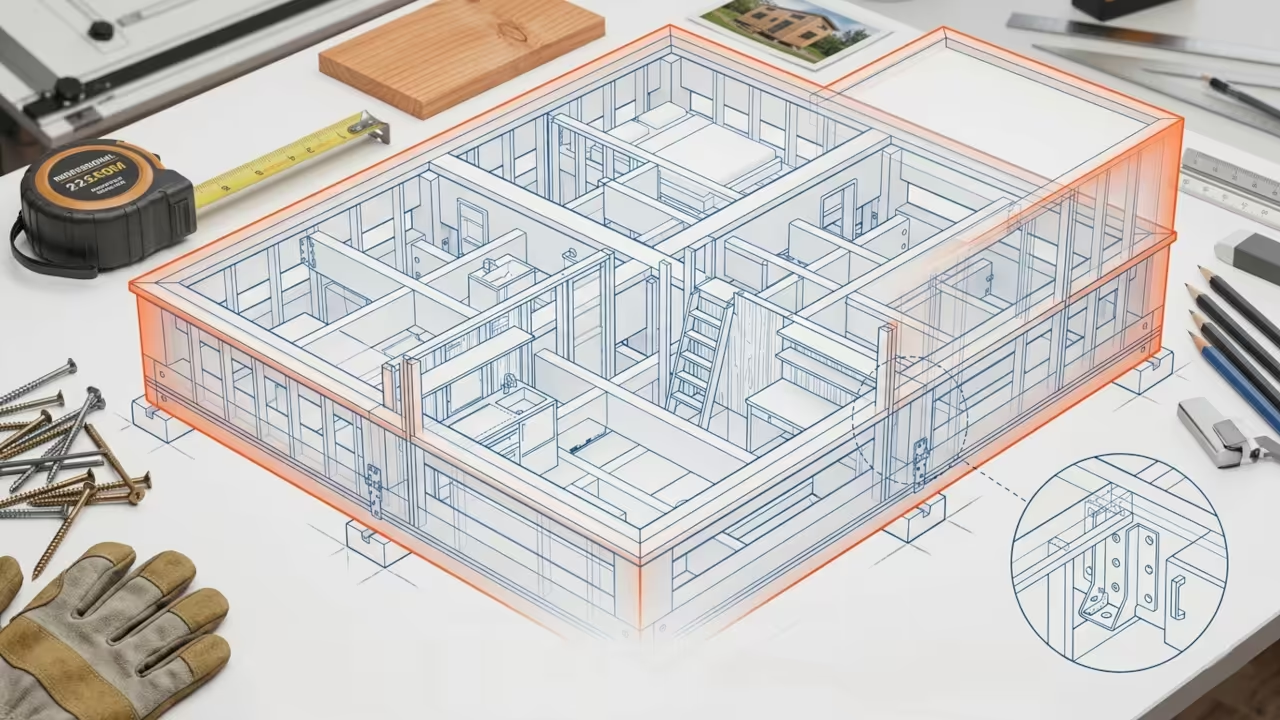
The structural integrity of a flat-roof modernist home relies entirely on the precision of the load-bearing frame and the management of dead loads. Unlike traditional gabled roofs that shed weight downward and outward, a flat roof must be engineered to withstand significant snow and rain accumulation without sagging. We utilize 2×12 rafters spaced at 12 inches on center to create a rigid horizontal diaphragm that transfers weight directly to the 2×6 exterior load-bearing walls. This over-engineering is necessary because the flat profile lacks the natural geometric strength of a triangle.
To ensure proper drainage on a seemingly flat surface, we implement a slight 1/4-inch per foot slope using tapered insulation or specialized ripping of the rafters. This ensures that water migrates toward the integrated scupper system rather than pooling in the center of the roof deck. The 2×6 wall studs provide a deeper cavity for high-density insulation, which is critical for maintaining thermal performance in a small footprint. Every intersection of the floor, wall, and roof must be mechanically fastened with steel connectors to resist uplift forces and lateral shifting over time.
Step-by-Step Instructions
Phase 1: Foundation and Site Prep
Clear the build site of all organic material and level the grade using a laser level for absolute accuracy. For a 450 square foot modernist structure, a thickened-edge concrete slab or a pier-and-beam foundation is recommended to handle the concentrated wall loads. Install your plumbing rough-ins and electrical conduit before pouring concrete or sealing the floor joists. Ensure your anchor bolts are placed every 4 feet along the perimeter to secure the sill plates.
Phase 2: Floor Framing
Lay down your pressure-treated sill plates over a closed-cell foam sill sealer to prevent moisture wicking from the foundation. Install 2×10 floor joists spaced 16 inches on center, ensuring every joist is perfectly crowned upward. Block the mid-span of the joists to prevent twisting and increase the floor’s rigidity for a premium interior feel. Apply a heavy bead of subfloor adhesive to the joists before nailing down the 3/4-inch tongue and groove plywood panels.
Phase 3: Wall Framing
Build your walls flat on the subfloor, starting with the long 30-foot sections before moving to the 15-foot end walls. Use double top plates to provide a continuous bearing surface for the heavy roof rafters that will follow. Frame your window and door openings with 2×10 headers to maintain structural continuity across large modernist glass spans. Square each wall section by measuring diagonally and tacking a temporary 1×4 brace before standing the wall into position.
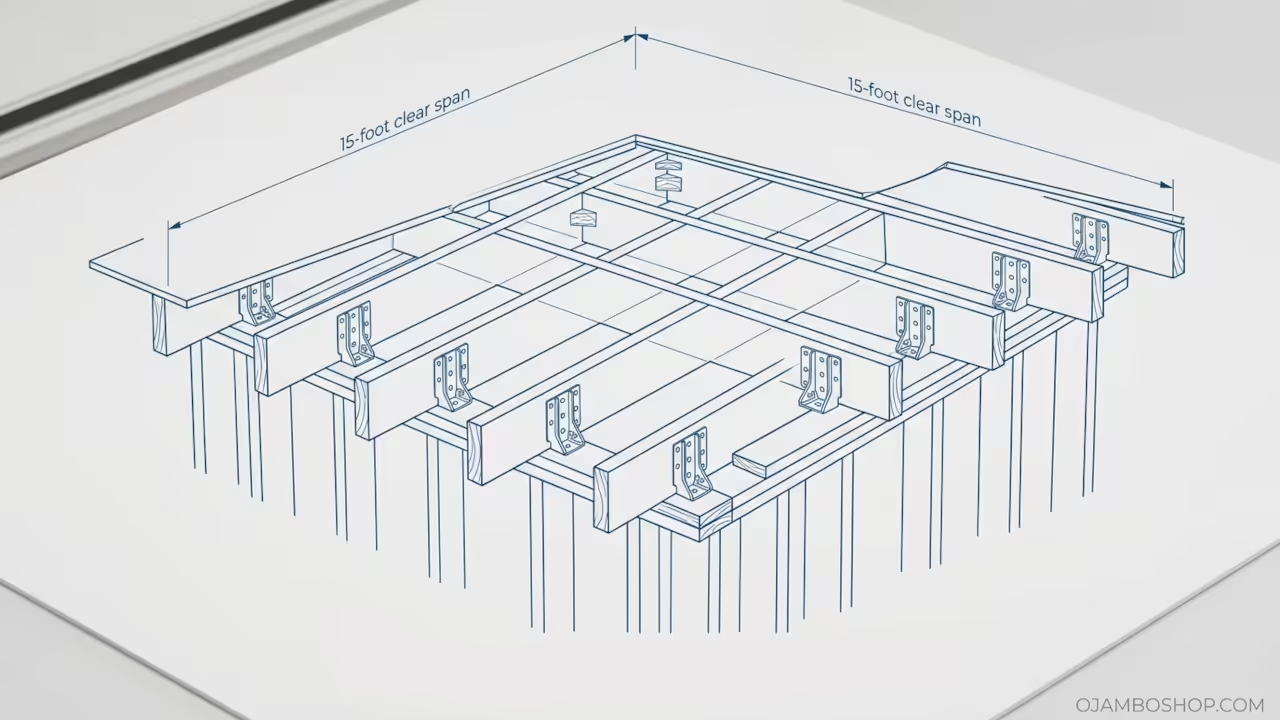
Phase 4: Roof Rafter Installation
The roof is the most critical component of the modernist aesthetic and requires 2×12 rafters for the 15-foot clear span. Cut a slight taper into the top of each rafter to create a 1/8 to 1/4 inch slope toward the rear of the building. Space these rafters at 12 inches on center to account for the lack of a ridge beam and the potential for heavy live loads. Secure each rafter to the top plate using H2.5 hurricane ties to meet modern building codes for wind uplift.
Phase 5: Sheathing and Weatherproofing
Apply 1/2-inch CDX plywood to the exterior walls and 5/8-inch sheathing to the roof deck, ensuring all joints fall on a stud or rafter. Wrap the entire structure in a high-quality moisture-permeable house wrap, overlapping the seams by at least 6 inches. Install the EPDM rubber roofing membrane over the roof deck, adhering it with specialized contact cement and flashing the edges carefully. This creates a waterproof “bathtub” design that is essential for flat-roof longevity in wet climates.
Phase 6: Windows and Doors
Select high-efficiency, black-framed windows to achieve the modernist look while maintaining a tight thermal envelope. Install the windows using self-adhering flashing tape at the sills and jambs to prevent water intrusion behind the siding. Ensure the door threshold is properly flashed and sloped away from the interior to protect the subfloor from driving rain. Use a low-expansion spray foam to seal the gaps between the window frames and the rough openings for maximum energy efficiency.
Phase 7: Exterior Siding and Trim
Install a rain-screen system using 1×2 furring strips over the house wrap to allow the siding to breathe and dry out. Modernist designs often utilize horizontal cedar tongue-and-groove or fiber-cement panels for a clean, industrial appearance. Maintain a 6-inch clearance between the bottom of the siding and the finished grade to prevent splash-back rot. Finish the roofline with a wide aluminum fascia or “gravel stop” to provide a crisp, architectural edge to the flat roof.
Phase 8: Mechanicals and Insulation
Run your electrical wiring, PEX plumbing lines, and HVAC ductwork through the wall cavities and floor joists. Once the inspections are passed, install R-21 mineral wool or fiberglass batt insulation in the walls and R-38 in the roof cavity. Mineral wool is preferred for tiny homes because of its superior fire resistance and sound dampening properties in tight quarters. Install a 6-mil poly vapor barrier on the warm side of the insulation before hanging the interior wall finishes.
Phase 9: Interior Finishes
Hang 1/2-inch drywall or birch plywood panels to create a minimalist interior that reflects the modernist exterior. Use a level-5 drywall finish for smooth walls or leave the plywood fasteners exposed for a more “industrial-chic” aesthetic. Install durable flooring such as luxury vinyl plank or polished concrete that can handle the high-traffic demands of a small living space. Finish the project with recessed LED lighting and custom built-in cabinetry to maximize every square inch of the 450 square foot footprint.
Common Mistakes
One of the most frequent errors in flat-roof construction is failing to provide adequate slope, leading to “ponding” water that eventually destroys the membrane. Even a modernist roof needs a subtle pitch to move water toward the drainage scuppers and away from the foundation.
Builders often underestimate the importance of the thermal envelope in small structures, leading to condensation issues in the roof cavity. Always ensure you have a dedicated ventilation path or use a “hot roof” spray-foam design to prevent wood rot caused by trapped moisture.
Another mistake is using standard 2×4 wall framing for a structure that needs to support a heavy, flat-roof snow load. Using 2×6 studs allows for more insulation and provides the necessary surface area for the structural sheathing required in modern tiny home builds.
Maintenance and Safety
Pro-Tip: For maximum material longevity, always use stainless steel or high-quality ceramic-coated fasteners when installing exterior trim and siding. Standard galvanized nails can react with the tannins in cedar or the chemicals in pressure-treated lumber, causing unsightly black streaks and premature fastener failure within the first five years of the build.
Regular maintenance should include an annual inspection of the EPDM roof membrane to check for punctures from falling debris or UV degradation of the sealant. Keep the roof scuppers and downspouts clear of leaves to ensure water never stays on the roof deck for more than 24 hours.
Safety is paramount when working on heights or with heavy machinery; always wear a fall-arrest harness when working on the roof deck. Utilize OSHA-approved eye protection and hearing protection during all phases of framing and finishing to ensure a long and healthy career in the trades.
| Material Category | Budget Option | Premium Option | Performance Impact |
|---|---|---|---|
| Roof Membrane | TPO | EPDM Rubber | High |
| Wall Insulation | Fiberglass Batts | Mineral Wool | Medium |
| Siding Material | Vinyl | Cedar / Fiber Cement | High |
| Window Frames | Vinyl | Aluminum / Wood Clad | Medium |
| Subfloor | OSB | Plywood T&G | High |