

Outdoor dining areas serve as the social heartbeat of a modern home during the warmer months of the year. Investing in a high quality, hand built table creates a permanent architectural statement that standard retail furniture simply cannot match.
This project utilizes the ancient Japanese art of Shou Sugi Ban to provide a natural, chemical free preservation method. By carbonizing the wood surface, we create a finish that is inherently resistant to fire, rot, insects, and harsh ultraviolet sunlight.
Quick Specs
Dimensions: 84 Inches Length by 40 Inches Width by 30 Inches Height.
Estimated Cost: 450 to 700 USD depending on local cedar or cypress market availability.
Difficulty Level: Intermediate (Requires precision joinery and propane torch operation).
Estimated Build Time: 15 to 20 Labor Hours excluding wood carbonization and oil curing stages.
Materials and Tools
For the primary structure, we will use Western Red Cedar due to its high tannin content and cellular stability during heat exposure. You will require six 2×6 boards for the tabletop planks and four 4×4 posts for the heavy timber leg assembly. The apron and internal supports will be constructed from 2×4 cedar stock to ensure a rigid frame that resists seasonal racking.
Hardware must be rated for outdoor use to prevent bleeding and structural failure over the lifespan of the piece. Use 2.5 inch stainless steel pocket hole screws and 4 inch structural timber screws for the primary leg to apron connections. A high quality waterproof wood glue, such as Titebond III, is essential for every joint in this outdoor environment.
Required tools include a sliding compound miter saw for square crosscuts and a table saw for ripping clean edges on the tabletop planks. You will need a propane roofing torch for the carbonization process and a stiff wire brush for removing excess soot. A random orbital sander with various grits will help achieve the final smooth texture before applying the protective oil.
| Material Feature | Western Red Cedar | Southern Yellow Pine |
|---|---|---|
| Rot Resistance | Naturally High | Low (Requires ACQ) |
| Finish Prep | Excellent for Charring | Poor (Uneven Burn) |
| Weight | Lightweight | Very Heavy |
| Stability | High Dimensionality | Prone to Warping |
| Cost | Premium | Budget Friendly |
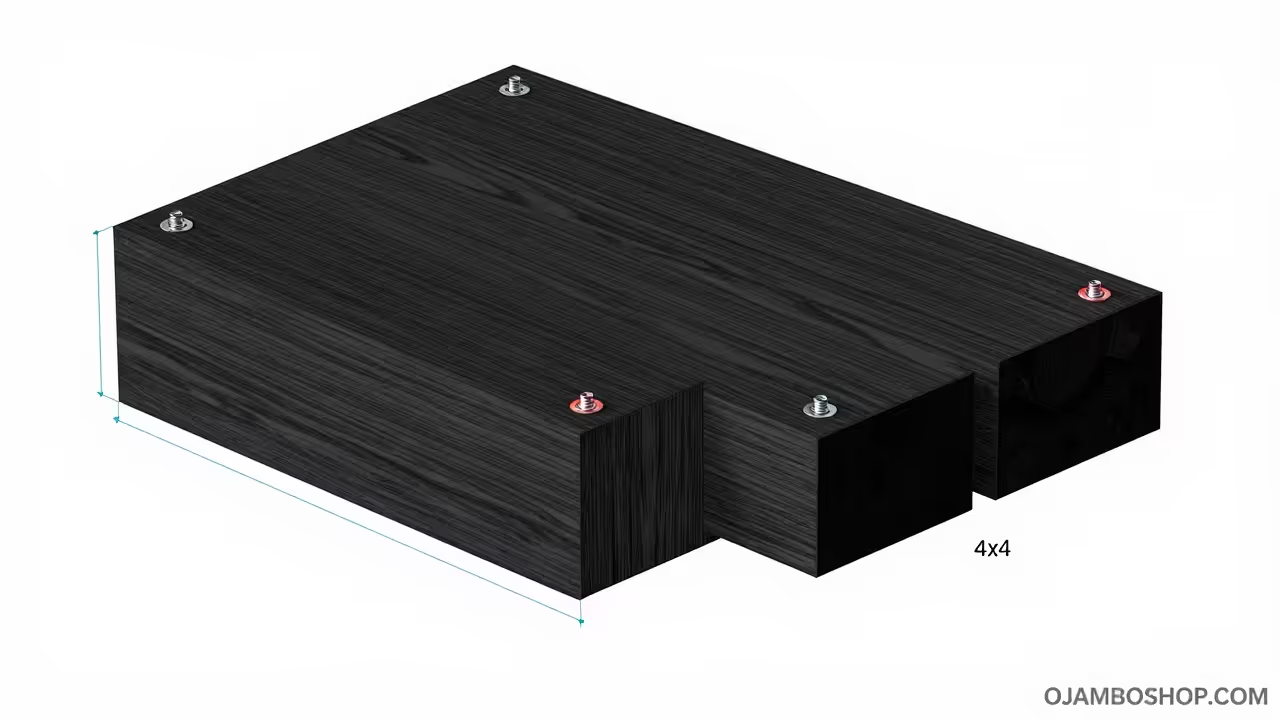
Technical Layout
The structural integrity of this Japanese style dining table relies on a robust trestle inspired frame with integrated mechanical fasteners. We utilize a dual stretcher system that connects the two leg assemblies to prevent lateral movement or swaying during heavy use. The 4×4 legs are notched to accept the 2×4 aprons, creating a mechanical lock that does not rely solely on the shear strength of screws.
The tabletop is designed as a floating assembly to account for the significant expansion and contraction of cedar in outdoor humidity. We use specialized tabletop fasteners or oversized pilot holes to allow the 2×6 planks to move without cracking the underlying frame. This technical approach ensures the table remains flat and stable even after multiple seasons of direct rain and sun exposure in your backyard.
Pro-Tip: When carbonizing the wood, aim for a “crocodile skin” texture during the initial burn to ensure deep penetration of the char. This thick carbon layer acts as a sacrificial barrier that prevents moisture from reaching the inner cellulose of the lumber. If you brush back too much of the char, you compromise the natural rot resistance provided by the Shou Sugi Ban process.
Step-by-Step Instructions
Phase 1: Material Preparation and Milling
Begin by selecting the straightest Western Red Cedar boards available at your local lumber yard to minimize waste. Use a table saw to rip a quarter inch off each edge of the 2×6 tabletop planks to ensure perfectly square glue joints. Crosscut all components to the lengths specified in the cut list, ensuring every end is perfectly square and clean for joinery.
Phase 2: Constructing the Leg Assemblies
Lay out the 4×4 posts and mark the locations for the half lap joints where the horizontal supports will meet the legs. Use a miter saw with a depth stop to make multiple kerf cuts before chiseling out the waste for a clean fit. Glue and screw the horizontal 4×4 members into the legs, ensuring the assembly remains perfectly square throughout the clamping process.
Phase 3: Building the Apron Frame
Connect the long 2×4 apron pieces to the leg assemblies using heavy duty pocket hole joinery on the interior faces. Reinforce the corners with 45 degree mitered blocks to prevent the frame from racking over time under the weight of the tabletop. Pre drill all holes to prevent the cedar from splitting, especially near the end grain of the long apron runs.
Phase 4: Tabletop Glue Up
Arrange the 2×6 planks on a flat surface, alternating the direction of the growth rings to counteract any natural tendency to cup. Apply a generous bead of waterproof wood glue to the edges and use pipe clamps every 12 inches to achieve a tight bond. Wipe away any glue squeeze out immediately with a damp cloth, as dried glue will resist the carbonization process later.
Phase 5: The Shou Sugi Ban Charring Process
Secure the tabletop and frame in a well ventilated outdoor area away from flammable materials or dry grass. Pass the propane torch slowly across the wood surface until the wood turns black and develops a cracked, textured appearance. Ensure you char every exposed surface, including the underside of the table, to maintain equal moisture equilibrium across the wood.
Phase 6: Brushing and Cleaning
Once the wood has cooled completely, use a stiff wire brush to scrub the surface in the direction of the wood grain. This process removes the soft, loose soot and reveals the hard, darkened latewood growth rings for a beautiful textured look. Use a compressed air nozzle or a damp rag to remove every trace of fine dust before moving to the finishing stage.
Phase 7: Applying the Protective Oil
Generously apply a high quality natural finishing oil, such as tung oil or linseed oil, to the entire charred surface. The porous carbon layer will drink in the oil, creating a waterproof seal that locks in the black color and prevents soot transfer. Allow the first coat to cure for twenty four hours before buffing the surface and applying a second protective layer.
Phase 8: Final Assembly
Place the tabletop face down on a protected surface and center the frame assembly over the underside of the planks. Attach the frame using Z-clips or figure eight fasteners to allow the wood to breathe and move with the seasons. Flip the table upright and perform a final check for levelness, adjusting the leg bottoms if your patio surface is slightly uneven.
Common Mistakes
Failing to alternate the grain direction in the tabletop is a frequent error that leads to severe cupping within the first year. Cedar is a responsive wood, and without proper orientation, the wide planks will eventually pull the entire table out of alignment. Always inspect the end grain of your boards to ensure you are balancing the tension across the entire width of the piece.
Another mistake is rushing the carbonization process by moving the torch too quickly across the surface of the Western Red Cedar. An uneven burn results in splotchy coloring and leaves sections of the wood unprotected from moisture and ultraviolet light. Take your time to achieve a consistent, deep char across the entire project to ensure the aesthetic and functional benefits of the technique.
Many builders forget to account for wood movement when attaching the tabletop to the heavy 4×4 leg and apron frame. Using standard deck screws driven vertically through the frame into the planks will eventually result in the screws snapping or the wood splitting. Mechanical fasteners designed for tabletop movement are a requirement for any professional grade outdoor furniture project that aims for longevity.
Maintenance and Safety
Working with a high output propane torch requires a dedicated fire extinguisher on hand and a clear workspace free of debris. Always wear a respirator and eye protection during the wire brushing phase to prevent inhaling carbon dust or getting soot in your eyes. Since cedar dust is a known irritant, ensure you are working in a space with excellent airflow during the sanding and milling stages.
Maintenance for a Shou Sugi Ban table is significantly lower than traditionally stained or painted outdoor furniture found in most backyards. Every two to three years, you should clean the surface with mild soap and water to remove any accumulated dirt or pollen. If the finish begins to look dull, simply apply a fresh coat of finishing oil to rejuvenate the deep black luster.
Inspect the hardware annually to ensure that all connections remain tight and that the wood has not experienced any localized structural damage. If the table is kept in a particularly harsh environment with heavy snow, consider covering it during the winter months to prolong its life. With minimal care, this Japanese style dining table will remain a functional piece of art on your patio for several decades.