
Introduction to the Quonset Hut Greenhouse
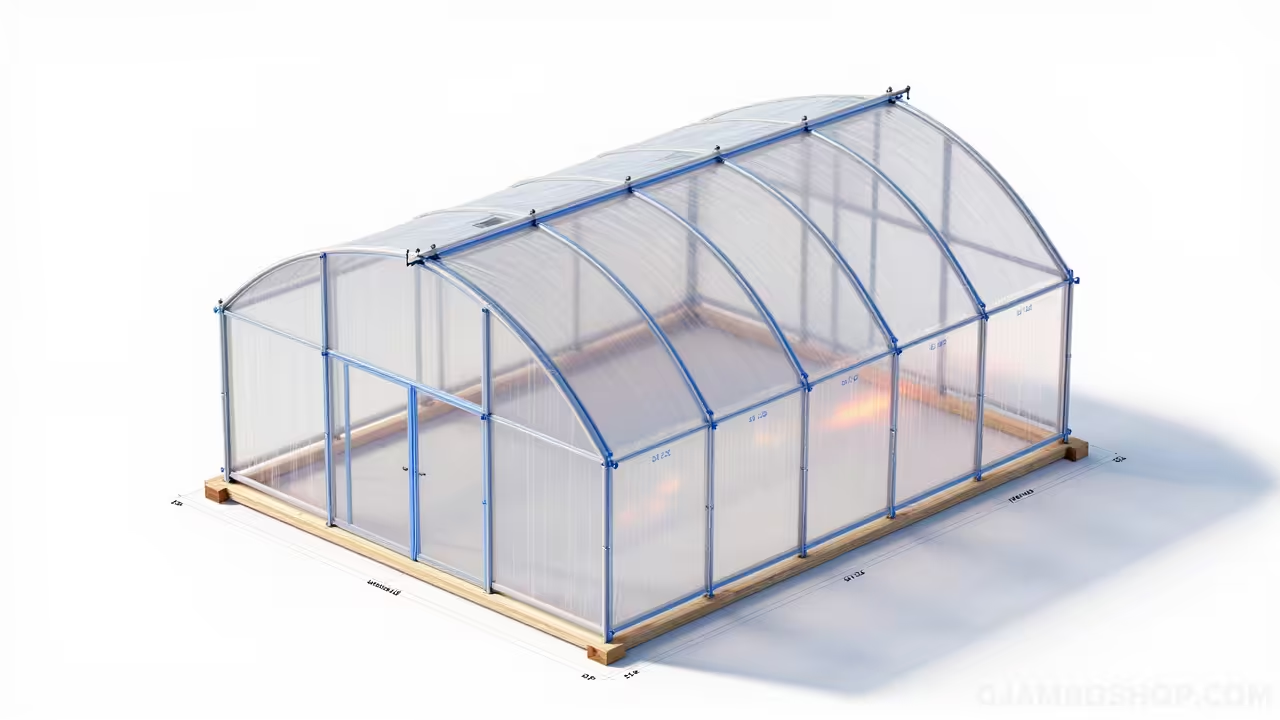
The Quonset hut greenhouse represents one of the most efficient and durable designs for the modern backyard grower. Its iconic semi-cylindrical shape is not merely an aesthetic choice but a calculated engineering decision that maximizes interior volume while minimizing wind resistance.
Adding a 10×12 structure to your property significantly extends your growing season and provides a controlled environment for delicate starters. This specific footprint offers ample room for vertical shelving and a central walkway without consuming excessive lawn space.
Beyond its utility as a garden tool, a well-constructed Quonset greenhouse increases property value and serves as a sustainable focal point. By following these professional plans, you ensure a structure that withstands heavy snow loads and high winds for years to come.
Quick Project Specifications
The 10×12 Quonset greenhouse is designed for the intermediate DIYer who has a basic understanding of power tools and framing. While the curved ribs may look complex, the assembly process is straightforward when using the right materials and jigs.
The estimated cost for this project ranges from 600 to 900 dollars depending on your local lumber prices and the quality of the polyethylene film selected. This budget covers the foundation, framing, door assembly, and high-grade UV-resistant greenhouse skin.
Construction time typically requires two full weekends for a solo builder or one long weekend with a dedicated assistant. The difficulty level is rated as moderate because it involves specialized bending or assembly of the arched ribs and precise squaring of the base.
Comprehensive Materials and Tools List
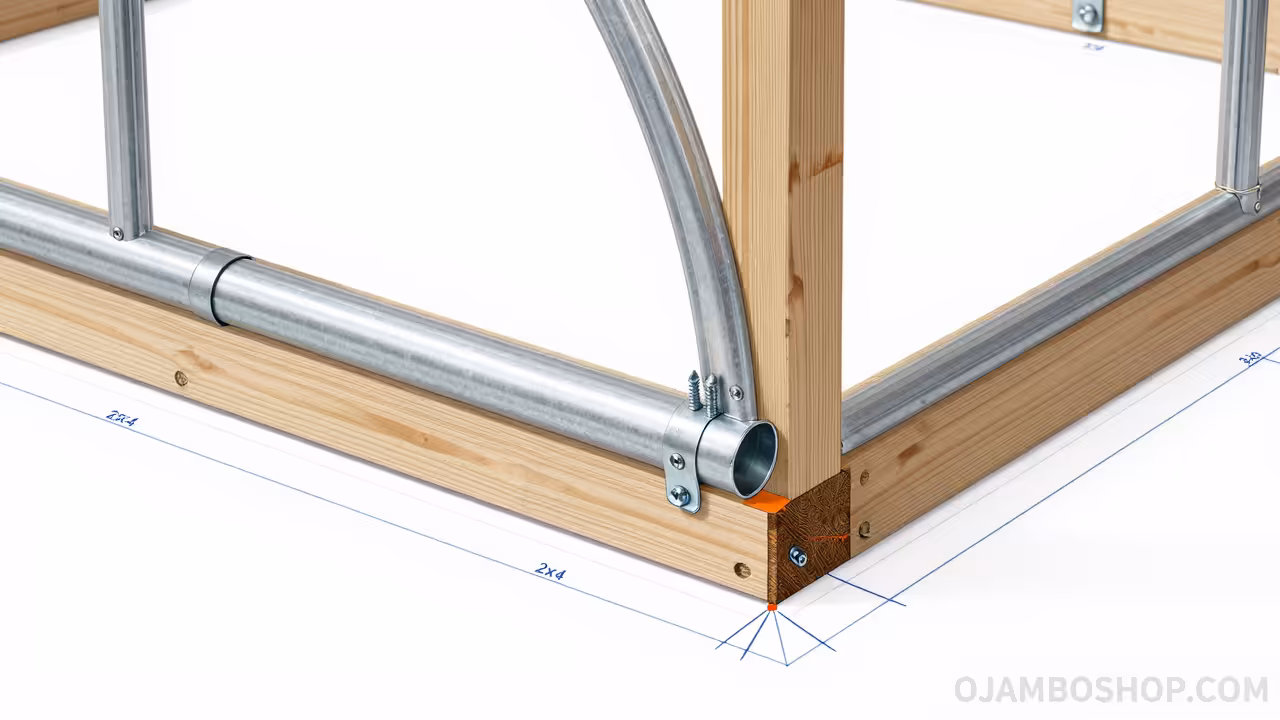
The longevity of your greenhouse depends entirely on the quality of the components you select at the start. For the 10×12 footprint, you will need pressure-treated 4×4 timbers for the base and schedule 40 PVC or specialized galvanized steel hoops for the ribs.
Standard 2×4 lumber is required for the end walls, door frames, and horizontal purlins that provide lateral stability. You will also need 6-mil greenhouse plastic, wiggle wire channels for securing the film, and a variety of exterior-grade fasteners to prevent rust.
Essential tools include a miter saw, a cordless drill with impact driver, a level, and a framing square for the base. A pneumatic stapler can speed up the process of attaching smaller details, but a manual hammer and high-quality wood glue are sufficient for the primary structural joints.
| Material Type | Recommended Specification | Primary Purpose |
|---|---|---|
| Base Timbers | 4×4 Pressure Treated | Foundation and Anchoring |
| Arch Ribs | 1-inch Schedule 40 PVC | Structural Skeleton |
| Wall Framing | 2×4 Cedar or Treated Pine | End Walls and Doorway |
| Cladding | 6-mil UV-Resistant Poly | Light Transmission/Cover |
| Fasteners | 3-inch Decking Screws | Main Frame Assembly |
| Securing | Wiggle Wire and U-Channel | Film Tensioning |
Technical Layout and Structural Integrity
The structural integrity of a Quonset hut relies on the distribution of tension across the continuous curve of the ribs. In a 10×12 configuration, the ribs are spaced every 24 inches on center to provide maximum support against external pressures like wind and snow. Each rib is securely fastened to the heavy 4×4 base plate using specialized pipe clamps or heavy-duty galvanized straps to prevent uplift during storms.
The end walls serve as the primary shear panels, preventing the structure from racking or leaning forward and backward under stress. By incorporating horizontal purlins that run the full 12-foot length of the structure, we tie each individual rib into a singular, rigid unit. This triangulation of forces ensures that the weight of the polyethylene cover and any environmental accumulation is transferred directly down into the foundation.
Pro-Tip: To significantly increase the lifespan of your greenhouse film, apply felt tape or specialized poly-patch tape to the top of every rib before installing the plastic. This creates a smooth thermal barrier that prevents the PVC or wood from off-gassing and degrading the plastic through friction and heat transfer during the summer months.
Step-by-Step Instructions
Phase 1: Site Preparation and Foundation
The first step in any successful build is ensuring the ground is perfectly level and well-drained. Clear a 12×14 area of all sod and debris to allow for a small gravel perimeter around your 10×12 footprint. Lay out your 4×4 pressure-treated timbers to form a perfect 10-foot by 12-foot rectangle on the leveled ground.
Use a framing square and measure the diagonals; if the diagonal measurements are equal, your base is square and ready for anchoring. Drive rebar stakes through pre-drilled holes in the 4×4 timbers to secure the foundation to the earth. This prevents the greenhouse from shifting or lifting during high-wind events, which is the most common cause of structure failure.
Phase 2: Assembling the Arched Ribs
For a 10-foot wide span, each rib needs to be approximately 15 to 16 feet long to create a comfortable 7-foot interior peak. If you are using PVC, you may need to join two smaller sections using a coupling and high-strength PVC cement for a seamless arc. Carefully bend the first rib and slot it into the base connectors on either side of the 10-foot width.
Ensure the rib is vertical and not leaning before tightening the clamps or driving the screws through the base plate. Repeat this process for all seven ribs, maintaining a strict 24-inch spacing on center along the 12-foot length of the base. Check the peak height of each rib with a string line to ensure the roofline remains perfectly level from front to back.
Phase 3: Installing the Ridge Pole and Purlins
The ridge pole is the most critical horizontal component as it connects the highest point of every rib. Use a 12-foot long 2×4 or a specialized metal pipe to span the interior peak and screw it into each rib. In addition to the ridge pole, install side purlins approximately 3 to 4 feet up from the base on both sides.
These side supports prevent the ribs from bowing inward and provide a solid surface for interior shelving or irrigation lines. Use galvanized carriage bolts or heavy-duty structural screws at every junction point to ensure the frame cannot vibrate loose. Once the purlins are installed, the structure should feel remarkably rigid and resistant to manual pushing or pulling.
Phase 4: Framing the End Walls
The end walls are where you will install your door and any necessary ventilation windows or fans. Use 2×4 lumber to create a vertical frame within the front and rear arches, ensuring the studs are spaced for a standard 36-inch door. It is vital to notch the 2×4 studs so they sit flush against the curved ribs of the Quonset hut.
Secure these vertical members to both the 4×4 base timbers and the overhead ribs using metal hurricane ties for maximum strength. Add horizontal cross-bracing between the end wall studs to create rough openings for your door and ventilation shutters. If you live in a hot climate, consider making the rear wall almost entirely openable to allow for maximum airflow.
Phase 5: Installing the Greenhouse Film
Choose a calm day with no wind to install the 6-mil polyethylene film, as even a slight breeze can turn the plastic into a sail. Drape the large sheet over the entire structure, ensuring there is at least a foot of overhang on all sides. Start by securing the film at the center of the ridge pole and work your way down toward the base.
Use wiggle wire and U-channels along the base timbers to create a drum-tight fit that prevents the plastic from flapping. Avoid over-tightening the plastic in cold weather, as it will naturally contract and may tear at the fastener points. The goal is a smooth, glass-like surface that allows water and snow to slide off effortlessly without pooling.
Phase 6: Door and Vent Construction
Build a simple rectangular door frame using lightweight cedar or treated 2x4s to prevent the door from sagging over time. Cover the door frame with a separate piece of greenhouse film, securing it with lath strips or staples. Install heavy-duty exterior hinges and a latch that can be operated from both the inside and outside of the greenhouse.
Ensure the door has a tight seal against the end wall frame to maintain the interior temperature during the winter months. On the opposite wall, install a manual or solar-powered exhaust vent near the peak of the arch. Since heat rises, placing the vent at the highest possible point is the most effective way to regulate the internal climate.
Phase 7: Interior Layout and Flooring
With the shell complete, you can now focus on the interior functionality by installing gravel or wood mulch flooring. Gravel is preferred for greenhouses as it provides excellent drainage and helps retain thermal mass to stabilize nighttime temperatures. Construct tiered shelving along the 12-foot sides of the greenhouse using rot-resistant lumber like cedar or composite decking.
Ensure the benches are at a comfortable working height and are sturdy enough to support heavy pots and saturated soil. Consider installing a basic drip irrigation system or a central water line to make daily maintenance more efficient. Having a dedicated workspace inside the 10×12 area allows you to pot plants and start seeds regardless of the weather outside.
Phase 8: Finishing Touches and Sealing
Walk around the perimeter of the structure and check for any gaps where air might escape or pests might enter. Use exterior-grade silicone caulk to seal the joints around the door frame and the ventilation openings. If you are in a region with extreme sun, consider installing a 30 percent shade cloth over the top of the film during the summer.
This prevents the interior from reaching lethal temperatures for your plants while still providing plenty of light for growth. Double-check all fasteners and tighten any that may have loosened during the construction process. Your 10×12 Quonset hut greenhouse is now ready for its first tray of seeds and a long life of productive gardening.
Common Mistakes to Avoid
The most frequent error builders make is failing to properly anchor the base timbers into the ground with rebar or concrete. A 10×12 greenhouse has a large surface area, and a strong wind can easily flip an unanchored structure, destroying the frame and film.
Another common mistake is using standard construction-grade plastic instead of specialized 6-mil UV-resistant greenhouse film. Standard plastic will become brittle and yellow within a single season, whereas greenhouse film is designed to last four to five years.
Builders often neglect the importance of ventilation, assuming the door will provide enough airflow for the plants. Without dedicated intake and exhaust vents, the humidity levels will spike, leading to fungal diseases and poor plant health within weeks.
Maintenance and Safety Procedures
Maintaining your Quonset greenhouse involves an annual inspection of the film for small tears or punctures that can be fixed with repair tape. Wash the exterior of the film every spring with a mild soap and water solution to remove dust and maximize light transmission.
Always wear safety glasses and hearing protection when operating power saws or drills during the construction phase. Ensure that any electrical components, such as fans or heaters, are rated for wet environments and are connected to a GFCI-protected outlet.
Apply a fresh coat of water-repellent sealer to the exposed wood of the end walls every two years to prevent rot. By following these simple maintenance steps, your OJAMBOSHOP.COM Quonset hut greenhouse will provide a lush, green sanctuary for decades.