
Introduction
Adding a heavy duty 12×20 carport to your property provides more than just shelter for your vehicle. This specific design incorporates a functional storage closet at the rear to bridge the gap between a simple lean-to and a full-scale garage. A well-constructed carport protects your automotive investments from harsh ultraviolet rays and heavy precipitation.
By selecting premium pressure-treated lumber and robust roofing materials, you ensure that this structure remains a permanent asset to your home for decades. Homeowners often find that the addition of integrated storage solves the common problem of cluttered driveways. This build combines structural engineering principles with practical utility to create a workspace that is both beautiful and incredibly resilient against the elements.
Quick Specs
Dimensions: 12 feet wide by 20 feet long with an 8-foot internal height. Estimated Cost: $1,800 to $2,400 depending on local lumber market fluctuations. Difficulty Level: Advanced DIY or Intermediate with a secondary helper. Estimated Build Time: Three to four weekends for a dedicated two-person team.
Materials and Tools
The foundation of any lasting structure begins with high-quality materials rated for ground contact and exterior exposure. You will need fourteen 6×6 pressure-treated posts to support the primary weight of the roof and the enclosed storage area. For the main headers, four 2×12 beams measuring twenty feet in length will provide the necessary span strength to prevent sagging over time.
Your rafter inventory should include thirteen 2×8 boards cut to twelve-foot lengths to accommodate the roof pitch and overhangs. The storage closet requires 2×4 framing studs, exterior-grade T1-11 siding, and a heavy-duty pre-hung exterior door or custom-built barn doors. Metal roofing panels are recommended for the top layer due to their longevity and ease of installation compared to traditional asphalt shingles.
Essential tools for this project include a sliding compound miter saw, a circular saw, and a high-torque impact driver for driving large structural screws. You will also need a post-hole digger or power auger, a four-foot level, a chalk line, and a laser level to ensure the site is perfectly flat. Safety equipment such as impact-rated eye protection, heavy-duty work gloves, and a sturdy extension ladder are non-negotiable requirements for a safe job site.
| Material Category | Item Description | Quantity/Unit |
|---|---|---|
| Framing Lumber | 6×6 x 10′ Pressure Treated Posts | 10 Pieces |
| Support Beams | 2×12 x 20′ Structural Headers | 4 Pieces |
| Roof Rafters | 2×8 x 12′ Kiln Dried Lumber | 13 Pieces |
| Hardware | 8-inch Structural Timber Screws | 50 Count |
| Hardware | 1/2-inch x 10-inch Galvanized Carriage Bolts | 24 Count |
| Roofing | 26-Gauge Ribbed Metal Panels | 260 Sq Ft |
| Foundation | 80lb Bags of High-Strength Concrete Mix | 14 Bags |
Technical Layout
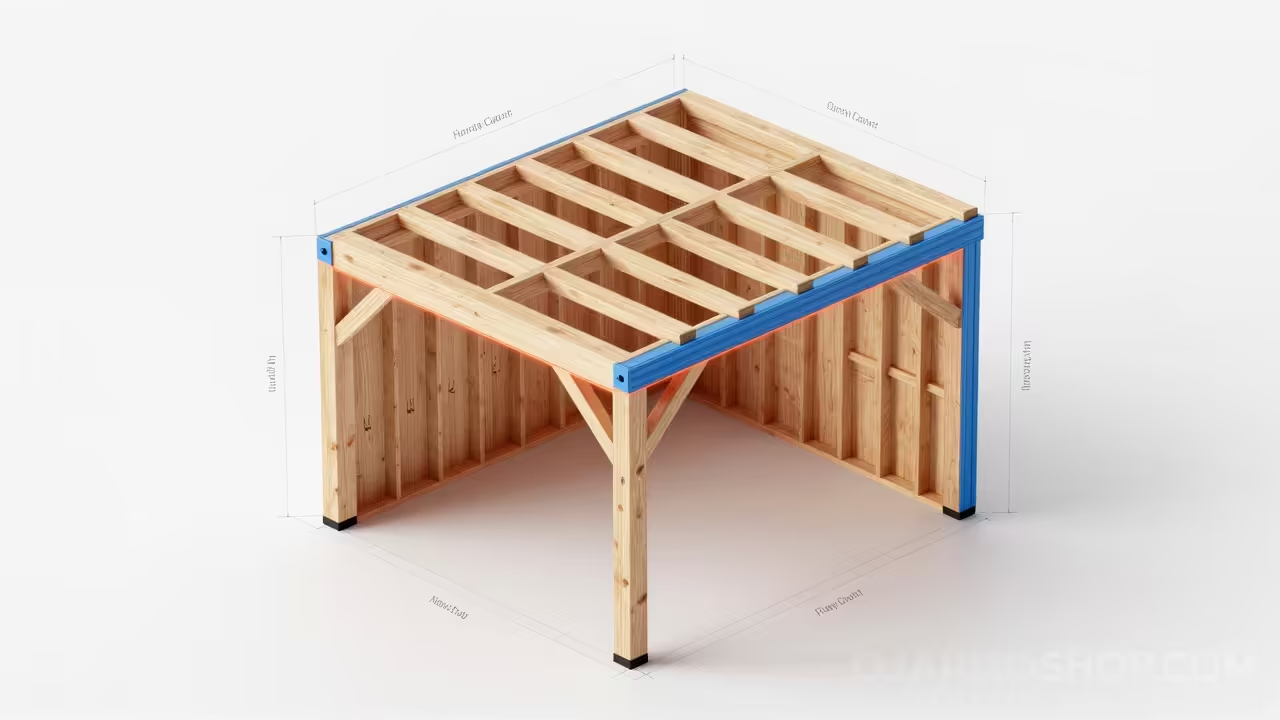
The structural integrity of a 12×20 carport relies heavily on the distribution of live and dead loads through the vertical posts to the concrete footings. In this specific design, the rear four feet of the twenty-foot span are dedicated to the integrated storage closet, which acts as a sheer wall to provide lateral stability. We utilize a post-and-beam construction method where the primary headers are notched into the 6×6 posts to ensure a wood-on-wood connection.
This prevents the entire weight of the roof from relying solely on the shear strength of the galvanized bolts. Each rafter is spaced at 24 inches on center, which is standard for metal roofing applications, though 16 inches may be used in high snow-load regions. The storage closet walls are framed with 2×4 studs at 16 inches on center and are tied directly into the main support posts.
By anchoring the base of these walls into the concrete pad or footings, we create a rigid box structure that prevents the carport from swaying during high-wind events. Pro-Tip: Always use double-mitered birdsmouth cuts on your rafters to ensure maximum surface contact between the rafter and the load-bearing beam for a professional finish.
Step-by-Step Instructions
Phase 1: Site Preparation and Footings
Begin by marking the perimeter of your 12×20 footprint using batter boards and mason line to ensure the layout is perfectly square. Dig fourteen post holes to a depth of 36 inches or below your local frost line to prevent seasonal shifting. Pour six inches of gravel into the bottom of each hole for drainage before setting your 6×6 posts in high-strength concrete. Use temporary 2×4 bracing to keep the posts perfectly plumb while the concrete cures for at least forty-eight hours.
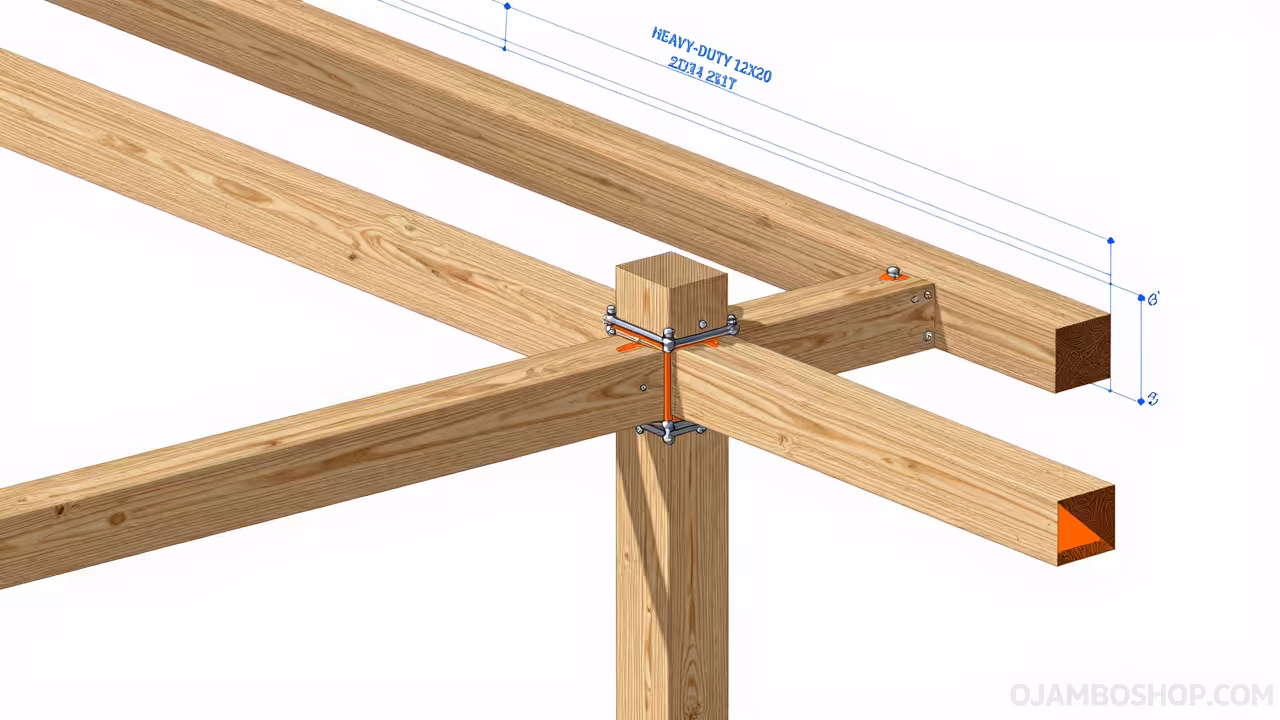
Phase 2: Notching and Setting Headers
Measure and mark the finished height on all posts, ensuring a slight slope of at least 1/4 inch per foot for proper roof drainage. Use a circular saw to notch the tops of the posts so the 2×12 headers can sit flush against the internal shoulder of the wood. Lift the twenty-foot beams into place and secure them using two 10-inch carriage bolts per post connection. Ensure the beams are level across the width of the structure to prevent issues during the rafter installation phase.
Phase 3: Rafter Installation
Cut your 2×8 rafters to length, incorporating a 12-inch overhang on both the front and rear of the carport for weather protection. Mark the positions for the rafters every 24 inches along the top of the main headers using a tape measure and a speed square. Secure each rafter using hurricane ties and structural wood screws to provide resistance against wind uplift. Check for squareness across the roof plane by measuring the diagonals frequently during this stage of the build.
Phase 4: Storage Closet Framing
The rear four feet of the carport will now be enclosed to create the integrated storage unit for your tools and equipment. Frame the bottom plates using pressure-treated 2×4 lumber and secure them directly to the concrete surface with wedge anchors. Install the vertical studs at 16-inch intervals and leave a rough opening for your chosen door size. Tie the top plates of these walls into the bottom of the roof rafters to create a seamless structural connection.
Phase 5: Sheathing and Siding
Apply exterior-grade plywood or T1-11 siding to the exterior of the storage closet walls, starting from the bottom and working upward. Use 8d galvanized nails spaced every six inches along the edges to prevent the panels from warping over time. If you are using T1-11, ensure the vertical grooves align perfectly at the corners for a professional, high-end appearance. Install Z-flashing above the door opening to prevent water from infiltrating the header and causing premature rot.
Phase 6: Roofing and Purlins
Install 2×4 purlins across the top of the rafters, perpendicular to the roof slope, spaced at 24 inches on center to support the metal panels. Starting from the downward edge of the roof, lay your first metal panel and secure it with neoprene-washered roofing screws. Overlap the subsequent panels by at least one full rib to ensure a watertight seal across the entire 240-square-foot surface. Install a metal ridge cap if your design utilizes a gable roof, or simple eave flashing for a single-slope lean-to style.
Phase 7: Door and Hardware Installation
Hang your storage closet door, ensuring that it swings freely and clears the ground by at least half an inch to account for debris. Use heavy-duty strap hinges for a rustic look or standard ball-bearing hinges for a more modern, smooth operation. Install a high-quality deadbolt or pad-lockable hasp to keep your stored items secure from theft. Apply weather stripping around the perimeter of the door frame to keep moisture and pests out of the storage area.
Phase 8: Finishing and Wood Treatment
Sand any rough edges on the visible portions of the 6×6 posts and rafters to prepare the wood for a protective coating. Apply a high-quality semi-transparent stain or exterior paint to all wood surfaces to protect against UV damage and moisture penetration. Pay special attention to the end grain of the lumber, as this is where water is most likely to be absorbed into the wood fibers. Clear any construction debris from the site and perform a final inspection of all fasteners and structural connections.
Common Mistakes
One of the most frequent errors in carport construction is failing to account for the local frost line when digging footings. If the concrete bases are too shallow, the entire 12×20 structure can heave and settle unevenly, leading to roof leaks and structural failure. Always check with your local building department to confirm the required depth for permanent outdoor structures in your specific geographic region.
Another common pitfall is neglecting the use of galvanized or stainless steel fasteners in pressure-treated lumber. The chemicals used to treat the wood are highly corrosive to standard steel and will eat through the screws within a few years. Using the wrong hardware can lead to a catastrophic collapse of the headers or rafters under heavy snow or wind loads.
Lastly, many DIY builders forget to install adequate bracing during the initial phases of the project. A 12×20 structure has a large surface area that can catch the wind like a sail before the siding and roofing are fully secured. Without temporary diagonal bracing, the posts can lean or the entire frame can rack, making it impossible to install the roof panels squarely.
Maintenance and Safety
Maintaining your heavy-duty carport involves an annual inspection of the roof panels and all visible structural joints. Check for any loose roofing screws and tighten them as needed, ensuring the neoprene washers are still intact and providing a seal. Clean the gutters and roof surface of any fallen leaves or branches to prevent moisture traps that can lead to rust or wood decay.
Safety should be your primary concern during the building process, especially when handling heavy 2×12 beams and working at heights. Always use a stable ladder and never work alone when lifting the primary structural members into place. Wear a tool belt to keep your hands free for climbing and ensure your work area is clear of tripping hazards like scrap wood and power cords.
For long-term durability, we recommend reapplying a UV-resistant sealant to the wood every three to five years depending on sun exposure. This simple maintenance task prevents the wood from checking and splitting, which maintains the load-bearing capacity of your posts and beams. Proper care ensures that your OJAMBOSHOP.COM blueprint results in a structure that lasts a lifetime.