Disclaimer: I may earn a commission from purchases made through these links at no extra cost to you.
Geodesic Dome Living Mastery Guide
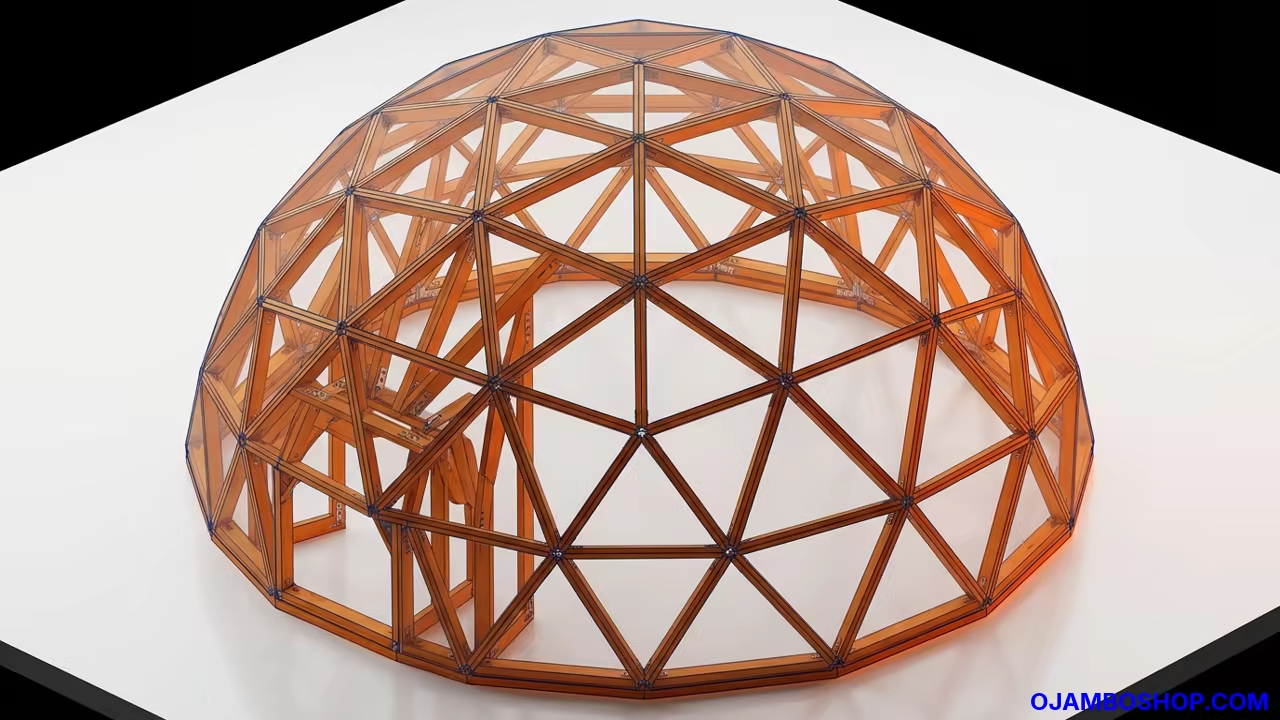
The geodesic dome represents a pinnacle of architectural efficiency and structural strength for modern micro living.
This design utilizes a network of triangles to distribute stress evenly across the entire surface of the home.
Implementing a dome structure adds significant aesthetic and functional value to any residential property.
These homes offer superior energy efficiency and an organic feel that traditional square dwellings simply cannot match.


Quick Specs
Dimensions are 19.5 foot diameter by 10 foot peak height.
The estimated cost ranges from 18,000 to 22,000 dollars.
The difficulty level is rated as advanced.
The estimated build time is 6 to 8 weeks.
Materials and Tools
The framing requires a high volume of precision cut lumber to maintain the geometric integrity of the 3V dome.
You will need approximately 120 pieces of 2×4 kiln dried douglas fir for the primary struts.
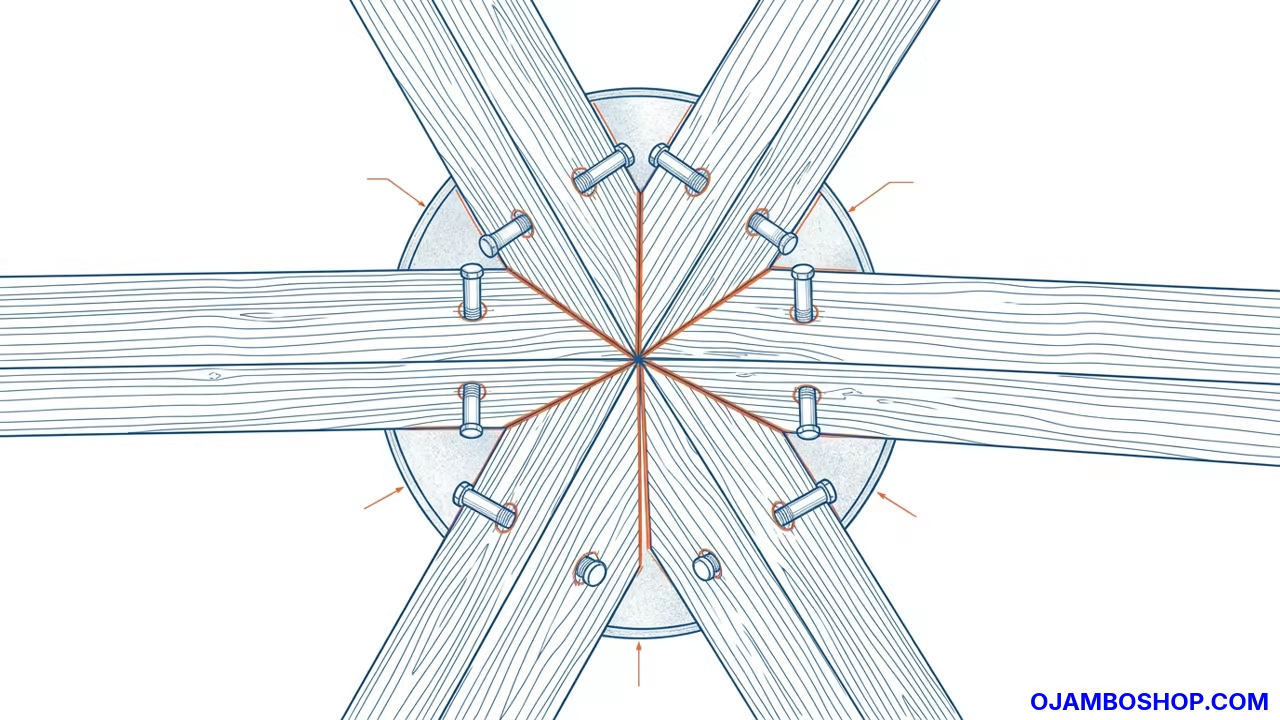
Heavy duty galvanized carriage bolts and locking nuts are essential for securing the hub connections.
For the exterior skin use 4×8 sheets of 1/2 inch CDX plywood for the structural sheathing.
A high quality synthetic underlayment and architectural asphalt shingles will provide the necessary weather protection.
Ensure you procure a professional grade vapor barrier to prevent internal condensation and wood rot.
Required tools include a compound miter saw for precise angle cuts and a heavy duty impact driver for assembly.
A laser level is critical for ensuring the foundation ring is perfectly circular and flat.
You will also need a variety of clamps a pneumatic nail gun and a professional grade tape measure.
Safety equipment must include a full body harness for roof work and impact resistant safety goggles.
High density ear protection is recommended during the intensive cutting phase of the project.
Work gloves with reinforced palms will protect your hands from splinters and sharp hardware edges.
Technical Layout
The structural logic of this 300 square foot micro home relies on the 3V geodesic frequency.
This means the original icosahedron face is divided into three segments to create a more spherical shape.
The load is distributed axially through the struts which minimizes the need for internal support columns.
This creates an open floor plan that maximizes the usable square footage of the interior.
Each triangle in the network serves as a rigid unit that resists deformation under heavy snow or wind loads.
The intersection points or hubs are the most critical components of the entire assembly process.
By using a combination of A struts and B struts the dome achieves its characteristic curvature.
Precision in these lengths is what prevents the structure from collapsing or becoming asymmetrical during the build.
The connection angles are calculated to ensure that every member meets at a precise geometric point.
This geometry allows the home to withstand extreme weather events better than traditional gabled roofs.
The spherical nature of the building also reduces the total surface area exposed to the elements.
This leads to lower heating and cooling costs throughout the year for the inhabitant.
Step by Step Instructions
Phase 1 begins with comprehensive site preparation and ground leveling to ensure structural stability.
You must clear a 25 foot diameter circle and remove all organic debris from the topsoil.
Use a transit level to create a perfectly flat pad of compacted crushed stone.
This base prevents the dome from settling unevenly which would cause severe stress on the hubs.
Phase 2 involves the construction of the foundation ring and the placement of anchor bolts.
Build a circular perimeter using pressure treated 4×4 skids secured with heavy duty steel brackets.
Ensure the circle is mathematically true by measuring the diagonals from a center pin.
Drill precise holes for the anchor bolts that will tie the wooden frame to the ground.
Phase 3 focuses on the precision cutting of the struts based on the 3V geometry charts.
You must cut two different lengths of 2×4 lumber with specific compound miter angles on each end.
Label every single strut with a permanent marker to avoid confusion during the assembly process.
Even a quarter inch error in length can lead to significant gaps in the final shell.
Phase 4 is the hub assembly where the strut ends are joined using galvanized plates and bolts.
Position the struts according to the geodesic map and align the pre drilled holes carefully.
Tighten the carriage bolts using an impact driver but avoid over tightening to prevent wood crushing.
Double check the angle of each triangle before moving to the next section of the frame.
Phase 5 involves the erection of the first tier of the dome starting from the base ring.
Work in teams to lift the pre assembled triangles into position around the perimeter.
Secure each hub to the foundation ring using the anchor bolts installed in phase two.
Verify that the base tier is plumb and square before proceeding to the second level.
Phase 6 requires the installation of the secondary and tertiary tiers to build the dome height.
As the structure rises the triangles will begin to lean inward to create the curve.
Use temporary scaffolding to support the higher sections while the bolts are being tightened.
This phase requires constant checking of the center point to maintain a perfect sphere.
Phase 7 involves the installation of the final top pentagon which caps the geodesic structure.
This is the most challenging part of the frame as the pieces fit tightly together at the peak.
Carefully hoist the center cap into place and secure all remaining hub connections.
Once the peak is locked the entire structure becomes self supporting and incredibly rigid.
Phase 8 focuses on the installation of the exterior sheathing and the moisture barrier.
Cut the plywood into triangles that match the framing dimensions of the geodesic shell.
Nail the sheets securely to the struts while leaving a small gap for natural wood expansion.
Wrap the entire dome in a high quality synthetic underlayment to block all wind and rain.
Phase 9 covers the application of the final roofing material and the installation of windows.
Install architectural shingles or metal panels following the curves of the geodesic geometry.
Carefully cut the circular openings for the door and windows and install flashing to prevent leaks.
Seal all edges with professional grade silicone to ensure a completely airtight envelope.
Phase 10 finishes the project with internal insulation and the installation of the living utilities.
Use spray foam or wool insulation between the struts to maintain a consistent internal temperature.
Install the electrical wiring and plumbing within the wall cavities before adding the interior cladding.
Finish the interior with light colored plywood or drywall to enhance the sense of space.
Common Mistakes
The most frequent error is the failure to maintain precise strut lengths during the cutting phase.
Small discrepancies accumulate quickly and result in a dome that will not close at the peak.
Many builders forget to use a high quality vapor barrier between the sheathing and the exterior finish.
This leads to trapped moisture and rapid rot in the structural 2×4 framing.
Incorrect torque on the hub bolts is another common issue that compromises the structural integrity.
Bolts that are too loose allow the dome to sway while over tightened bolts crack the wood.
Improper site leveling often causes the base ring to warp over time.
This puts uneven pressure on the lower hubs and can lead to structural failure under heavy loads.
Maintenance and Safety
Regularly inspect the exterior seals and flashing every spring to prevent water intrusion.
Use a high quality clear sealant on all exposed wood joints to protect against UV damage.
Check the tightness of the hub bolts annually as the wood shrinks and expands with the seasons.
Use a torque wrench to ensure that all fasteners remain within the specified tension limits.
Always wear a certified safety harness when performing maintenance on the upper sections of the dome.
Ensure that a second person is on the ground to manage the safety line at all times.
Apply a fresh coat of water repellent sealant to the base ring every two years.
This prevents ground moisture from wicking up into the main structural framing of the home.
| Parameter | Description | Value |
|---|---|---|
| Douglas Fir | Structural Strength | High |
| Galvanized Steel | Structural Strength | Very High |
| PVC Plastic | Structural Strength | Medium |
| Cedar Wood | Structural Strength | Medium |
| Parameter | Description | Value |