
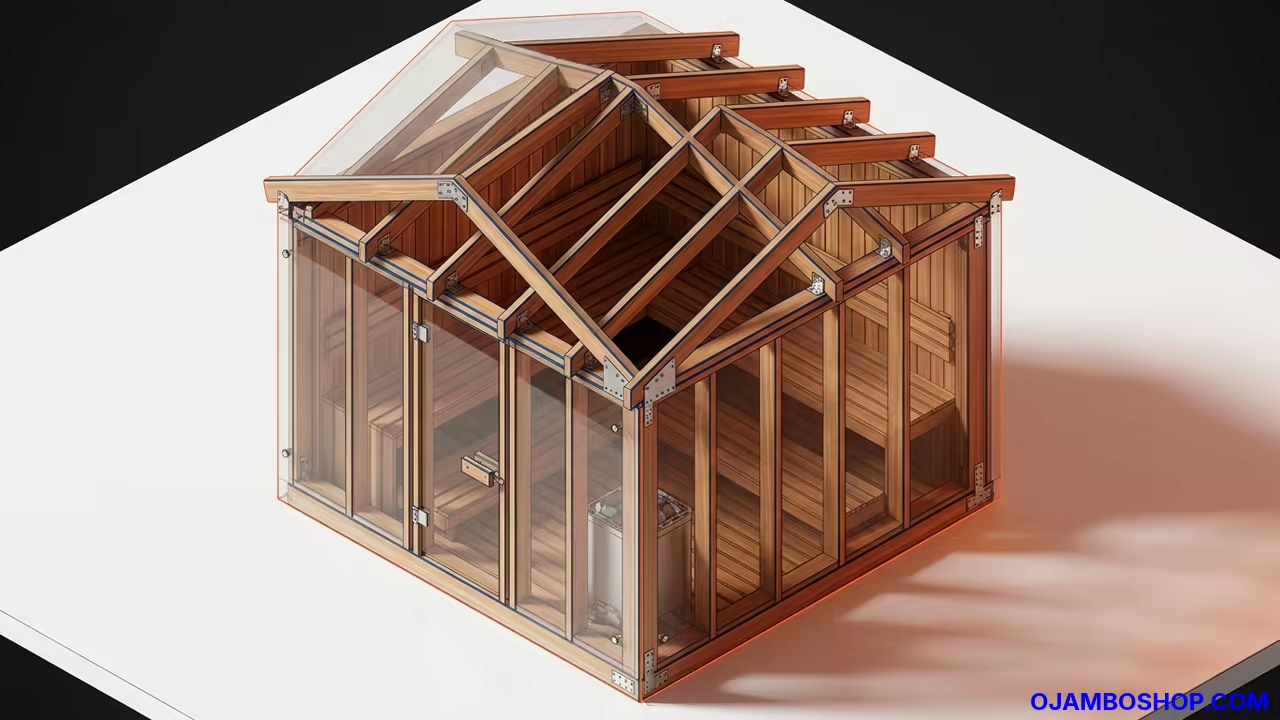
Celestial Cedar Sauna Sanctuary Blueprints For Backyard Wellness
Investing in a personal sauna is a transformative addition to any modern residential property. These structures provide an essential sanctuary for detoxifying the body and calming the mind after a long day.
A properly constructed cedar cabin increases the functional square footage of your outdoor living space. It serves as a focal point for wellness while adding significant market value to the home.
Building your own unit allows for complete control over the material quality and architectural layout. You can optimize the interior for specific heat preferences and ergonomic comfort.
Quick Specs
Dimensions are six feet by six feet for the exterior footprint. The total volume is optimized for four adults.
Estimated Cost ranges from two thousand five hundred to four thousand five hundred US Dollars. This varies based on lumber grade.
Disclaimer: I may earn a commission from purchases made through these links at no extra cost to you.


Difficulty level is classified as Advanced DIY. It requires proficiency with power tools and framing.
Estimated build time is eighty to one hundred twenty working hours. This depends on the number of assistants.
Materials and Tools
Lumber requirements include Western Red Cedar for all exterior and interior cladding. Pressure treated four by four skids are used for the foundation base.
Standard two by four framing studs create the wall structure. Rockwool mineral wool provides high temperature insulation for the walls and floor.
Stainless steel screws and galvanized framing nails ensure structural integrity. Cedar tongue and groove boards finish the walls and ceiling.
Hardware needs a professional wood burning sauna stove with a chimney kit. High temperature silicone sealant is required for heat shields.
Heavy duty door hinges and a magnetic sauna door latch provide secure access. Aluminum flashing protects the roof drip edges from moisture.
Stainless steel mesh is used for the stove heat shield. Required tools include a miter saw with a fine finish blade and an impact driver.
A cordless drill set and framing hammer are essential. A speed square and laser level ensure the foundation is perfectly square.
A stud finder and measuring tape are used for layout. A heavy duty staple gun secures the insulation batts.
| Parameter | Description | Value |
|---|---|---|
| Heat Resistance | Ability to withstand high temperature | Excellent for Cedar |
| Moisture Decay | Resistance to rot and water | Natural resistance in Cedar |
| Aroma Profile | Scent of the wood | Sweet and woody for Cedar |
| Cost Factor | Price per board foot | High for Cedar |
| Lifespan | Estimated years of service | Twenty to thirty years for Cedar |
| Parameter | Description | Value |
Technical Layout
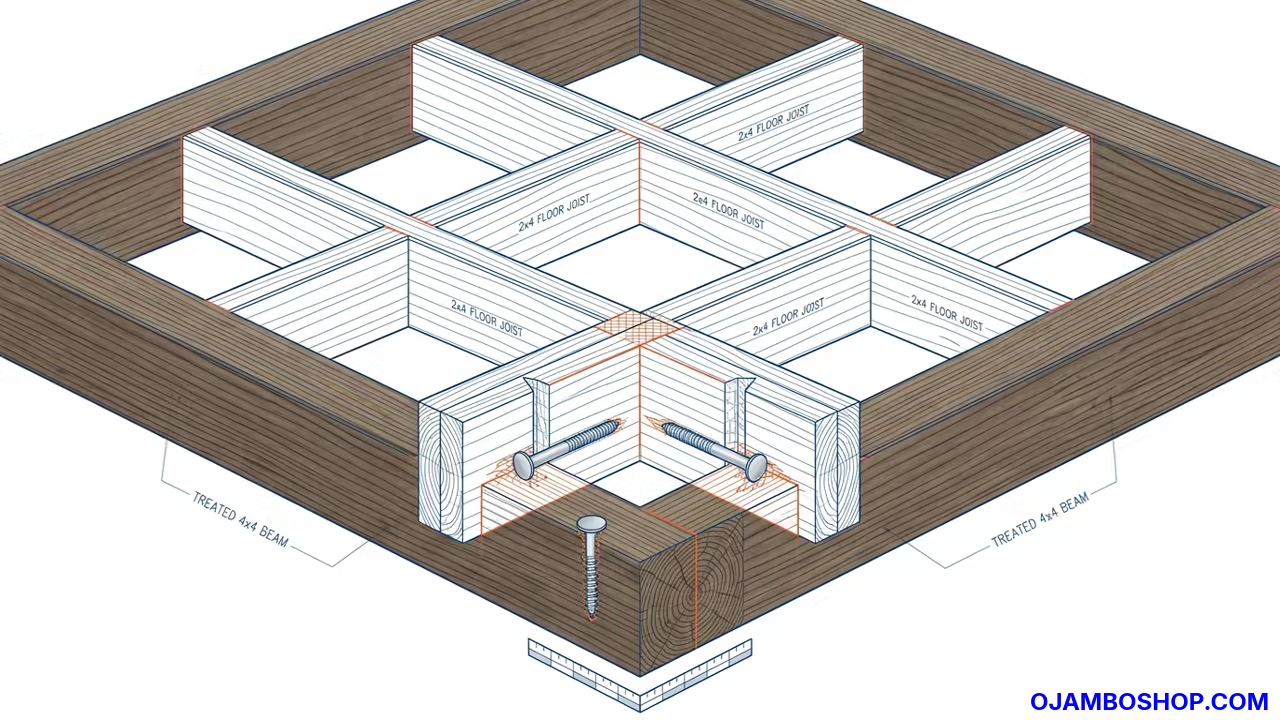
The structural integrity of a six by six sauna relies on a rigid load bearing frame designed to handle extreme temperature fluctuations. The foundation uses four four by four pressure treated skids that distribute the total weight evenly across a leveled gravel pad.
These skids support a two by four joist system spaced sixteen inches on center to prevent floor sagging under the weight of the stove. The walls utilize a standard stud array with double top plates to ensure the roof rafters remain perfectly aligned during high wind loads.
To manage the intense heat of a wood burning stove the interior frame incorporates a dedicated heat shield zone. This area uses a non combustible cement board layer separated from the cedar cladding by a one inch air gap.
This ventilation gap prevents the structural studs from reaching their ignition temperature while allowing the cedar to radiate heat. The roof is engineered with a four inch per foot pitch to ensure rapid water runoff and prevent snow accumulation.
Every joint is secured with stainless steel fasteners to prevent corrosion in the humid environment. This ensures the cabin remains safe and stable for decades.
Step by Step Instructions
Phase 1 Foundation Preparation
Phase one involves preparing the site and installing the foundation skids. You must first excavate a six by six area and fill it with four inches of compacted crushed stone.
Place the pressure treated four by four skids parallel to each other with twelve inches of spacing between them. Use a laser level to ensure the base is perfectly flat before securing the perimeter joists.
This stable base prevents the cabin from shifting during the freeze thaw cycles of winter. Proper leveling at this stage prevents structural lean in the final walls.
Verify the squareness of the skids using the three four five rule. Secure the corners with galvanized brackets for added stability.
Phase 2 Floor Assembly
Phase two focuses on the assembly of the floor frame and decking. Install two by four floor joists across the skids using galvanized framing nails at every intersection.
Lay a moisture barrier of heavy duty plastic over the joists to block rising ground dampness. Install cedar decking boards with a small gap between each board to allow for drainage.
Secure these boards with stainless steel trim screws to avoid unsightly rust stains. Ensure the floor is perfectly level before proceeding to the walls.
Check that all board ends are flush with the perimeter joists. This provides a clean surface for the wall plates to rest upon.
Phase 3 Wall Framing
Phase three requires the construction of the wall frames. Build four separate wall sections using two by four studs spaced sixteen inches apart on center.
Ensure the front wall has a rough opening for the door and the rear wall has a passage for the chimney. Use a speed square to verify that every corner is exactly ninety degrees before nailing the plates.
Stand the walls up and brace them temporarily while you secure the corners with structural screws. Double check the plumb of each wall using a level.
Nail the double top plates to tie the walls together into a single unit. This creates a rigid box that resists twisting.
Phase 4 High Temperature Insulation
Phase four is dedicated to the installation of high temperature insulation. Fit rockwool mineral wool batts tightly between the wall studs and floor joists.
This material is essential because it does not melt or release toxic fumes at sauna temperatures. Use a heavy duty staple gun to secure the insulation firmly against the framing members.
Ensure there are no gaps in the insulation to prevent heat leaks and cold spots. Press the batts firmly into the corners for a tight fit.
Verify that no insulation is blocking the ventilation gap for the heat shield. This allows air to flow freely around the stove area.
Phase 5 Interior Cedar Cladding
Phase five covers the installation of the interior cedar cladding. Begin by installing the tongue and groove cedar boards from the bottom up on the walls.
Use stainless steel blind nails to secure the boards without leaving visible heads on the surface. Leave a small expansion gap around the perimeter to allow the wood to breathe as humidity changes.
This cladding provides the iconic aroma and heat retention necessary for a true sauna experience. Ensure the boards are tightly locked together to prevent drafts.
Finish the ceiling with matching cedar boards running the length of the cabin. This creates a seamless and warm visual appearance.
Phase 6 Roof Engineering
Phase six focuses on the roof framing and sheathing. Cut the rafters at a consistent angle to create a shed roof slope for water drainage.
Install a ridge board and attach the rafters using hurricane ties for maximum structural stability. Lay cedar roof decking over the rafters and cover it with a waterproof underlayment.
Finish the roof with cedar shingles or metal panels depending on your aesthetic preference. Ensure the drip edges are installed to move water away from the walls.
Check the roof for leaks by spraying water over the seams. Seal any gaps with high quality exterior sealant.
Phase 7 Stove and Chimney Installation
Phase seven involves the installation of the wood burning stove and chimney. Place the stove on a non combustible hearth made of cement board or stone.
Install the chimney pipe according to the manufacturer specifications with a proper firestop through the roof. Apply high temperature silicone sealant to all pipe joints to prevent carbon monoxide leaks.
Test the draft of the chimney before performing the first full heating cycle. Ensure the pipe is perfectly vertical for optimal airflow.
Double check the clearances between the stove pipe and the cedar walls. Use a heat shield if the distance is less than the required safety margin.
Phase 8 Bench Construction
Phase eight centers on the construction of the ergonomic seating benches. Build a two tier bench system using clear cedar to avoid sap leaks onto the skin.
The upper bench should be positioned high enough to keep the user in the hottest zone of the room. Secure the bench supports to the wall studs to ensure they can hold several adults safely.
Sand all edges smooth to prevent splinters during use. Use rounded corners for a more professional and safer look.
Install small cedar slats on the bench surface for better air circulation. This prevents moisture from pooling on the wood.
Phase 9 Final Finishing
Phase nine is the final finishing and sealing process. Install the cedar door using heavy duty hinges that can withstand high heat and humidity.
Apply a clear non toxic wood sealer to the exterior cladding to protect it from UV rays. Seal the door frame with a high temperature gasket to minimize heat loss.
Perform a final walkthrough to ensure all fasteners are flush and the interior is clean. Remove all construction debris from the site.
Conduct a low heat test fire to cure the wood and check for any odors. Ensure the ventilation system is working as intended.
Common Mistakes
Many builders forget to install a proper vapor barrier between the insulation and the exterior cladding. This error leads to condensation trapping inside the walls and causing premature rot in the framing.
Another frequent mistake is choosing a stove that is too large for a six by six space. An oversized heater can overheat the cabin quickly and make the environment uncomfortable or dangerous.
Some DIYers use galvanized nails for the interior cedar work which eventually rust due to the high humidity. Always use stainless steel or cedar specific fasteners to maintain the beauty of the wood.
Incorrect chimney clearance is a major safety risk that can lead to house fires. Failing to maintain the required distance between the hot pipe and the wood framing is a critical error.
Maintenance and Safety
To ensure the longevity of your cedar cabin you must implement a strict maintenance schedule. Check the exterior sealer every two years and reapply it to prevent the cedar from turning grey.
Inspect the chimney flue annually for creosote buildup to prevent dangerous chimney fires. This prevents blockages and ensures a safe draft during winter use.
Clean the interior benches with a mild soap and water solution to remove skin oils and sweat. Avoid using harsh chemicals that can strip the natural oils from the cedar wood.
Ensure the floor is swept daily to remove debris that could obstruct the stove airflow. This maintains the efficiency of the wood burning system.
Safety gear is mandatory during the construction phase including safety glasses and a dust mask. When operating the sauna always keep a thermometer near the benches to monitor the heat.
Ensure a working carbon monoxide detector is installed just outside the sauna door for peace of mind. This is a critical safety requirement for wood burning heaters.
Pro Tip: To maximize material longevity install a rain screen system on the exterior. This involves adding a thin strip of cedar furring between the house wrap and the outer cladding.
This creates a ventilation gap that allows moisture to escape and keeps the exterior wood dry. It prevents rot and extends the life of the siding by several years.