
The creation of an heirloom quality jewelry box represents a significant milestone for any serious woodworker. It is a project that transcends simple utility, offering a vessel for history and sentiment that can be passed down through generations. A well-crafted box does more than store valuables; it serves as a testament to craftsmanship and adds a touch of sophisticated elegance to any interior space.
Building an heirloom piece increases the value of your skill set and your home collection simultaneously. Unlike mass-produced storage solutions, a handmade jewelry box utilizes premium hardwoods and precision joinery to ensure longevity. This guide focuses on the mitered corner design, which provides a seamless aesthetic flow of wood grain around the entire perimeter of the piece.
The satisfaction of completing this project comes from the marriage of technical accuracy and artistic expression. Whether you are building this for a loved one or as a high-end commission, the following blueprints ensure a structural integrity that withstands the test of time. By following these professional protocols, you will transform raw lumber into a functional work of art that commands attention.
Quick Specs
- Dimensions: 12 inches wide, 8 inches deep, 6 inches high.
- Estimated Cost: 80 to 150 dollars depending on hardwood species.
- Difficulty Level: Intermediate to Advanced Woodworking.
- Estimated Build Time: 12 to 16 hours plus finishing time.
Materials & Tools
Lumber
- 2 board feet of 4/4 Primary Hardwood (Walnut, Cherry, or Mahogany)
- 1 board foot of 1/4 inch Secondary Wood (Maple or Cedar)
- 1 piece of 1/4 inch Plywood (for the base and lid panel)
Hardware
- 2 Small Brass Quadrant Hinges
- Wood Glue (PVA or Hide Glue)
- Velvet or Suede Fabric for lining
Technical Layout
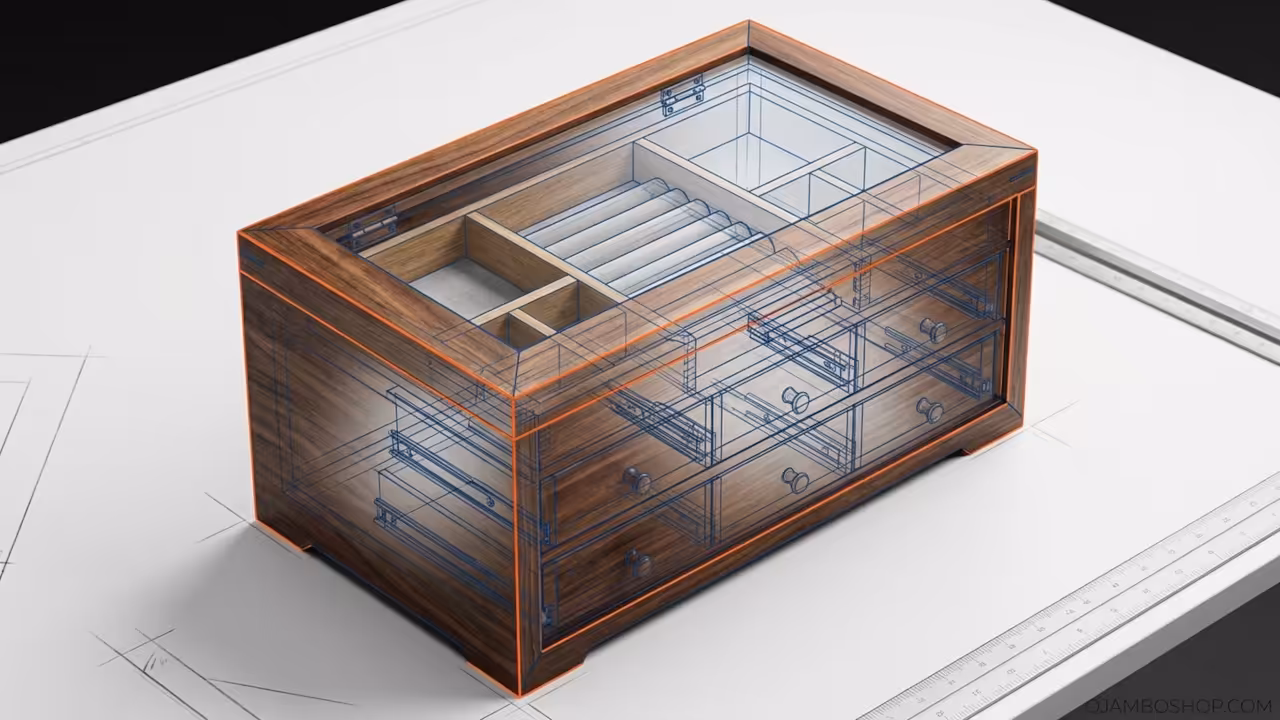
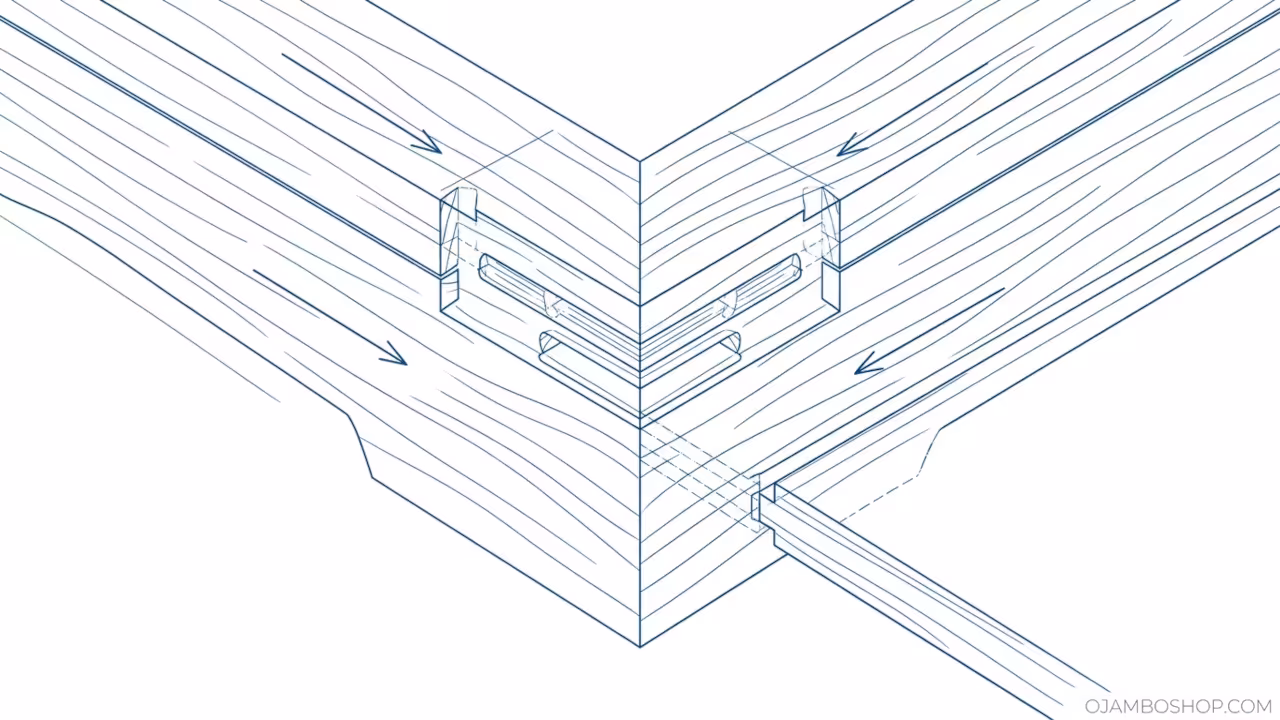
The technical foundation of this heirloom jewelry box relies on the precision of the four corner miters and the structural integration of the base and lid. Unlike butt joints, miters offer a clean visual transition, but they lack inherent mechanical strength because they involve end-grain to end-grain gluing surfaces. To compensate for this, our design incorporates hidden splines or keys that bridge the mitered gap, providing a significant increase in glue surface area and lateral stability.
The box is constructed as a solid six-sided cube before the lid is separated from the main body on the table saw. This method ensures that the grain remains perfectly continuous across the seam where the lid meets the base, a hallmark of high-end furniture making. The internal dimensions are calculated to allow for a 1/16 inch clearance for the fabric-lined inserts, preventing the trays from binding during seasonal humidity shifts. The bottom panel is housed in a groove, left unglued to allow the solid wood sides to expand and contract naturally without cracking the joinery.
Step-by-Step Instructions
Phase 1: Material Selection and Milling
Begin by selecting a single board of high-quality hardwood with consistent grain patterns. Mill the lumber to a final thickness of 5/8 inch for the main walls, ensuring the boards are perfectly flat and square. It is critical to plane all pieces in the same session to maintain uniform thickness throughout the build. Mark the faces and edges of your boards to keep the grain sequence in order for a wrap-around effect.
Phase 2: Cutting the Precision Miters
Set your table saw to exactly 45 degrees using a digital angle gauge for maximum accuracy. Use a dedicated miter sled or a high-quality miter gauge with a sacrificial fence to prevent blowout during the cut. Cut the front, back, and two side pieces to their final lengths, ensuring that the internal faces are perfectly matched. Dry fit the four sides together with blue painter’s tape to verify that the corners close tightly without any visible gaps.
Phase 3: Grooving for the Top and Bottom
While the box is still in four separate pieces, use a router table or table saw with a dado blade to cut grooves. These grooves should be 1/4 inch wide and 1/4 inch deep, located 3/8 inch from the top and bottom edges. These channels will house the top panel and the bottom base plate during the assembly phase. Ensure the depth of the groove does not exceed half the thickness of your wall material to maintain structural integrity.
Phase 4: Preparing the Panels
Cut your 1/4 inch plywood or solid wood panels for the top and bottom to fit within the grooves. If using solid wood for the panels, remember to undersize them slightly in width to allow for seasonal wood movement. Sand the interior faces of the panels and the inside of the box walls to 220 grit before assembly. It is much easier to achieve a perfect finish on the interior now than after the box is glued together.
Phase 5: The Main Glue-Up
Apply a thin, even layer of wood glue to the mitered faces, taking care not to use excessive amounts that will squeeze out onto the interior surfaces. Insert the top and bottom panels into their respective grooves and wrap the four sides together. Use a strap clamp or several parallel jaw clamps to apply even pressure from all four directions simultaneously. Check the box for square by measuring the diagonals; they must be identical for the box to sit flat.
Phase 6: Strengthening the Miters
Once the glue has fully cured for at least four hours, it is time to add the miter splines. Use a spline jig on the table saw to cut thin slots across each corner of the box at 90 degrees to the miter joint. Glue in thin strips of contrasting hardwood into these slots and allow them to dry completely. Use a flush-cut saw and a block plane to trim the splines level with the box surface, providing both strength and a decorative element.
Phase 7: Separating the Lid
This is the most critical phase where the solid box is transformed into a container and a lid. Set your table saw fence to 1.5 inches and raise the blade height just slightly higher than the thickness of the box walls. Carefully run each side of the box through the saw to cut the lid away from the base. Sand the resulting sawn edges on a flat surface covered with sandpaper to ensure a perfectly flush fit when the lid is closed.
Phase 8: Mortising for Hinges
Mark the locations for your quadrant hinges on the back wall of the base and the corresponding locations on the lid. Use a sharp chisel or a small router to create mortises that match the thickness and shape of the hinge leaves. Drill pilot holes for the brass screws using a bit that is slightly smaller than the screw shank to prevent the hardwood from splitting. Test the fit of the hinges to ensure the lid opens smoothly and aligns perfectly with the base.
Hardware & Material Comparison
| Component | Standard Choice | Premium Choice |
|---|---|---|
| Primary Wood | Oak or Pine | Black Walnut / Cherry |
| Joinery | Simple Miter | Keyed Miter Splines |
| Hinges | Surface Mount | Brass Quadrant Hinges |
Common Mistakes
The most frequent error in building a mitered box is failing to account for wood movement. Even a small jewelry box will expand and contract with the seasons, and if the top or bottom panels are glued tightly into their grooves, the sides will eventually crack. Always leave a small gap of approximately 1/16 of an inch for the panels to float freely.
Another common mistake is neglecting the sharpness of the saw blade. A dull blade will cause burn marks on the end grain of the miters or cause the wood fibers to tear rather than cut cleanly. This leads to poor glue adhesion and visible gaps in the final product. Always use a high-tooth-count finishing blade specifically designed for cross-cutting.
Finally, many builders rush the hinge installation process. If the mortises are even a fraction of a millimeter off, the lid will appear crooked or will not close flush. Take the time to use a centering bit for your pilot holes and verify the alignment multiple times before committing to the final screw placement.
Maintenance & Safety
Pro-Tip: For maximum structural integrity and material longevity, always apply the same number of finish coats to the inside of the box as you do to the outside. This balances the moisture absorption and release across both faces of the wood, preventing the walls from cupping or warping over time.
Safety is paramount when working with small pieces on powerful machinery. Always use push sticks or specialized hold-down jigs when cutting the box walls on the table saw to keep your fingers away from the blade. Because this project involves fine sanding and potential exposure to exotic wood dust, always wear a N95 rated respirator and use an active dust collection system.
To maintain your heirloom jewelry box, avoid placing it in direct sunlight or near heat sources like radiators, which can dry out the wood and cause finishes to fade. Every few years, you can refresh the luster of an oil-finished box by applying a small amount of high-quality furniture wax and buffing it with a soft microfiber cloth.