
Introduction to the Japandi Zen Studio Project
The fusion of Japanese minimalism and Scandinavian functionality creates a space that transcends simple storage or basic habitation. A Japandi Zen Studio serves as a high-value addition to any modern property by offering a dedicated environment for meditation, creative work, or guest accommodation. This 300 square foot structure is engineered to balance aesthetic lightness with structural permanence, ensuring your investment appreciates over time.
Homeowners often find that adding a detached dwelling unit of this caliber provides a significant boost to total square footage without the complexity of a primary home renovation. By focusing on clean lines and natural materials, you create a sanctuary that fosters productivity and mental clarity. This guide provides the technical roadmap necessary to execute a professional-grade build that rivals expensive pre-fabricated alternatives.
Quick Specs
Dimensions: 15 feet by 20 feet (300 Square Feet)
Estimated Cost: $12,000 to $18,000 depending on finish grade
Difficulty Level: Advanced DIY / Intermediate Carpentry
Estimated Build Time: 4 to 6 weeks for a two-person team
Materials and Tools
Foundation and Framing Lumber:
* 4×4 Pressure Treated Posts for pier foundation
* 2×10 Pressure Treated Joists for floor framing
* 2×6 Kiln-Dried Douglas Fir for exterior wall studs
* 2×8 Douglas Fir for roof rafters
* 3/4 inch Tongue and Groove CDX Plywood for subflooring
Hardware and Connectors:
* Hot-Dipped Galvanized Framing Nails (3-1/4 inch)
* Structural Wood Screws for ledger and rim joist attachment
* Hurricane Ties for rafter-to-top-plate connections
* High-performance flashing tape for window and door headers
* Stainless steel trim nails for cedar cladding
Required Tool List:
* Sliding Compound Miter Saw
* Circular Saw with a high-tooth count finishing blade
* Pneumatic Framing Nailer and Finish Nailer
* Laser Level for foundation squaring
* Impact Driver and Cordless Drill set
* Speed Square and Chalk Line
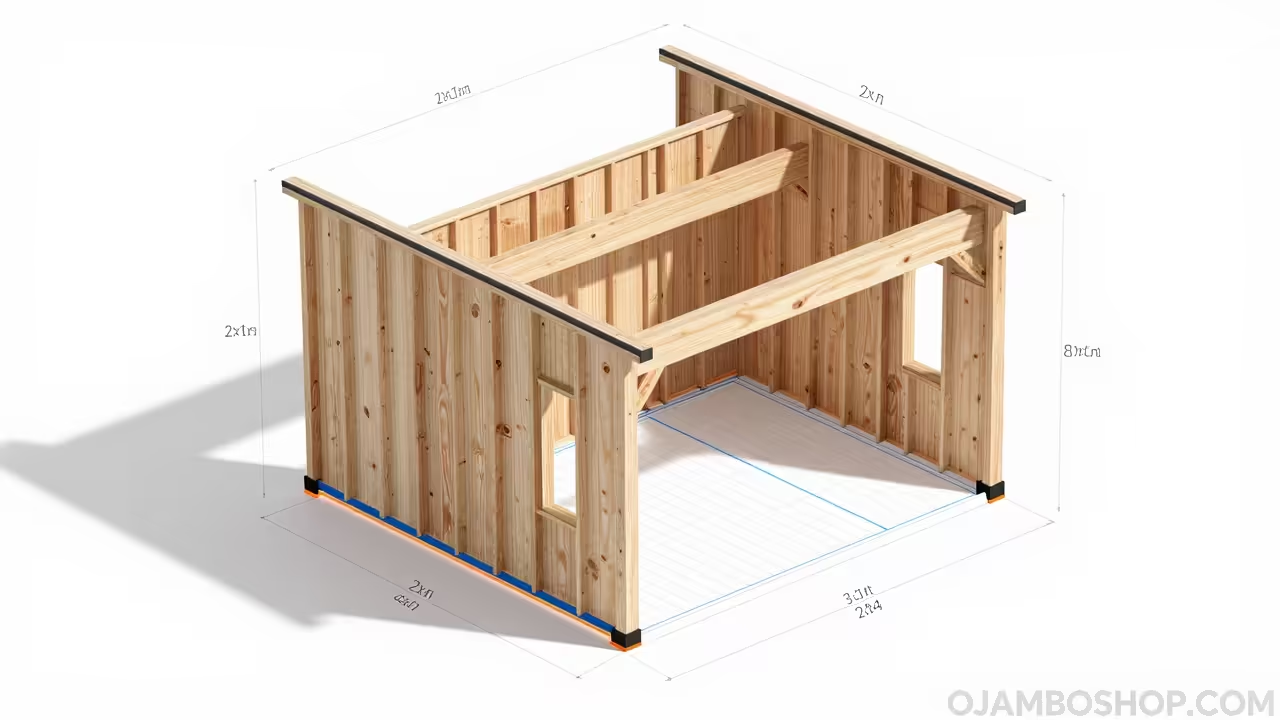
Technical Layout
The structural integrity of the Japandi Zen Studio relies on a modified advanced framing technique that emphasizes thermal efficiency and material economy. We utilize a 24-inch on-center stud spacing for the non-load-bearing walls while maintaining 16-inch on-center spacing for the primary 20-foot span to support the heavy timber roof rafters. This layout allows for thicker insulation pockets, which is essential for maintaining the quiet, temperature-controlled environment required for a Zen-inspired workspace.
Load distribution is managed through a double top plate system that transfers the weight of the 4:12 pitch roof directly to the vertical studs and down into the pressure-treated floor joists. The floor system itself is a rigid box-frame design, utilizing blocked joists every 4 feet to prevent lateral movement and floor bounce. By integrating a continuous load path from the ridge beam to the concrete piers, the structure can withstand significant wind loads and seismic activity common in varied climates.
Step-by-Step Instructions
Step 1: Foundation and Site Preparation
Begin by clearing a 20-foot by 25-foot area to allow for a 2.5-foot perimeter of workable space around the actual footprint. Use a laser level and batter boards to establish a perfectly square 15-foot by 20-foot rectangle, checking the diagonals to ensure they are identical. Dig post holes to the local frost line depth and set your 4×4 pressure-treated posts in concrete, ensuring each pier is perfectly vertical.
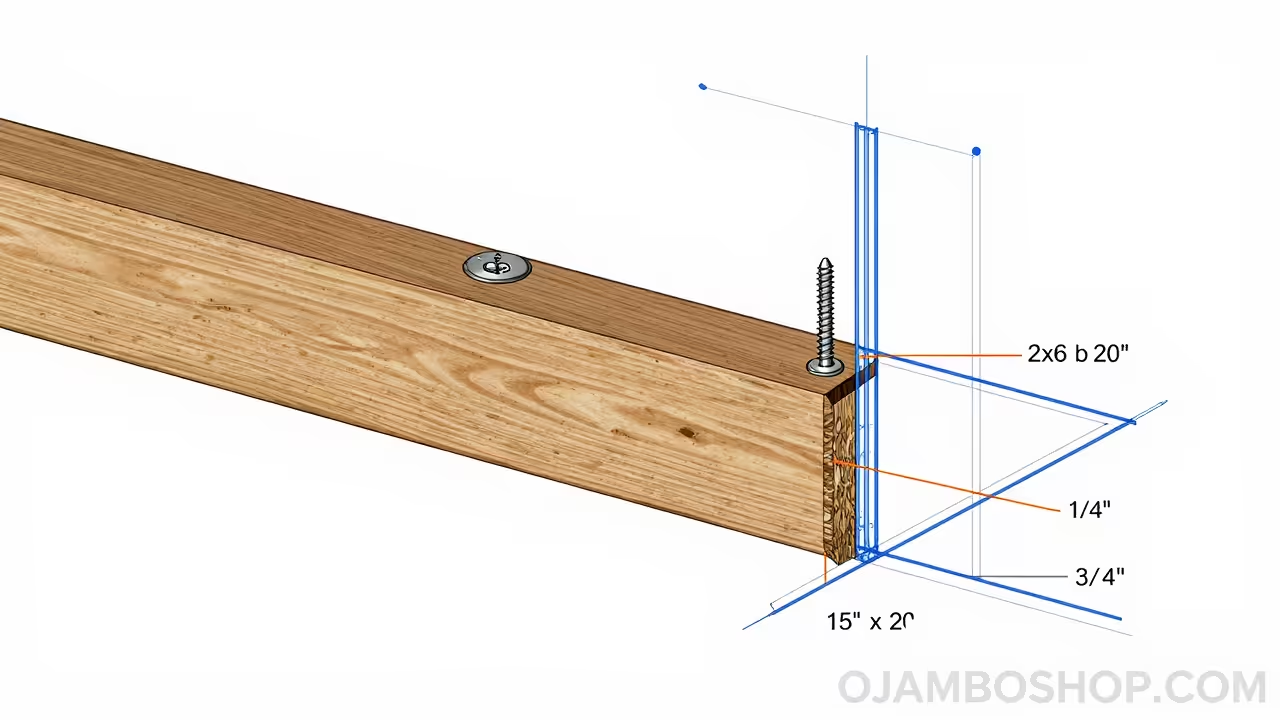
Once the concrete has cured for at least forty-eight hours, cut the posts to a uniform height using a water level or rotary laser. Install the 2×10 rim joists around the perimeter, followed by the interior floor joists spaced at 16 inches on center. Finish the foundation phase by glueing and nailing the 3/4-inch plywood subfloor, ensuring all seams fall directly over a joist for maximum stability.
Step 2: Wall Framing and Plate Layout
Layout your wall plates on the flat subfloor to mark the positions of every stud, window opening, and the main entrance door. The Japandi style often features large floor-to-ceiling windows, so ensure your headers are sized correctly using 2×10 or 2×12 lumber to span these wide openings. Frame the two longest walls first, as they will provide the primary lateral stability once they are raised and braced into position.
Lift the framed walls into place and secure them to the floor joists using 3-inch structural screws driven through the bottom plate. Use temporary 2×4 bracing to hold the walls plumb in both directions until the corners are tied together and the top plates are doubled. Check the squareness of the entire wall assembly frequently during this process to avoid compounding errors that will affect the roof installation.
Step 3: Rafter Cutting and Roof Framing
The roof of the Zen Studio uses a simple gable design with a 4:12 pitch to evoke the traditional low-slung aesthetic of Japanese architecture. Cut a master pattern for the rafters, including the birdsmouth notch where the wood sits on the top plate and the plumb cut at the ridge. Once the master rafter is tested for a perfect fit, use it as a template to cut the remaining rafters for the entire 20-foot length of the building.
Install the ridge board first, supported by temporary vertical posts, then begin installing rafters in pairs to keep the pressure equal on both sides of the structure. Secure each rafter with hurricane ties to ensure the roof remains attached during high-wind events, which is a critical safety requirement. Sheath the roof with 5/8-inch plywood, starting from the eaves and working up toward the ridge, leaving a small gap for expansion between sheets.
Step 4: Exterior Sheathing and Moisture Barrier
Apply 7/16-inch OSB or plywood sheathing to the exterior walls, ensuring that the sheets overlap the floor framing to tie the entire structure together. Use a high-quality synthetic house wrap to create a weather-resistant barrier, overlapping all seams by at least 6 inches and sealing them with specialized tape. This layer is the most important defense against mold and rot, so meticulous attention to detail is required around window and door openings.
Pro-Tip: For the Japandi aesthetic, we recommend using a “Rain Screen” system behind your siding. By installing vertical 1×3 furring strips over the house wrap before the final siding, you create an air gap that allows moisture to escape and significantly extends the life of your exterior wood. This prevents the cedar or charred wood siding from trapping dampness against the sheathing, which is the leading cause of structural failure in small outbuildings.
Step 5: Window and Door Installation
Select high-efficiency double-pane windows with black or dark bronze frames to complement the minimalist design of the Japandi studio. Apply flexible flashing tape to the sills of the openings before sliding the window units into place and leveling them with cedar shims. Secure the units through the exterior flanges, then apply a secondary layer of flashing tape over the side and top flanges to ensure a watertight seal.
The main entrance should ideally be a sliding door or a wide swinging door with a large glass lite to maximize natural light. Ensure the threshold is properly supported and flashed to prevent water from wicking into the subfloor during heavy rain. Once the doors and windows are in, the building is “dried-in,” allowing you to work on the interior regardless of the weather conditions outside.
Step 6: Siding and Exterior Finishes
The Japandi look is best achieved using vertical cedar siding or the traditional Japanese Shou Sugi Ban charred wood technique. Start at one corner and work your way around the building, using a story pole to ensure that all horizontal lines or fastener patterns remain consistent. Use stainless steel nails to prevent “bleeding” or rust streaks, which can ruin the appearance of natural wood over time.
Finish the exterior by installing the soffit and fascia boards, opting for a clean, square-edge profile rather than ornate moldings. If you are using natural cedar, apply a clear UV-protective sealer to maintain the warm wood tones, or leave it untreated if you prefer a weathered silver patina. Ensure all gaps around windows and doors are filled with a high-grade silicone sealant that matches the color of your trim.
Step 7: Electrical and Insulation
Rough-in the electrical wiring for lighting, wall outlets, and a small split-system HVAC unit to provide year-round comfort in the studio. Use Romex wiring and plastic work boxes, keeping all runs centered in the studs to avoid accidental nail punctures during the interior finishing phase. Once the wiring is inspected and approved, install R-21 fiberglass batts or mineral wool insulation in the wall cavities and R-30 in the ceiling.
Mineral wool is highly recommended for a Zen Studio because of its superior sound-dampening qualities, which will help create a silent interior environment. Ensure the insulation is fitted tightly without being compressed, as compression reduces the R-value and compromises the thermal performance of the building. Install a 6-mil poly vapor barrier over the insulation if you are located in a cold climate to prevent interior moisture from reaching the wall cavity.
Step 8: Interior Wall and Ceiling Finishes
For the interior, choose materials that reflect light and warmth, such as birch plywood panels or smooth-finish drywall painted in off-white tones. If using plywood panels, leave a 1/8-inch “reveal” gap between sheets for a modern, architectural look that mimics Japanese shoji screens. Secure the panels with finish nails and use a color-matched wood filler to hide the fastener heads for a seamless appearance.
The ceiling should follow the line of the rafters to create a vaulted feel, making the 300 square foot space feel much larger than its actual footprint. You can add decorative non-structural collar ties made of dark oak or stained pine to provide visual contrast against a light-colored ceiling. This contrast is a hallmark of Japandi design, where the “skeleton” of the building is celebrated through careful material selection.
Step 9: Flooring and Trim
Install a durable, natural flooring material such as wide-plank oak, bamboo, or high-quality engineered hardwood that can withstand temperature fluctuations. Use a foam or cork underlayment to provide additional sound insulation and a softer feel underfoot during meditation or yoga. Install the flooring perpendicular to the longest wall to visually widen the room and create a sense of expansive space.
Keep the baseboards and window trim minimal, using 1×4 clear pine or poplar with simple butt joints rather than mitered corners. Paint the trim the same color as the walls for a hidden look, or use a dark stain to frame the views of the garden like a piece of art. The goal is to eliminate visual clutter, so avoid any decorative molding that might distract the eye from the overall harmony of the room.
Step 10: Final Fixtures and Landscaping
Mount the light fixtures, focusing on warm-spectrum LED lamps that provide soft, indirect light rather than harsh overhead glare. Install the faceplates for outlets and switches, choosing matte finishes in black or white to match the hardware used throughout the build. Finally, clear away all construction debris and focus on the immediate surroundings by planting bamboo or ornamental grasses near the entrance.
A small gravel or stone path leading to the studio will help define the transition from the main house to the Zen retreat. Consider adding a small wooden deck or a simple stone “engawa” (porch) at the entrance to provide a place to remove shoes before entering. This final touch completes the cultural and aesthetic journey of building your own Japandi-inspired sanctuary.
Common Mistakes
One of the most frequent errors is failing to properly square the foundation at the start of the project. If the base is even slightly out of square, every subsequent step from framing to roofing will become significantly more difficult and require custom cuts. Always use the 3-4-5 triangle method or a high-quality laser to verify your corners before pouring any concrete or nailing any joists.
Another mistake is skipping the rain screen or proper flashing around windows, which leads to premature wood rot in a minimalist building. Minimalist designs often lack large roof overhangs, meaning the walls are more exposed to rain and moisture. Without a proper drainage plane, water can become trapped behind the siding, destroying your framing and insulation within just a few years.
Finally, builders often underestimate the weight of the roof and fail to use enough structural fasteners or hurricane ties. In a 300 square foot building, wind uplift can be a serious threat due to the light weight of the overall structure. Over-engineering your connections is a low-cost way to ensure the studio survives extreme weather events and remains a permanent fixture on your property.
Maintenance and Safety
To keep your Japandi Zen Studio in top condition, inspect the exterior wood finish every two years for signs of fading or water penetration. Re-apply UV-protectant oils to any cedar surfaces to prevent grey-out and cracking, especially on the southern-facing side of the building. Keep the gutters clear of debris to ensure water is directed away from the foundation piers, preventing soil erosion and settling.
Safety should be your primary concern throughout the construction process, particularly when working with power saws and climbing on the roof. Always wear ANSI-rated eye protection and hearing protection when operating machinery, and use a fall-protection harness when sheathing the rafters. Ensure you have a second person on-site when raising the walls or setting the ridge beam to avoid muscle strain or accidental falls.
| Material Type | Pros | Cons |
|---|---|---|
| Cedar Siding | Natural rot resistance, beautiful grain | Higher cost, requires periodic oiling |
| Shou Sugi Ban | Extremely durable, insect resistant | Labor intensive to DIY, messy process |
| Fiber Cement | Fire resistant, very low maintenance | Heavy to install, doesn’t look like real wood |
| Engineered Wood | Uniform pieces, easy to install | Susceptible to moisture if edges aren’t sealed |
Building a Japandi Zen Studio is a rewarding project that combines technical skill with artistic vision. By following these steps and maintaining high standards for your materials and joinery, you will create a space that offers peace and utility for decades to come.